Thursday, January 27, 2011

Mixology


Sorry for the bad quality picture!

What’s better than a sexy, scrumptious martini after a long, tiring day?? A sexy, scrumptious martini mixed by your husband! Ain’t I a lucky girl..my man knows his drinks! I had gifted my then fiancé a stylish cocktail mixer from Sur La Table. However, he never got a chance to flaunt his mixology skills until recently. My hubby dear mixed up a delicious pomegranate martini for me and it deserves a special place on this blog! This martini was just perfect - not to sweet yet not too dry. Don't judge the color by the picture - the lighting was horrible when I clicked it.

Pomegranate Martini

Ingredients:
3 parts pomegranate juice
1 part vodka
½ part of orange liqueur
½ part gin (optional)
Splash of lemon juice
A handful of pomegranate seeds
Salt and sugar
Crushed ice

  • Keep the martini glasses in the freezer for 20-30 minutes - keeps your martini chilled. 
  • Mix some salt and sugar (most people use salt only but the sugar tastes great with the pomegranate) and dip the glass rims in it. Put a few pomegranate seeds at the bottom of the glass.
  • Fill up the cocktail mixer half way with crushed ice and add the pomegranate juice, vodka, orange liqueur, gin, a splash of lemon juice and a few pomegranate seeds. My husband made one with gin and one without and I liked the one without better.
  • Shake, shake, shake and pour into your glass.

Drown in the ecstasy!

Sunday, January 23, 2011

Med-ley


My husband and I recently visited a new Mediterranean restaurant after reading outstanding reviews online. We were really excited to go there but were hugely disappointed in the food. It's rare that you get bad hummus in a Mediterranean restaurant. So to make up for the bad experience, I decided to cook my own Mediterranean Dinner! So here I'm presenting you with two recipes.

I've made hummus many times before but never with roasted garlic. And I must say, I made a pretty kick-ass hummus compared to the one we had in the restaurant. Now, there's a story as to why I am mentioning that restaurant but I won't get into it now. Let's just say, I had to please my own ego! Nevertheless, I love hummus and this one came out pretty well.


Roasted Garlic & Sun-dried Tomatoes Hummus

Ingredients:
1 Can (~16 oz.) garbanzo beans – cooked
2 Tablespoons tahini (sesame seed paste)
2-2 ½ Tablespoons olive oil
1 Garlic head (whole bulb)
Sundried tomatoes (I used about 15 dried tomato halves)
Paprika or red chili powder per taste
Splash of lemon juice
Salt to taste
Water as necessary
  • Roast 1 small to medium sized garlic head. You can use a traditional oven to roast the garlic, but I just used one of those lean meat grills instead and it did a great job. To roast, peal the outer layer of the garlic leaving a thin layer of skin on. Cut the top off the garlic so the cloves are exposed. Brush a little bit of oil and roast the garlic until brown and soft. The roasted garlic is very aromatic and not as pungent as the raw one. Once cooled down, peel the cloves.
  • Drain the garbanzo beans from the can. I always wash the canned beans to get rid of all the extra sodium.
  • Toss all the ingredients except for lemon juice in a blender/food processor. Add about ¼ cup of water and blend until you have a smooth paste. I left it a bit grainy because that’s how my husband likes it. You may need to add a little more water if the paste is too thick and difficult to blend.
  • Add a splash of lemon juice, just enough to bring out the sourness of the tomatoes, and mix well.
  • Sprinkle a pinch of paprika for presentation and serve with your favorite pita bread. 


I made my own version of couscous taking inspiration from some classic recipes I've tried before.

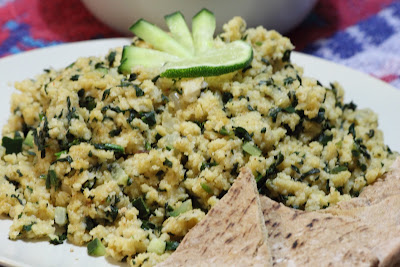
Lemon-Spinach Couscous

Ingredients:
1 Cups original(plain) couscous
1 Cup fresh chopped spinach
3 Cloves of crushed garlic
¼ Cup finely chopped onion
1 ½ - 2 Tablespoons lemon juice
1 Tablespoon olive oil
1/2 Cup finely chopped cucumber
Red chili powder to taste
Salt to taste
  • Cook couscous according to the instructions on the box. It cooks pretty quickly.
  • In a pan, heat oil and sauté chopped onion and garlic cloves until golden brown.
  • Add spinach and sauté for a couple of minutes on medium heat.
  • Season with some red chili powder and salt. It helps to season before adding the couscous so the seasoning is distributed evenly.
  • Add couscous, sprinkle lemon juice, mix and cook together for 3-4 minutes on low heat.
  • Turn off the heat and add cucumber to the dish. The cucumber should not cook but the heat from the couscous will soften it just a bit. Cucumber was a random addition because I had a small piece I wanted to finish. It tasted amazing! It paired well with the refreshing lemon juice and added a nice crunchy bite.
This dinner turned out well. We ended up eating more than we needed to..it might have had something to do with one whole bottle of wine we finished but that’s another story :D.

Something for the Sweet Tooth


I have a sweet tooth…and my husband has an ‘ice-cream’ tooth! I’m not kidding; he can have ice-cream for any meal of the day. So I made something that made both of us very happy – warm, ooey gooey blueberry compote in a crispy spring roll wrapper cone with vanilla ice-cream. Now don’t get thrown by the long name of this dessert – it’s super simple and easy to make. This dessert was something I just put together because I got a big box of fresh blueberries in the grocery store and wasn't going to eat them all with my oatmeal!

Warm Blueberry Compote in Crispy Cones With Vanilla Ice-cream

Ingredients:
2 Cups Blueberries
¾ Cup sugar (You can add a little more or little less depending on how sweet you like it)
1 ½ Cups water
1 Teaspoon vanilla essence
1 Teaspoon lemon juice
1 Pinch of salt
6 Square spring roll wrappers
Melted butter to brush on the wrappers
Your favorite vanilla ice-cream

Work on your crispy cones first –
  • Brush the spring roll wrappers with melted butter on one side. Fold them in half across the diagonal to make triangles.
  • Fold the triangles from the longest side into a cone and stick the ends with some more butter. This is as complicated as it gets, I promise!
  • Brush the cones from outside with some butter and put them on a baking sheet.
  • Bake the cones in the oven for a few minutes (sorry, I didn’t check the exact time but doesn’t take very long) on 300F. They are done when they turn golden brown. Keep monitoring so they don’t burn.
And the compote -
  • In a pot, combine the blueberries, water, and sugar and bring to a boil.
  • Add vanilla essence and sprinkle a pinch of salt, reduce the heat and simmer the mixture until the blueberries cook well and you have that ooey gooey yummy compote. 
  • Add lemon juice to the compote and stir. The compote recipe is pretty standard, but the lemon juice was an addition I found online. It tasted really good!
 Put it together-
  • Fill up the spring roll wrapper cones with that blueberry yumminess.
  • Serve a couple of scoops of vanilla ice-cream, tuck the blueberry compote filled cones on one side and pour some more warm compote on the ice-cream.
This is pure bliss! The warm compote with cold ice-cream and the nice crunch of the cones with the gummy compote is just perfect. I was very happy with this creation and my husband more than just approved it (he ate the leftover compote for his breakfast the next day :D). I’m going to make it again for some party. It looks fancy, is really easy to make and most people like ice-cream!

Saturday, January 22, 2011

Chatpat Chane


I got kala chana (black chickpeas) in the Indian grocery store the other day and was reminded of the good ol’ days when my mom made us the yummiest and yet some of the healthiest snacks after school. Chatpat Chane - literally means Quick Chickpeas – was one of those spicy-savory snacks that made me drool. I made the chana dish and it came out ‘just like my mom made it’ good! The best thing about this dish – you can have something to munch on without feeling guilty. Chickpeas are quite nutritious and a healthy source of carbs due to their high fiber content. 

Chatpat Chane

Ingredients:
~  1 Cup Black chana (bown chickpeas) – I got a bag of frozen pre-soaked chana.
1-1 1/2 Tablespoons oil
1/2 Teaspoon mustard seeds
A pinch of asafoetida
1-2 Teaspoons red chili powder
1 Teaspoon Chaat masala
1 Teaspoon cumin-coriander powder
½ Teaspoon sugar
Salt
Lemon juice
Cilantro for garnishing
  • I used pre-soaked chickpeas. If you have dry chickpeas, soak them in water overnight and boil just enough so they soften yet have a bite. 
  • Heat oil in a pan and add mustard seeds. Add a pinch of asafoetida after the mustard seeds pop.
  • Add chickpeas and sprinkle the spices, sugar and salt to taste. Let the chickpeas roast nicely on high heat for a few minutes. As the name of the dish suggests, this doesn’t take too long.
  • Add some lemon juice for a sour kick when the chickpeas are done. Garnish with chopped cilantro.
  • Savor the goodness!

Sunday, January 16, 2011

Hot Off the Grill


I love paneer! For those who have never tried paneer – it’s soft Indian cheese you must try. And here’s a great paneer recipe that never fails you. No matter how you change it up, it’s bound to taste good (unless you put too much salt, or not enough spices, or burn the paneer – Okay, I see how you can mess it up :D). The original recipe was in one of Sanjeev Kapoor’s (a celebrity Chef from India) cookbooks. I have given this recipe many variations and this is the easiest way to make it.   

Paneer Tikka

Ingredients:

Paneer
Green & Red Bell Peppers
Onions
Yogurt
Ginger-Garlic Paste
Cumin-Coriander Powder
Red chili powder
Chaat masala
Fennel Seed powder
Salt
Lemon juice
  • Cut paneer into one inch thick cubes.
  • Cut the bell peppers and onions in bite size pieces.
  • Mix the ginger-garlic paste, the spices and salt with yogurt. Grilling mellows down the flavors, so add just a bit extra than you usually would.
  • The star ingredient in this recipe, which I haven’t changed from the original one, is the fennel seeds powder. Grind roasted fennel seeds into a fine powder and mix with the yogurt-spices marinate. The fennel seeds powder gives a very refreshing sweet, toasty taste. 
  • Marinate the paneer cubes and the veggies for an hour or so.
  • Put the veggies and paneer alternating on a skewer and grill until nice and brown. 
  • Sprinkle some lemon juice when just off the grill. 
All I can say as the closing line: Oh-So-Yum!

Tangy Tomatillo


Tomatillos may have 'Mexican' written all over them, but we Indians know how to give anything our own twist! My mom used to make a delicious green tomato chutney. Though very similar, tomatillos are a bit different in their tartness. I got some great fresh tomatillos in the grocery store the other day and decided to make my mom's green tomato chutney with tomatillos instead. Now that I live in a warm & sunny city, I don't have to wait till summer to enjoy a fresh, zesty chutney.
 

Tomatillo Chutney

Ingredients:
Oil
4 Tomatillos cut in big chunks.
4 Garlic cloves
3 Green chilies cut in big pieces
1 Tablespoon ground peanuts/ can be substituted with sesame seeds
1 Teaspoon cumin – coriander powder
½ Teaspoon garam masala
Salt
Lemon juice
Cilantro
  • Heat oil in a pan and sauté the garlic till it turns golden brown. Go easy on oil as the ground peanuts will secrete some oil.
  • Add the green chilies, tomatillos, cumin-coriander powder, garam masala, ground peanuts and salt. Sauté till the tomatillos are slightly cooked and turn brownish. If you don't like peanuts or don't want to go through the hassle of grinding them, add a tablespoon of sesame seeds instead. Make sure to roast them well.
  • Add a splash of lemon juice to give it a little more tanginess.
  • Grind this in the food processor. Don’t puree it, leave it a little bit chunky. Add some cilantro and you have your spicy-tangy-yummy chutney!
 Eat it like any other chutney with Indian food, use it in your sandwich, or make those tomatillos happy and eat with some tortilla chips!

Monday, January 10, 2011

Pretty in Pink


Now you could debate on whether beetroot is deep red or magenta or pink or any other fancy color..all that matters is it looks beautiful! Here's a very simple tasty side-dish recipe that will add a splash of color to the table.

Beetroot Koshimbir (Salad)

Ingredients:

2-3 Beets
1 Cup yogurt
1-2 Green chilies - chopped
Chopped cilantro
1/2 Teaspoon sugar
Salt

  • Clean the beets well and cook them in boiling water until you can poke a knife into them easily. I usually use a pressure cooker for faster cooking (2-3 whistles). Once they are cool enough to touch, peel the beets. The skin comes off very easily without a peeler. Cut them in small cubes.
  • Add yogurt, chilies, cilantro, a little bit of sugar (Beets are naturally sweet but a bit of sugar brings out the sweetness) and some salt for taste. Mix well.
  • Garnish with some more cilantro and you are done. Simple as that!


I usually eat this with roti/rice but it tastes great by itself.

Sunday, January 9, 2011

What would've been my first post!


This was the first recipe I wrote down when I started creating a blog back in August, 2010! I don’t have a picture of the dish unfortunately, but I had really liked this recipe – so you here you go. The original recipe was in a Costco cookbook and I changed it a little bit based on what I had in my pantry. Hope you like it.

Spinach-Rice Cakes with Yogurt Sauce

Ingredients:
1 cup rice – I used thick sticky rice since it holds together
Your favorite wine to cook rice with
1-1/2 cups chopped spinach
1 small finely chopped onion
Chopped Cayenne pepper – I used the canned one
Minced garlic
Cumin powder
Olive oil
Bread crumbs
Grated Parmesan
Salt
Yogurt
Garlic-herb mix powder
Cracked black pepper

  • In a pot, cook the rice in water and some wine. Cooking rice with wine was my addition to the original recipe – I used Sutter Home blush wine I had bought in Napa valley. The rice should be sticky enough so you can make patties/cakes out of it.
  • Heat 2 teaspoons of olive oil in a pan and sauté minced garlic and onion until golden brown.
  • Add the chopped spinach, cayenne pepper for some heat, cumin powder and salt for seasoning.
  • Mix the cooked rice and spinach and let the flavors mingle. Let it cool. Make round cakes about an inch thick.
  • Coat the rice cakes in bread crumbs and grated Parmesan mixture.
  • Sauté the cakes in a pan using a little bit of olive oil (I believe the original recipe mentioned frying these cakes but who needs those extra calories?). The cakes are done when they turn golden brown.
  • To accompany the cakes, mix yogurt, cumin powder, garlic/herbs mix powder, cracked black pepper and some salt. The yogurt sauce is a great pair to balance the heat from cayenne pepper.

I will make this again some time and post the pictures!

Made in China???


Have you ever been to an Indian-Chinese restaurant? In case you haven't, let me tell you that you will find dishes even Chinese people haven't tried yet! Indians have been successful in making something that's NOT Made in China :D.

Here's one of the most popular dishes I learned a long long time back from my aunt. It seems tedious to make but it's not much work once you have chopped the ingredients. Pardon me for not noting the measurements but I usually just eyeball them. Use spices/chili per your tolerance and liking.

Gobi Manchurian

Ingredients:
Manchurian balls:
            Cabbage
            Finely chopped onion
            Corn flour/starch
            Rice flour
            Soy sauce
            Red chili powder/hot sauce
            Minced garlic
            Minced ginger
            A pinch of baking soda (Optional)
            Salt
            Water
            Oil for frying
Sauce:
            Soy sauce
            Tomato Ketchup
            Vinegar
            Finely chopped green chilies
            Minced garlic (lots of it)
            Salt
            Corn starch (If you want to make gravy)

  • Gobi Manchurian can be made either with cabbage or cauliflower. Both are equally delicious, but I use cabbage for the crunch it adds to the dish.
  • Slice cabbage nice and thin, add chopped onion, some red chili powder or hot sauce, 2-3 teaspoons of soy sauce, minced ginger and garlic (don’t overdo this since the sauce has lots of garlic), salt for taste and mix well so that it is distributed evenly before adding the flour.
  • Adding a pinch of baking soda makes the manchurian fluffy, but a couple of tea-spoons of hot oil instead will do the job if you are not a baking soda fan.
  • Add half part corn flour and half part rice flour to the cabbage mixture – just enough to bind the ingredients – so it doesn’t become a blob of flour.
  • Mix everything well and add a little bit of water and bind it. Be very careful with the water as cabbage itself is very watery. The dough should be thick enough to make a small fritter ball.
  • Heat oil in a pan and fry the balls until brown. Keep aside.
  • The sauce is what gives the manchurian all that amazing taste! You can either make gravy (an extension of the sauce) or a thick sauce similar to chicken wings sauce.
  • Heat oil in a pan – you have to forget about your diet and be generous.
  • Add lots of minced garlic and chopped green chilies to the oil, stir until the garlic turns golden brown (Oh, and don’t forget to turn on your exhaust fan :D).
  • Add a couple of teaspoons of vinegar, Soy sauce and ketchup and cook until you have the right consistency. There are no right measurements for the soy sauce and ketchup. Some people like it tangy, some a little sweet…so adjust the measurements according to your taste.
  • Add salt for taste.
  •  To make gravy, add some corn starch and water mixture to the sauce described above. Corn starch makes the gravy thick pretty quickly so don’t use too much of it.
  • You can also add chopped spring onion to the gravy which tastes good and makes the dish look pretty. 
  • Add the Manchurian balls to the sauce and garnish with cilantro. Enjoy it as an appetizer or eat with some rice if you have made gravy!
This dish is definitely not figure friendly - but it's a big hit at parties when people forget about their calorie consumption. A good vegetarian option to serve at parties..and trust me, it's so yummy people will forget their carnivorous side!

Reliving childhood


I have a bunch of recipes to post before I go on adventuring more…and what better way to start than write about one of my childhood favorites?

My mom made a simple cauliflower sabji (seasoned/spiced vegetable) and made it fun…not that I didn’t eat my veggies but this is a great dish if you are not a big cauliflower fan yet want to eat healthy.

Crunchy Cauliflower with Ketchup!

Ingredients:
1 ½ cup Cauliflower florets
1 tablespoon Ketchup
1 teaspoon oil
Mustard seeds for seasoning
1 pinch Asafoetida
1-2 pinches turmeric powder
½ teaspoon cumin-coriander powder
Red chili powder
Salt
  • Heat oil in a pan, add mustard seeds and wait till they pop. Add a pinch of asafoetida, turmeric powder and the cauliflower florets immediately so the turmeric powder doesn’t burn. 
  • Add the cumin-coriander powder (you can find this in Indian grocery stores. Cumin or coriander powders are sold separately or blended) and red chili powder per your spice tolerance. 
  • Sprinkle some salt for taste…be conservative since ketchup has a lot of sodium. Mix well, cover the pan and let it cook for a few minutes on medium heat. 
  • Cauliflower is watery in nature, so you may not need to add any water. And remember, the title says ‘crunchy cauliflower’ so don’t overcook it. 
  • Uncover and add the star ingredient of the dish – ketchup! Ketchup seems out of place in a sabji but believe me, you’ll love the sweet-tangy taste.  Cook for a couple of minutes until the flavors marry and Tadaaa(my lame attempt at giving a sound effect!) Your dish is ready. 

Simple, tasty and on the healthier side. You can enjoy this sabji by itself or eat it with some roti – Indian whole wheat tortilla.

Make this for your kids if they don’t get their full serving of veggies!

LinkWithin

Related Posts Plugin for WordPress, Blogger...