Monday, December 2, 2013

Thanksgiving Recap

My close friend, and neighbor from Utah, visited us with her husband this Thanksgiving break. I've hosted plenty of potlucks over the last few years, but it had been a while since I planned and cooked the entire meal by myself. I was so excited about having her over that I made and scratched and remade my menu list a hundred times. It was just a party of four for dinner, of which two don't eat turkey. So I wanted to keep the menu simple, finishable (if there's such a word), yet complete with all the traditional favorites such as cranberries, and squash, and the usual. This definitely saved me from the much feared holiday cooking nightmares! We leisurely enjoyed multiple courses over 3 hours, breaking in between to make room for more. 

**My friend's hubby took food pics on his camera, which I forgot to transfer. Sharing the few that I had.


After ogling over hundreds of recipes and ideas online, here's what the menu was decided to be:

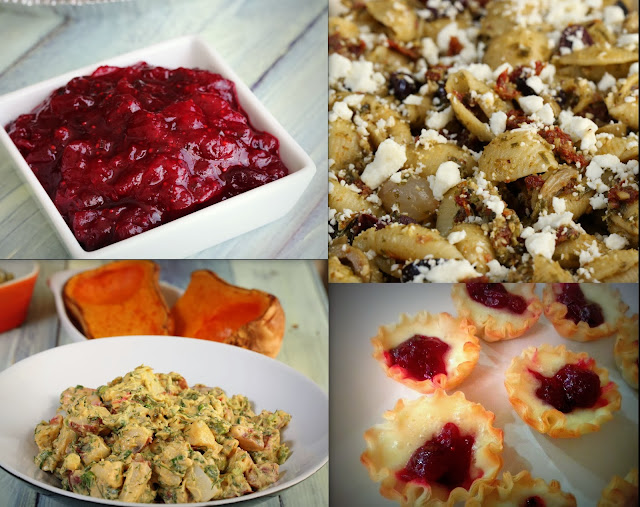
1. Brie-cranberry mini tarts - I've become addicted to Pinterest lately. I had pinned this simple fix-up appetizer recipe which not only tasted delicious, but also looked beautiful. I left out the pistachios from the original recipe, solely for forgetting to buy them. But it didn't make a difference to my guests. You can never go wrong with ooey-gooey baked brie with fruit relish. 
I tried the Spicy Pepper Cranberry Relish recipe from this NY Times article. Boy, was that a hit! I used regular green jalapenos instead of red, and added 1/2 cup of fresh orange juice instead of water+lemon juice. The orange juice enhanced the sweetness while adding acidity. The amount of pepper scared me at first, but they provided just the right amount of kick after taking out all the seeds. This recipe is a keeper. 

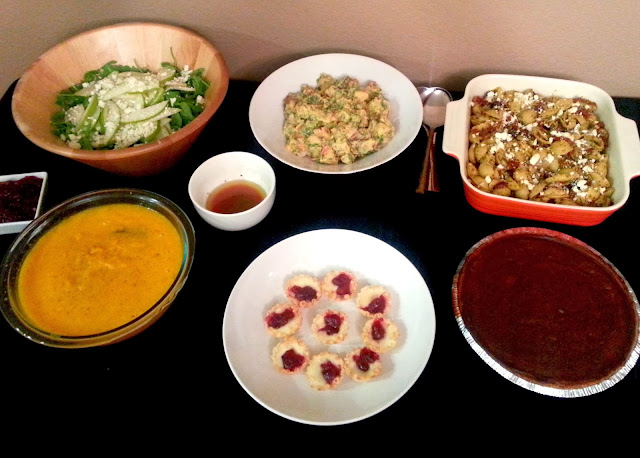
2. Arugula-pear salad with feta cheese and honey vinaigrette - For something green on the table, I went with my favorite salad greens paired with pears (funny I should use them together) and feta cheese. The dressing was very simple - honey, olive oil, red wine vinegar, and salt & pepper. Honey is perfect with the fruit, and it tames the peppery flavor of arugula. 

3. Roasted butternut squash soup with sage - What's Thanksgiving without the season's favorite? We make squash soup frequently during winter. It's always a simple fair with sauteed onion, garlic, sage, paprika, and salt & pepper. Roasted squash is so creamy by itself, it never requires anything additional. Oh btw, I made the soup in my new Vitamix - that's going to need its own post. 

4. Potato salad - I asked husband for a suggestion on the potato dish. What did he come up with? Deli style potato salad with mayo! Of course, I could have made creamy mashed potatoes, or a fancy gratin. But who ever laid the rules and said we couldn't have this salad instead? :P. No complaints, though. I love it myself and so did my friends. The salad had boiled red potatoes with skin on, chopped red radish, spring onions, lots and lots of fresh dill, a dash of paprika, mayo, mustard sauce, and good ol' salt & pepper. 

5. Shell pasta with basil pesto - Going down the menu items, I realize how easy everything was! The pasta was our last vegetarian course before the dessert. I pretty much just put everything together, yet it was quite elegant. I prefer simple butter/olive oil dressing or pesto in pasta over tomato sauce. I bought ready-made pesto, mixed it with perfectly cooked (yes, I actually got compliments on that!) pasta, added lots of chopped sun-dried tomatoes, olive medley, and topped it with feta cheese. This Mediterranean affair was quite delicious. 

6. Husband's special shrimp - The most exciting item on the table for the non-vegetarians was husband's 'world famous' shrimp. He makes this shallow fried shrimp marinated in coriander, garlic, and his mom's special masala for his friends all the time. I don't know what magic he puts in it, but that one dish always seems to take over ALL the other things I toil over! My friend's husband went gaga over the shrimp dish. Well, happy guests make me happy. 

7. Chocolate-pumpkin pie - Thanksgiving is incomplete without pie, make that pumpkin pie. My original plan was to set up our unused fondue for dessert. Some delicious dark chocolate fondue with fruits, marshmallows, and simple cake. But I couldn't resist making pie when I came across this Triple-Chocolate Pumpkin Pie recipe on Pinterest. Tell me that wouldn't entice you!
I grossly simplified the recipe though. My pie had a store bought graham cracker crust (yeah, judge me!). The basic pie filling recipe came from the pumpkin puree can (the standard recipe with 1 can pumpkin puree, 1 can evaporated milk, 2 eggs, 3/4 cup sugar, and spices). I melted 4 tablespoons of butter and 8 ounces semi-sweet chocolate in the microwave - a shortcut I use instead of using double boiler. Just melt the chocolate for 40-45 seconds each time until it's completely melted. Half of this chocolate mixture went into the pie filling. Once the pie was baked and cooled, I poured the rest on top to form a nice chocolaty crust. I think I'll never go back to the non-chocolaty pumpkin pie after having this!

All in all, the Thanksgiving dinner was a success. The preparation was fret-free, and the outcome was delicious. Most of all, it was the company whom we shared the meal with made it very special. Yet another year great year and wonderful people in our lives to be thankful for! Hope you all had a very special time as well!

Thursday, November 21, 2013

Winter Cooking

I used to sulk over the drab winter days before moving to San Diego. Now I cherish whatever cold days we get. It is the perfect time to crank up the oven and make something hearty. Here's what was on the menu Monday night - Stuffed Bell Peppers, with Maple Roasted Sweet Potatoes on the side. A combination of savory and sweet dishes. The great thing was, I baked both the dishes at once - saving some energy. What a comforting dinner that was!

Sweet potatoes usually turn into baked fries (the contradiction of that makes me laugh), or get pressure cooked with jaggery in my kitchen. I've wanted to try roasting them with maple syrup for a long time. As the sweet potatoes were baking, I decided to add a crisp apple to the dish on a whim - just because it was sitting there on the counter. It seemed like a natural pairing - apples and maple syrup taste great together, and they'd provide some crunch to soft roasted sweet potatoes. Husband, although skeptical of my creation at first, couldn't get enough of this dish. That's a victory in my opinion!

**The below recipes make 2 servings.


Maple Roasted Sweet Potatoes & Apples

Ingredients:
1 Large Sweet Potato
1 Apple (pick your favorite. I always buy Pink Lady)
1 Tablespoon olive oil
4 Tablespoons maple syrup (depending on how thick it is)
Salt to taste
Paprika to taste
  • Preheat oven at 375F. 
  • Peel and dice sweet potato in ~1 inch cubes.
  • Mix olive oil, 2 tablespoons of maple syrup, salt, and paprika, and toss the diced sweet potatoes in them. 
  • Cut the apple in similar sized cubes and toss them in the remaining maple syrup. 
  • Spread the sweet potatoes on a baking sheet and bake until tender, yet not fully done. Add apples at this point, and bake until the sweet potatoes are fork tender. The apples should be slightly crispy when the dishe is ready. 


Stuffed Peppers With Brown Rice & Lentils

Ingredients:
2 Medium red bell peppers - pick plump ones.
1/2 Cup brown rice
1/2 Cup whole lentils (Masoor)
1 Large garlic clove - minced
1/4 Cup finely diced onion
1 Tomato - diced
1/4 Cup finely diced carrot
1 Spring onion diced (optional)
1 Chipotle in adobo sauce - finely chopped
1 Tablespoon oil
Salt to taste
  • Preheat oven at 375F. 
  • Wash and cook brown rice and lentils together. 
  • Thinly cut the top off the peppers from the stem side. Remove seeds and ribs. Save the tops.  
  • Heat oil in a saute pan and saute garlic and onion until onions turn translucent. 
  • Add chopped tomato, carrot, spring onion, chipotle pepper, and saute until everything comes together (2-3 minutes)
  • Add cooked brown rice and lentils, and salt to taste. 
  • Stuff peppers with the rice mixture. Spray peppers with oil, or lightly brush some oil from the outside. This will help retain moisture. Close the pepper with the top that you chopped. 
  • Keep the peppers in a baking pan and bake for 30 mins, or until the peppers are soft and slightly wrinkled. 
Serving suggestion - Once you take the bell peppers out of the oven, top them off with some grated cheese (I used mozzarella) and let it melt on hot stuffing.

Sunday, November 3, 2013

Diwali Wishes!

Wishing all my readers a very happy Diwali! May the coming year bring happiness and peace to you and your family!

It's great for us less fortunate ones living outside India when Diwali falls on the weekend. We've had a weekend full of activities this year. Somehow our plans to keep the celebration small just don't work out (and I'm not complaining :). 


My friend Deepti invited a few girlfriends for a Mehendi night on Friday. We yapped, giggled, stuffed ourselves with delicious Dhokla, Paav-bhaji, and Cassata she made all by herself for us, and sat around doing mehendi till late into the night. Isn't that a great start to the festivities? As a small token of appreciation for the fun time, I gifted Deepti a set of fruit coasters. I got the patterns here - so cute, aren't they?


Husband and I woke up bright and early on Saturday for Abhyanga Snana, the ceremonial fragrant oil massage and bath on the first day of Diwali, that is supposed to cleanse your body. I decorated the door front with rangoli. Even after deciding against making any faraal, I ended up making Andhra style Murukku using this recipe, thanks to husband's last minute craving! We spent the rest of Saturday in the kitchen cooking together. There was Cauliflower-potato curry, salad, and Gajar Halwa on the menu for two potlucks we attended on Saturday night and Sunday morning. I'm now now in food coma, and all I can think of having for dinner is Tums! 

I feel very fortunate to have spent time in good company with good food yet another Diwali! 

What was Diwali special at your end this year???


Tuesday, October 29, 2013

Hunky Chunky Cookies And Halloween Fun

Halloween decorations have crept up (literally) in my neighborhood over the past week. Our orange and purple lights are hanging on the palm tree, finally. Better late than never. The one thing that we did have out in time, our carved pumpkins, didn't survive to see the Halloween day though. Husband was quite methodical in his approach - he bought a pumpkin carving stencil book and all the fancy tools for carving. He even made a chlorine solution to prevent pumpkins from rotting. Unfortunately, the solution dried out the pumpkin a bit too much, shriveling and cracking through some of the design. The mold didn't seem to care about chlorine either. Anyhow, our haunted house and headless man managed to spook others for almost a week.


I picked up a Halloween special magazine while waiting at the grocery check-out counter a couple of weeks back - yes, I can shop all the way to the check-out line :D. I promptly tried one of the appetizers - Potatoes stuffed with herb & garlic cheese. Tell me how you can go wrong with cheese and potatoes! I am planning to make them again for my office Halloween potluck. Recipe should follow soon.


Now, what's Halloween without some lots of chocolate? Another recipe I tried for chocolate chip cookies, with a couple of modifications, was a winner! I made a fresh batch for my friends on Sunday, and also shared some with my colleagues yesterday. Everyone was all praises for the cookies, genuinely :D. The original recipe used a combination of milk, bittersweet, and white chocolate chips. I went with what was available in the pantry - bittersweet chips only. We're bigger fans of dark chocolate anyway. The cookies came out nice and big - the kind that make kids happy. So I called them Hunky Chunky cookies!


**Note: This recipe makes about 22-24 cookies

Hunky Chunky Chocolate Chip Cookies

Wet Ingredients:
1 Cup unsalted butter
2 Cups sugar (all white or half brown and half white)
1 Extra large egg
1 Teaspoon vanilla extract

Dry Ingredients:
1 Cup APF
3/4 Cup whole wheat flour
1/2 Cup unsweetened cocoa powder
1 1/2 Tsp baking powder
1 Tsp salt
1 Cup bittersweet chocolate chips

Prep: Line two baking sheets with parchment paper/aluminum file. Preheat oven to 350F.

  • In a large bowl, cream together butter and sugar with until smooth.
  • Beat in egg until the mixture if fluffy. Stir in vanilla extract.
  • In a separate bowl, sift all the dry ingredients except chocolate chips. Beat the flour into the butter-sugar mixture slowly, and fold in the chocolate chips.
  • Drop big spoonfuls of the batter on the lined sheets. I used a small ice-cream scoop to ensure the same size. Each drop was approximately the size of a golf ball.
  • Bake for 10-12 minutes. Then let the cookies cool on a rack.

I kept one of the baking sheets right at the center of the oven, and the other closer to the bottom. The center sheet cookies turned perfectly chewy. The bottom ones were more on the crispy side. Still delicious, but I wouldn't put the sheet right by the heating coils. I would like to add macadamia nuts next time - that'll make these cookies just perrrfect!

Hope you have a spooktacular, sugar-filled Halloween!!!


Thursday, October 17, 2013

Laddu Love

I find it challenging to plan for late afternoon-early evening snacks, especially when I'm ready to chomp down anything after getting home from work. But then, I don't like to kill my appetite for dinner either. It's not too much work to whip up guacamole or make veg cutlets or something else. Still, it would be nice not having to think about it every day. For quick energy boost between meals, I liked all sorts of khau (snack/treat) grandma used to keep ready - bhadang or healthy chivda to eat with yogurt, or one of her wholesome laddus made with moong, haliv (aserio) or whole wheat. How easy life used to be when mom or grandma had to worry about such things...*sigh*!

Now that I'm working up an appetite with the cooling Fall weather (and in preparation for the holiday season ;), I wanted to have something ready in the house for the occasional hunger pangs. Kanakeche Ladu (Whole Wheat Laddus) seemed to suit my mood, and the lack of enthusiasm for making anything elaborate, the other day. These laddus are quite nutritious, with golden roasted whole wheat flour, dry fruits, and a good dose of ghee. They are made with my favorite sweetener jaggery - always happy to forgo refined sugar. Most importantly, unlike besan or rava laddus, there's very little that can go wrong in the preparation. And you don't have to fret if you can't roll laddus, because the churma, or the coarse mixture, tastes fantastic by itself. Just don't tell anyone you attempted to make laddus :D.

Ladies, these laddus will be great to break your Karwa Chauth fast. Sweet, and energy packed when you are ready to faint after a long day of fasting =).

**The recipe below makes approximately 12 laddus.


Kanakeche Ladu/Whole Wheat Laddu

Ingredients:
2 Cups whole wheat flour
1/2 Cup ghee
3/4 Cup grated jaggery
Chopped dry fruits per your liking - almonds, cashews, raisins
1/2 Teaspoon cardamom powder

  • Heat 3 tablespoons of ghee in a kadhai on low flame. Add whole wheat flour and roast until golden and aromatic (~10 mins). Keep the stove on low and stir the flour so it doesn't burn. Once done, keep aside.
  • Add the remaining ghee and grated jaggery to the kadhai and heat just until the jaggery melts completely. Don't overcook. Be very careful -jaggery can really burn once hot!
  • Pour this ghee-jaggery mixture in roasted whole wheat flour. Add chopped dry fruits and cardamom powder. Mix everything well with a spatula.
  • Once the mixture cools enough to touch, break all the lumps with your hands and make golf-ball size laddus. If you find it difficult to roll laddus, add a little bit of ghee (although 1/2 cup should enough really).

If the laddus harden (because ghee can solidify in cold weather), just pop them in the microwave for a few seconds and they'll be as good as fresh. 

Sunday, October 13, 2013

Hello Again!

First of all, a big HELLO to you all! I've been away so long, I don't even know where to begin this post. Let me start by wishing a very happy Dashera! What did you do this Navratri season?

I've been neck deep in work lately. I don't want to whine, but it's been an uninspiring couple of months. We finally caught a much needed break last weekend and escaped to a beautiful mountain log cabin. After recuperating, this weekend was all about cleaning, reorganizing, and decorating the house for the holiday season. We're ready to celebrate fall, Halloween, Diwali, and whatever other holiday that's coming up :). Doing something festive cheered me up to finally write a post. A bright wreath with fall hues adorns our front door now, carved pumpkins are ready to spook passersby, and a big star shaped lantern will be hung up soon. Fun times are here again!

I asked husband what he wanted for Dashera today, and he sounded pretty unenthusiastic about any sweets. There was no time to make a big feast among all the chores either. So I kept the menu simple yet special - a fragrant pulao, daal fry, with papad and pickle on the side. I often make peas pulao to add a touch of  'special'. Today, I tried my mom's favorite khada masala pulao (whole spices pulao) topped with decadent ghee fried potatoes and onions. I certainly care more about the topping than the rice itself :D. This pulao is all the fancy without much work. And it's a big crowd pleaser, loved by kids and adults alike. It'll be a great addition to your Diwali party menu.


Whole Spices Pulao with Fried Potatoes & Onions

Ingredients:
4 Small red potatoes - peeled and cut into 8 wedges each
1/2 Red onion thinly sliced
1 1/2 Cups Basmati rice
2 Green chillies (slit in the center)
1 Teaspoon cumin seeds
2 Bay leaves
1 Cinnamon stick (~ 2 in)
5-6 Cardamom pods
4-5 Cloves
1/2 Teaspoon whole black peppercorns
2-3 Tablespoons ghee
Salt to taste

**Use a cast iron pot for making pulao. If not, use any thick bottom cooking pot.
  • Wash and drain rice and keep aside. 
  • Heat the cooking pot on medium-high and add 2 tablespoons ghee to it. Fry potatoes in ghee until golden brown (2-3 minutes) on each side. The potatoes should get crispy on the outside. Make sure they are tender when poked. Take them out and keep aside. 
  • Fry thinly sliced red onion (enough to garnish pulao) until brown in the remaining ghee. Keep aside.
  • You should still have enough ghee left in the pot for pulao. If not, add some more. If the ghee you fried potatoes and onions in smells burnt, replace it with a tablespoon of fresh ghee. 
  • Add all the whole spices, and green chilies to the pot and roast for a few seconds. Once the spices are fragrant, add washed rice and roast for another minute. 
  • Add 2 cups of water, salt to taste, and let the rice cook. It should cook fairly quickly after soaking, and cooking in ghee. You can cover it for some time, but take the lid off once it is half way done so that it doesn't get clumpy. Add a little bit of water if needed. 
  • Take out the rice in a serving bowl/dish and layer with fried potatoes and onion. 
**You can add peas, carrots, or green beans to the pulao if you like.

Serve with raita, daal fry, or your favorite curry. It tastes quite great by itself too. I prefer it this way.

Now that I'm back, stay tuned for more updates!

Tuesday, September 10, 2013

Ganpati Wishes

Dear readers,

I know I have been a bad blogger the last couple of months. I will be returning soon. For now, here's a belated wish for Ganesh Chaturthi. Hope you spend the next few days in good company, eating good food.

My decor this year -


Monday, July 8, 2013

Dabeli To Go & Summer Art Work

My neighbor's kids wake me up early these days with their gleeful squeals and loud splish-splash in the swimming pool. Am I complaining? Yes, but only because I can't join them...hmph! Wouldn't it be wonderful to become a kid again and enjoy carefree, summer-long vacations! Those days are never to return. Nonetheless, I made the most of my 4-day Independence Day holiday.

We decided to camp out at Coronado Island for the 4th of July fireworks. You have to reach there early and secure a spot to be able to see the fireworks. We packed a lot of munchies that my in-laws brought from India. For the 'main course', we had my favorite Dabelis. I had to find a way of transporting dabeli to the location - taking ready-made dabeli would've left them soggy, and carrying all the ingredients separately wasn't going to be efficient. I ended up making a filling 'cake' and carrying paav (bread) and sev separately. All this could fit in my bright orange beach tote - perfect for a day out.
The 'cake' was nothing but layers of everything that goes in between the paav. You can find the elaborate recipe here. I mashed potatoes with ready-made dabeli masala, and mixed in green and tamarind chutnies with the potatoes. This was the bottom layer. On top went a layer of spice-roasted peanuts, pomegranate seeds, and finely chopped onion. Chopped cilantro would've been perfect, but I had run out of it. When we were ready to eat, I dug a big scoop of this filling, taking some from each layer, and smeared it on paav, then topped it off with crunchy sev. The idea and the outcome was loved by everyone.

**Tip: Cut the onion in half and wash it in cold water before chopping it up. This will take away some of that pungency and odor.


Now that the days are getting hotter and hotter, I find it convenient to cook quick and simple meals, and use that extra time to get back to art work.

Husband had gifted me a Chinese brush painting set for Valentine's day. I finally got around to trying it. Here's my first try at it. (As you can tell, I get lazy with the pictures quite often).
There was some learning curve here, but I loved the free-style brush strokes and light color pigments. These would make great greeting cards.


I've been doing a lot of instant-gratification kind of crochet work lately.

Guess hoo? I saw these ridiculously adorable cell phone cases on Etsy. I wanted to keep mine simpler, but the eyes could've been bigger for sure. I plan to make more of these in different colors for gifts.


Husband always demands I make something for him. Whether he uses it or not is another question. I tried to make a 'man' version cell phone case for him with a football pattern. I can pretty much slap this pattern on anything and he'll love it.


I bought cotton yarn for the first time over the weekend. It was perfect to make this summery, two-colored dish towel. 


I gifted this purse to my sister, just for being the awesome self she is =). I am in love with the shell pattern I used for the flap. 


Yet another bright-colored pattern for our patio. I intended it to be a rug, but we've been using it as a patio chair throw and it looks pretty. 


Wednesday, July 3, 2013

Fresh From The Garden

The garden gods have been pretty generous lately. My plants are loving the warm weather and all the extra attention they've been getting from two new members in the house now.

Our heirloom tomato plant produced its first meaty, juicy, attractive babies. Their vibrant color won me over even before tasting them. And the taste - aah! They had the perfect balance between sweetness and tartness. Nothing like the grocery store varieties. I could eat these on their own!


Along with the prized heirloom produce, we picked a few red chilies, plenty of tiny purple tomatoes, and a whole lot of fragrant basil. Thank heavens for all these fresh veggies and herbs, or I may forget how things are supposed to taste.


What do you do when you have organic, flavorful produce? Not muddle the flavors! That's what I decided and made this simple tomato-pesto tart using puff pastry sheets lying in the freezer. Tart was a great choice to use heirloom tomatoes - they are firm and meaty, and hold up really well even after being blasted with heat. And their soft flesh contrasted the crunchy pastry sheet beautifully. These tarts made for a nice summer meal - crispy, light, full of bursting juices.


Heirloom Tomato - Pesto Tart

Ingredients:
2 Puff pastry sheets
3-4 Heirloom tomatoes (depending on their size)

For pesto:
1 Cup packed fresh basil leaves
2 Garlic cloves
1/4 Cup nuts - cashews, almonds, pine nuts, or walnuts
2 Tablespoons grated parmesan cheese
Olive Oil as required
Salt to taste

  • Preheat oven at 375F.
  • Add all the ingredients for pesto, except olive oil, to the food processor. Make a coarse paste, while adding olive oil little by little. I use minimum amount of oil to get a smooth paste.
  • Wash and cut tomatoes in 1/4 inch discs.
  • Thaw the puff pastry sheets just enough so that you can separate them. If you let them thaw for too long, the dough will start stretching in all directions! Cut each sheet in three width wise. I used Pepperidge Farm box which comes with 2 sheets - so I had 6 decent sized tarts.
  • Lay these sheets on a tray lined with parchment paper or lightly oiled aluminum foil. Divide the pesto and spread it on each sheet. Then lay the tomato slices, and bake these tarts for 15-18 minutes or until the pasty sheets are golden brown. The tarts are ready to eat. 
---

One of my very close friends, Aditi, has been a loyal reader of my blog. We keep exchanging recipes and ideas. She gave me the recipe to make Sai Bhaji - a simple mixed greens preparation using split chickpea lentils and potato for some substance. I tried it last night using fresh Swiss Chard from the garden and other greens. This recipe is a keeper. It was done in no time and just tasted 'healthy'! I was too eager to eat and took a very bad picture with my phone. 


Sai Bhaji

Ingredients:
1 Cup of spinach, swiss chard and mustard greens each - washed and chopped. Feel free to add any other greens that are smooth in texture when cooked.
2 Cup washed split chickpeas (chana daal) - soaked in water to soften
1 Small potato - peeld and cubed
1 Small onion - finely chopped
1 Tomato - cubed
2 Teaspoons minced ginger and garlic
1 Tablespoon oil
1 Teaspoon mustard seeds
1/4 Teaspoon turmeric powder
Red chili powder to taste
Salt to taste

  • Heat oil in a pressure cooker and add mustard seeds. Once they splutter, add turmeric powder, and chana daal. Saute for 2 minutes.
  • Add ginger-garlic, onion, tomatoes, and potatoes if using, and mix well. 
  • Mix in all the greens, add red chili powder and salt to taste, and add a little bit of water (just enough to cook). Pressure cook the greens for 2-3 whistles. I cooked them without the whistle just enough so the chana daal would cook but not break. 


The Bhaji is ready to be eaten with rotis. Chana daal provided a great bite to the otherwise soft bhaji. A good dose of protein too. It had a nice tang provided by tomatoes that lifted all the flavors. I'll add this recipe to my usual dinner rounds.


Sunday, June 30, 2013

Summer Recipe - Pineapple Curry

Ever since the in-laws arrived, we've been caved in trying to stay out of the 3-digit temperatures. The only solace has been walking on the beach in the evening dipping our feet in pleasantly cold waters, and eating cooling foods. It only helps that my MIL is a fantastic cook who has plenty of recipes I want to learn. We've been cooking up a storm already. As soon as she was out of jet-lag, we went and bought the ingredients to make Ananas Amti (Pineapple curry). A recipe I've wanted to learn from her first-hand ever since I got married. 


My first encounter with this tangy, sweet and sour curry was at my wedding! My MIL gave her mother's recipe to our caterer, who did a very good job making it on a large scale. If you're married, you'll know how trying it is to eat at your own wedding while greeting hundreds of guests. Yet, I remember the taste of this amti very distinctly. It was quite special. My MIL made it today, and it was even better than how I remembered it. Although it's called amti, the color, consistency and flavors are more like kadhi. It has a simple yet fragrant tempering of ghee, cumin seeds and green chili - the classic flavors of kadhi. The pineapple chunks are then cooked in a mixture of cashew paste and coconut milk to make a very smooth and creamy curry. Slurp! For all the richness, this amti is a quick fix, especially if you buy canned coconut milk and pre-cut pineapple. 


Ananas Amti - Pineapple Curry

Ingredients:
2 1/2 Cups fresh,ripe pineapple chunks - the success of this curry depends on the quality of pineapple
1/2 Cup whole cashew nuts (or halved in the center)
1 Cup coconut milk
2 Tablespoons sugar (or as required)
Salt to taste
Lime juice as required (optional)

Tempering:
2 Tablespoons ghee
1 Teaspoon cumin seeds
2 Green chilies - slit vertically in the center
1/8 Teaspoon turmeric powder

  • Cut pineapple in ~3/4 inch chunks. If the pineapple is not ripe/sweet enough, sprinkle some sugar on it and keep aside for 30 minutes. This brings out the juices and makes the pineapple taste better. You can use canned pineapple, but like anything else, fresh ones taste better. 
  • Soak cashew nuts in warm water so they soften. 
  • Once the pineapple and cashews are ready, take out 1/2 cup pineapple chunks and one third cashews and make a smooth paste. 
  • Heat ghee in a pot and add cumin seeds and green chilies. Once the cumin seeds splutter, add remaining pineapple chunks and a little bit of turmeric (only for slight color), and let the pineapple cook for a couple of minutes. 
  • Mix in pineapple-cashew paste, and the remaining cashews. Add a little bit of water if the mixture is too thick and let it boil for 4-5 minutes. 
  • Lower the heat, add coconut milk, salt to taste, and sugar you desire more sweetness. Mix everything well and turn off the heat. You don't want to cook this too long after adding coconut milk else it'll separate. 
  • Let the curry cool down a little, then sprinkle very little lime juice to add some tang. Taste and decide the balance between sweet and sour to your liking. Do not add lime juice to hot curry - it can taste bitter. 


Serve this amti with hot rotis or puris. It is heavenly with the decadence of cashew paste and coconut milk. The sweet, bursting pineapple is just perfect for a summer meal.


Friday, June 28, 2013

Spice Paradise

Wednesday was my lucky day. I had signed up for the Spice & Something Nice Swap event hosted by Nupur @ One Hot Stove. My fabulous swap partner, Gayatri of Double Expat, sent me a wonderful package of gifts which arrived on Wednesday afternoon. I won't mention all the details since Nupur will do a round-up with photos soon, but I must talk about the spice mix that was gifted to me. Gayatri sent me a family made spice mix called Paach Masala, or Five Spices literally. It's a smoky and hot(!) spice mix with chili powder, chana daal, coriander, cumin, and black pepper. There were two recipes sent along with this masala, of which I tried the Tikhat Batata Bhaji (Spicy dry potato curry) recipe promptly. The preparation was extremely simple and the fragrance reminded me of Masale Bhat. We devoured the bhaji with rava dosas. I see myself making many quick Indian veg stir fries and curries with it. 

To make the bhaji, peel and cube 3 medium sized potatoes. Make a tempering by heating 1.5 tbsp oil and adding 1/4 tsp mustard seeds, 1/4 tsp cumin seeds, a couple of pinches asafoetida, and curry leaves from one sprig. Once the mustard seeds splutter, add 1/4 teaspoon turmeric powder and a teaspoon of paach masala (use garam masala in lieu), and saute. Add cubed potatoes, salt, sprinkle a little bit of water, and cover the pot. Let the potatoes and spices steam together. I garnished this bhaji generously with cilantro. 


To continue the spices saga, a HUGE bag of goodies arrived from India with my in-laws on Wednesday night. Oh, the snacks and sweets and groceries and spices they brought! My stove is going to work overtime the next few months. There just aren't enough meals in a day to make all the deliciousness I want to cook! 

Here's a (very poor) pictorial of some of the goodies:

Spicy and regular banana wafers - I'd take these over potato chips any day. 
Chitale Bandhu bakarwadi - These hardly need an introduction.


Konfal chips - Purple yam chips


Jackfruit Chips - There's a small window before the rains start to get freshly made jackfruit chips.


Aamba vadi (candy made with alphonso mangoes) - If I can't have alphonso, it comes to me in this form!
Sutarfeni - Sweet noodles that literally melt in your mouth.


I love you Rasna! - I'm feeling soo nostalgic. These soft drink concentrates were our favorite, especially during the sweltering summer months. 


Sabudana - Tapioca pearls to make khichadi. I have not found good quality sabudana in Indian stores here.
Kala vatana - My the favorite usal is with kala vatana. I've looked hard to find kala vatana here without any luck.
Charoli - These seeds are used to garnish Shrikhand traditionally. Finally I can make shrikhand exactly like my grandma does!


Mumbai Ki Galiyon Se (From the streets of Mumbai)
Dabeli Masala, Sandwich Masala, Kitchen King Masala, Usal-Misal Masala, Vada-Paav Masala
Rock salt, Anar dana (Pomegranate seeds), and Garam Masala


Red Chili Powder - Freshly ground and HOT!


A taste of home!!!
Metkut - Maharashtrian style poodi chutney made by mom. There's no better metkut in the world!
Malvani Masala - Konkani style masala made by my mother's help as a gift to me. Isn't she a sweetheart!


Thalipeeth Bhajani - There's a bhajani swap going on in my house. This was made by my aunt to send to my cousin. Since I've hijacked it, my mom will be sending some to my cousin soon =D.


Sambar Masala - Also made by my aunt. This came with bhajani and stays with me as well ;).


Along with all the food goodness, my in-laws brought a whole lot of kitchen ware (the copper kadhai in the first pic is one of them). The surprise item which made me the happiest was this big, flat dosa tava. I already used it to make rava dosas and finally achieved perfectly thin and crispy dosas.


Let me know if you have any fun recipes I should try using any of these ingredients. And stay tuned for the updates on all that's cooking in my kitchen! 

Tuesday, June 25, 2013

Dreaming of Deutschland

What does one do when asked to travel to the Netherlands for business on a very short notice? One jumps on the opportunity, takes a few days off to mix pleasure with business, and takes the husband along! We went on a short yet satisfying trip to Deutschland last week. One post is simply not enough to talk about this beautiful land of green pastures, windmills, canals, arts and culture, and history spanning centuries. I will give you a few tasty highlights of the trip!

Chocolate For Breakfast: I fell in love with the Dutch instantly when I saw a spread of chocolate sprinkles at the breakfast table on the first day. Chocolate sprinkles, called Chocoladehagel (or chocolate hail), go with a slice of bread. These chocolate confections come in various shapes and types, such as sprinkles or shavings, pure chocolate, milk chocolate, or white chocolate etc. It is common practice for people of all ages to enjoy a topping of chocolate sprinkles on buttered slice of bread for breakfast. The Dutch have found the mantra for happiness!


Pannenkoeken: Pannenkoekenhuis or 'Pancake Houses' can be found at every street corner in the Netherlands. And they are not for breakfast only. The Dutch pancakes are much larger and thinner than the American version I'm used to. They are akin to thick crepes. Make sure you are hungry because these pancakes can be as large as a foot or more in diameter! A variety of fruits, cheese, cream, veggies, or bacon are either incorporated in the batter or topped on the pancakes. Mini pancakes called Poffertjes drizzled with chocolate sauce are perfect for sharing for a light snack. They are fluffy and slightly chewy bite size pancakes prepared with lots of butter. Want to go for the real thing? Look at that monster pancake in the second picture topped with warm cherries, vanilla ice-cream and whipped cream..mmm mmm good! The third one was a savory pancake - topped with grated cheese and mixed veggies. The interesting condiment with the savory pancake was 'curry ketchup'. A jazzed up version of ketchup with curry powder and some other spices. This needs to be introduced to the rest of the world!


A Jumbled Mix: While pancakes are nice, the long and cold winters in Holland beckon something more hearty. I am talking about potatoes and meat of course. A traditional Dutch meal consists of mashed potatoes and vegetables with some kind of meat on the side (the 'on the side' part had me sold). I was ecstatic that the Dutch were so vegetarian friendly! I didn't have to opt for the only vegetarian option on the menu put as an afterthought. This jumbled mix of ingredients called Hotch Potch, getting its name from Hutspot or Shaken pot, has an interesting history. I won't go on telling it, but you can read it here. We ordered a hotch potch of mashed potatoes with endive, and cheese croquettes in a traditional Dutch restaurant - doesn't that look simple and comforting? The traditional dinnerware made it even more authentic.


Cheese Galore: The Dutch countryside has lush green pastures with black and white belted cows grazing in large numbers. With an abundance of milk, it is no surprise that Holland has some of the best cheeses. Cheese and bread were the focal point of lunch selections where ever we went.
The famous Gouda made with cow's milk gets its name from the city of Gouda where the cheese making process originated. By the way, I learned that Gouda is pronounced Howda with a funny, grainy sounding H as though you are clearing your throat!
We visited a few Kaas or cheese stores in Amsterdam with stacks and stacks of yellow cheese wheels. While those were great, a small cheese factory and store in Zaanse Schans, a traditional Dutch town just north of Amsterdam, gave us a peek at how cheese is made. We sampled a wide selection of cheeses flavored with cumin seeds, red pepper, fenugreek, basil and anything else you can think of. The luxurious Gouda with truffles was certainly the winner. There were quite a few aged and young goat's and sheep's cheeses as well. The cheese was served with mustard sauce which also came in many flavors. Husband and I must have eaten more cheese in one week than we did since the beginning of the year. After much picking and choosing and deliberation, we purchased 3 cheeses - hot and spicy Gouda, young goat's cheese, and smoked cow's cheese. I see plenty of good eats in the near future =D.


The Chocolate Factory: The Dutch built their country on trade. Their industries are reminiscent of the trading era. They borrowed pottery making art from the Chinese, spices from the Indians, and cocoa from the African countries. Holland is the largest importer of cocoa beans in the EU and produce some of the best cocoa powder and chocolate. We visited a small chocolate store, also in Zaanse Schans, where we got a demonstration of the chocolate making process. The picture below shows the steps in making pure, decadent chocolate from dry cocoa beans.


The beans are first roasted and cracked to separate nibs from the cover. These nibs taste somewhat like coffee beans, but don't have any chocolate taste yet. The nibs are then ground to powder, and then ground on a warm stone for as long as 24-36 hours. This warm grinding process brings out the fats (cocoa butter) and makes a smooth paste called cocoa mass. It is still very bitter at his point. Making chocolate is then as simple as mixing the right amount of sugar and extra cocoa butter for smoothness. Simple enough right? :P. All this was fun, but the most exciting part was the sampling of fresh chocolate made right in front of our eyes. It's amazing how different something fresh and pure can taste. The picture below shows our demonstrator scraping freshly made chocolate from the hot stone.


The demonstrator showing us a slab of compact cocoa powder slab, on the right is
cocoa mass (before extracting cocoa butter) and white cocoa butter. All natural and pure
There were so many other new and unique experiences, but I can't go on forever. A trip that started with chocolate and ended on the same note had to be memorable. We will cherish the memories and devour the goodies brought back with us - until next time =).

The summer is here and the schools are out. Do you have any travel plans? What are you up to?

Tuesday, June 4, 2013

Mexico In A Bowl

For someone living in San Diego, I have surprised myself by not posting many south of the border recipes. Today I had all the right ingredients to put together a fabulous salsa using a can of black beans that was pushed to the back of the pantry. Don't you feel just as happy when you find the perfect ingredients for a dish you weren't expecting to make?? This salsa has everything you expect in Mexican cuisine - roasted corn, black beans, mango, avocado - the whole nine yards. Hence, I call it 'Mexico In A Bowl'! Of all the salsas that I have ever made/tasted, this is by far my most favorite combination. The contrasting textures and flavors marry really well. My love for using sweet fruits in savory dishes is no secret to anyone. And wouldn't one love a zesty salsa with bits of mango bursting with sweet juices? Digging into a bowl of this was like taking a vacation to a tropical paradise.


I couldn't stop myself from taking one scoop after another of the salsa while husband was clicking pictures. He sure makes my food look good! This salsa bowl, exactly like the ones in Mexican restaurants, was a gift from my company for participating in the Salsa competition last month. Thinking back, I should've made this salsa for the competition to secure a spot..oh well. The look of this bowl makes me feel like I'm dining out =D.


Roasted Corn, Mango, And Black Bean Salsa

Ingredients:
1 Corn on the cob - white or yellow
1 Ripe mango - chopped into small pieces
1 Cup cooked black beans
1 Small or 1/2 large avocado - chopped into small pieces
1/2 Small onion finely chopped
1 Small tomato finely chopped - take out the seeds
1 Whole chipotle in adobo sauce
Lots of chopped cilantro
Juice from 1 lime
Serrano hot sauce - to liking
Salt to taste

  • Roast corn on open flame until you get beautiful char marks. To separate the kernels, hold the stem of the corn in one hand and rest the tip on a cutting board (holding the corn at an angle). Now run the knife through the base of the kernels from top to bottom - away from you. 
  • Mix corn kernels, chopped mango, black beans, avocado, onion and tomato. 
  • Finely chop chipotle and add to the above. Sprinkle plenty of cilantro. 
  • Add juice from one lime, salt to taste and mix everything well. Taste the salsa and add some hot sauce if you would like. It tastes better on the milder side since it has so many sweet elements. You can add more of one or more of the ingredients - suit yourself!


Serving suggestion: 

  • The salsa is perfect with tortilla chips as an appetizer
  • I used it in hard shell tacos - All you need is sauteed red and green bell peppers (cut them in strips and saute in some oil on high flame. This will give them nice charring) and some queso. Add bell peppers to taco shells, add a big scoop of this salsa, and top it with some shredded cheese and more hot sauce if you want. The tacos were just perfect! Husband especially enjoyed them. 
  • You could make a nice burrito/burrito bowl with soft tortilla, Mexican rice, salsa, lettuce and sour cream if you like. 


LinkWithin

Related Posts Plugin for WordPress, Blogger...