Sunday, June 26, 2011

Beat The Heat

San Diego weather is quite notorious..while the no-snow-winters are the envy of the not so privileged ones, we have to put up with May Grays and June Glooms. Just when you think of wearing that bright colored summer dress, the clouds take over making you want to put on a boring black shirt. Well, it seems to be over now..all bright and sunny..and yeah, HOT! I've been drinking water by the gallons and it just doesn't seem to do enough in this heat. For a hot day like this, there's nothing better than a glass of chilled iced-tea!

Making a pitcher of iced-tea at the start of summer has been a ritual for me for the past 3-4 years. My GF in Utah and I would get all excited about our girly summer meals of berry salads and home-made iced teas. We would put on our cute summer dresses, set up a table on the patio and talk about all nice things in the world that suddenly made appearance after a dreadful winter.

Not a cute dress today..and just some leftovers for lunch, but this iced-tea was enough to keep me and hubby happy. With layers of flavors and everything your body craves in this weather, it's a perfect summer drink!

Heaven in a glass!
I drink my iced-tea without the ice :D
Ginger-Orange Iced Tea

Ingredients:
4 Cups water
3 Teaspoons sugar - or however sweet you like it
2 Teaspoons black tea or 4 Teabags
1 Inch ginger
1 Orange
4-5 Mint leaves
Ice
  • Heat water, add sugar and thinly sliced/grated ginger to it. Turn the heat off at the brink of boiling.
  • Drop the teabags or a cloth pouch with tea leaves in the water once it gets luke-warm. I don't like my tea bitter so I let the tea flavor seep in luke-warm water for 10-15 mins until it cools off. Keeps it light.
  • Once the tea is completely cooled off, add mint leaves (crushed for more flavor), juice from half an orange and some orange slices. I had dried some mint leaves last week which I used in this tea. They added the same refreshing taste without the bold green color. Adding orange juice to hot water can turn it bitter sometimes so wait till the tea is cold.
  • Add some ice and keep refrigerated. Strain some tea and enjoy with a slice of orange whenever you please! 
Each sip of this tea will give three distinct yet harmonious flavors - first the ginger, then hits the citrusy orange and then palate cleansing mint. The combination of the three leaves a fresh floral taste in your mouth. Ahhh...I can take all the heat if I have a glass of this every day!

Friday, June 24, 2011

Painting The World Around Me - II

The long gap of 11 years or so made it a bit of a struggle to go back to Oil Painting. The colors didn't speak to me, if I had to get philosophical :D. It came back to me this time though. I could immdediately see the difference in my approach, in the way I mixed colors and applied them fearlessly. Of course, something my husband preaches could've helped a little - I had a plan!! So instead of getting too excited and working the strokes haphazardly, I looked up some youtube tutorials, went over a bunch of pictures online and decided to copy a picture I liked. I mean, I ain't no Picasso! It really helped - having something to look at. This was a good practice painting and I'm liking the product way better than the last one.

Here's the original painting: http://artmauve.com/index.php?main_page=popup_image&pID=708&zenid=f60522ef8adddbcb860741a477b965a9

And here's my version of it (simplified to suit my skill level). Please be lenient in the comparison as the original painting was by a pro =).

I had no patience to hang it on the wall and take a pretty picture!

Some of the finer details


Sunday, June 19, 2011

Setting New Trends..Breaking Some Old

Brace yourself for a long 50th post!

Boy, what an exciting week it's been! New creations, new acts of bravery and some new friends - all packed in one fraction of a month.
The week started off with the same old Monday blues with a bit of a drama at work...never hurts to have some spice in life, eh? I thought it would be just an ordinary week, only to find myself going routes I would have either avoided or not expected myself to be.

1. The (not-so) big purchase of a measuring cup: Yes! I now own an actual measuring cup that's not a 'katori' (small bowl) or a ramekin used to eyeball ingredients. It was a big commitment for a person like me who swears by 'a pinchful of this and a palmful of that'. But I was quick to realize what a whole new world of opportunities it has opned for me. All that baking I steered away from, well..not anymore! Of course, I want to stay true to myself and enjoy what I do. Nevertheless, with all the inspiration from my fellow bloggers and a little bit of rethinking, I've realized what I'll love making and eating.

To begin with - Whole Wheat Banana Loaf! I had two bananas too ripe for my taste. I thought of making Kelyachi Puri (Indian Fried Banana Flat Bread) but frying is always at the bottom of my cooking techniques list. Last year I made a whole wheat banana bread/cake/loaf/whatever using barely any oil and no eggs. It turned out yummy but this was a good opportunity to make it the right way. I stumbled upon this recipe through Elise's blog. I followed the recipe exactly except replacing nuts with chopped dates. So rustic and earthy with the whole wheat, dates and honey! This is breakfast, lunch, snack, dinner all in one. Two thumbs up!

The loaf..and a slice with a drizzle of honey that wasn't supposed to get soaked up :D

2. Food Bloggers Round Table 1: I feel so lucky to have met some of the best food bloggers from San Diego through the Bake Sale. Our ever-so-gracious host Marie along with Amanda initiated the San Diego Food Bloggers Round Table meetings starting this weekend. This will be a platform for some veteran bloggers and small time bloggers like me to get together and discuss various blogging related topics. The topic for our first meeting was Social Media - how to leverage the various social networking sites to our advantage. It pushed me to be a little tech savvy, the result of which was my blog's Facebook Page! Yay! Thanks to Kathy and the rest of the group for their valuable input. We met up over a potluck brunch. You can only imagine how delicious the food was!


I wanted to bring a taste of India to the table without serving something completely foreign. And you'll all agree there's nothing more popular than Samosas! To make it extra special, the filling was made of Paneer. It was my random experiment that went right thankfully. Here's the recipe:

Cilantro-Mint chutney
Baked Samosa

Paneer Samosa

Ingredients:
1 Cup All purpose flour
1 Tablespoon Ghee/clarified butter
12 Oz. Paneer - grated
1 Medium potato - boiled and mashed
1/2 Cup green peas - coarsely ground
1/2 Small Onion - finely chopped
3 Cloves garlic
1 Inch Ginger
3-4 Mint leaves
1 Small green chili
1/2 Teaspoon cumin seeds
Garam Masala
Chaat Masala
Cumin-coriander powder
Red chili powder - if needed
Salt to taste
Oil for frying

  • Mix a cup of all purpose flour, a pinch of salt and warm ghee and add water little by little to form a firm, thick dough. Cover and keep aside.
  • Grind ginger, garlic, green chili and mint to a paste.
  • Heat about a couple of teaspoons of oil in a saute pan and add cumin seeds to it. Once the seeds roast, add onions and let them sweat just for a couple of minutes. I didn't want to add raw onion hence I added this step. 
  • Take it off the heat, add grated paneer, mashed potato, peas, salt to taste, some garam masala and chaat masala and some red chili powder if needed. I was doing a trial and error with the spices since my Indian taste buds are biased and I wanted it to appeal any palete. This is the stuffing.
  • To make the samosa, take a small ball of the dough (smaller than a golf ball) and roll it out thinly. Cut it in the center forming two half moons. Form a cone from each half, add the stuffing and close the open side with a little bit of water to help the dough stick together.

I fried one batch for the meeting and baked one for us at home (350F ~15-20 minutes turning every 5 minutes). As always, I loved the baked version a lot better - much less oil and the crust was much crispier. The fried one tasted good no doubt - but my vote always goes for baking. I must thank my lovely husband for helping me fry the samosa as I waited to make them at the last minute so they'd be fresh.

To accompany the samosa, I made a quick green chutney with 2 bunches of cilantro, some mint, a couple of small cloves of garlic, green chili and cumin seeds and salt ground finely.

3. Into the ocean: Now for the most exciting, somewhat scary, adrenaline rushing experience of the week - Kayaking!! This may sound like a regular activity to any San Diegan - not to me. I am not scared of water..hell no...I'm TERRIFIED! Ocean especially freaks me out, for that matter any body of water where I can not touch the ground (which ain't too deep) or hold onto something. This was the bravest thing I've done in a long time. Hubby gave me all the support and kept me calm throughout and brought me back to the shore safe. Although every nerve and muscle in my body was cringing with fear, I managed to stay afloat for a little more than an hour and landed back without tipping over. Am I a superwoman or what?! Go ahead - laugh at me. I have no shame though. Floating over big waves in the ocean may not be my idea of fun, but I can finally check this off my list!

On the way to La Jolla Cove

With that and hoping everyone had a very happy father's day...I bid you adieu till the next time.

Thursday, June 16, 2011

Mid-Week Grilling

Of the myriad 'food-related' activities we both enjoy, going to the farmer's market remains a top favorite. It turns an otherwise mundane grocery shopping activity(for him - I could spend hours at the grocery store) into a desirable outing. So getting a reminder call from hubby about this week's farmer's market only put a smile on my face.

Here's a simple recipe from this week's produce basket - perfect for an easy hump day dinner.

(I fiddled with hubby's camera in a miserable attempt at getting artsy with my pictures - lesson learned, leave the job to him!)


Grilled Asparagus with Roasted Garlic-Yogurt Dipping Sauce

Ingredients:
1 Bunch asparagus
3 Cloves garlic
3 Tablespoons yogurt
Chipotle and habanero chili flakes
Salt & Pepper
Olive Oil
Grilled Asparagus:
  • Toss whole asparagus in some OO and sprinkle salt & pepper for seasoning.
  • Grill the asparagus until you they get charred black spots.  
*Tip* Put the asparagus on a skewer sparsely when grilling. It makes it easier to turn them all at once.

Dipping Sauce:
  • Coat 3 garlic cloves (or you can use a whole garlic head) in OO and roast until soft and slightly brown. You can grill the garlic over an aluminum foil or roast in the oven.
  • Peel and grate the garlic, add yogurt, chili flakes per your liking and some salt. Mix well. 

While I was grilling the asparagus, hubby practiced his culinary skills making a delicious omlette with onions, tomatoes, avocado and spices.

The weekend is in sight now...have a good one!

Tuesday, June 14, 2011

Painting The World Around Me

The last couple of days, I gave my dining table a break from the hot pots of steaming curries and used it as a coloring station instead. I'm sure it enjoyed losing itself in the world of oil paints just as much as I did.

For as long as I can remember, painting has been a big stress-buster for me. Painting that magical place from my dreams on a paper brought it to life. Back in school, when getting a project done or studying for an upcoming exam were the causes of worry (oh, how little of the world I knew), I would lock myself in a room and start working the strokes on a paper. Many a times, the painting would never go beyond some random strokes; yet the colors would brighten my world.

On our first trip to Michael's together (yes, it happens to be an event for me!), I expressed my wish to try oil painting on canvas some day. Hubby immediately bought the essentials to get me started on it. Without any clear picture in mind, I started working on the painting. Then half way through, we moved into a new place and the painting sat in a corner completely neglected. Finally, seeing a friend's oil paintings gave me a nudge and I went back to it determined to complete within a couple of days. So here it is, almost finished..and I say almost because I'll keep finding some mistake or the other I would want to fix. I'm absolutely not satisfied with the product knowing I've made quite a lot of errors. It's been so long since I last used oil paints (coming to think of it, any paints) that my skills are a little rusty. Nevertheless, I'm back to the colorful world of painting thanks to hubby!


A poor start, but a start nonetheless...

Sunday, June 12, 2011

Chocolaty Delight

The  no-baking spell has been broken, finally! Remember how I talked about my baking (or not)...well, I've proven myself wrong. Last Thursday at 10:00pm when I had an uncontrollable sweet craving, I did something unthinkable. I went into the kitchen, pulled out the baking ingredients lingering around from some previous projects and actually BAKED fresh chocolate-macadamia cookies from scratch (patting myself on the back!).

When I was wondering how I would use up the leftover baking chocolate (which has made its way into a mousse, sandwich, fruit cups and some other recipes yet refuses to get over), Saee from My Jhola posted this this microwave chocolate cake recipe. The simplicity of the recipe was too compelling not to give it a shot.

I convinced myself that I totally earned myself a little chocolaty treat after the long tiring hike we went for yesterday. I mean, I must've burned like 5000 calories right?? Okay, maybe not..but I figured some chocolate would help me forget about the sore muscles :D. I reached into the pantry to take out the all purpose flour, and guess what? It was nowhere to be found! Stupid, stupid me...I forgot it got over when I made the cookies. Well, cooking (or baking in this case) is all about thinking on your feet and I decided to make whole wheat chocolate cake. Maybe I was just meant to give this a little healthier spin. I also substituted the Nutella with chocolate fudge which is what I had in the house.

I've submitted this for the following event: http://myeasytocookrecipes.blogspot.com/2011/05/chocolate-recipes.html
A picture is worth a thousand words

Microwave Chocolate Cake

Ingredients:
4 Tablespoons whole wheat flour
1 Oz. Baking chocolate - I used Baker's brand
2 Tablespoons chocolate fudge - my substitution for Nutella 
3 Tablespoons milk
2 Tablespoons sugar
1 Tablespoon vegetable oil
1 Teaspoon coffee powder
2-3 Pinches baking soda
1 egg
Raspberry for garnishing (optional)
  • Melt the baking chocolate in the microwave - takes about 1-1.5 minutes. 
  • Mix all the ingredients together in a bowl and whisk it for a couple of minutes by hand. I used a little more baking powder than the original recipe fearing the whole wheat wouldn't rise as well.
  • Pour the mixture in ramekins (only about half way...the cake rises quite a lot) or cups and microwave for 2 minutes. Perform the toothpick test and cook for another 30 seconds if needed. It took me 2.5 minutes. 
  • Garnish with some powdered sugar and raspberry.  
I absolutely loved how simple this recipe was. Not having any butter was yet another reason to love it. I didn't miss all purpose flour at all. I would've liked a little more sugar though - maybe 3 tbsp instead of 2. But the cake was unbelievably soft and fluffy. And it took only 2.5 minutes to bake..how can you beat that?? I'm amazed. Delectable chocolaty personal treats.

As I was in the process of making this cake, hubby came by:
Hubby: What are you doing?
Me: Making a chocolate cake
Hubby: Why are you making me fat? (trying to hide excitement over the cake)
Me: Because I love you!

:)

Friday, June 10, 2011

Monsoon Mélange

The long harsh summer has given way to the cooling showers of monsoons in India now. This marks the end of mango season when people scramble to lay their hands on last of the season. After 2-3 months of devouring mangoes in every single of its forms, this is the time to salvage the not so great last few. My MIL was describing excitedly to me last night how she found small green mangoes really cheap in some small town. Then like two typical women, we exchanged what all we could make with the specific kind of mangoes she bought and how my mom's recipe differs from hers and how she shouldn't eat anything too sour now that the weather is cooling down.

Coincidently, I had bought 2 green mangoes just yesterday and the weather in San Diego today is a perfect reminder of the Indian monsoons. The sun is playing hide and seek with the clouds with occasional showers. It is the perfect weather to indulge your senses in a cup of steaming and slightly spicy Kairiche Saar - Green Mango Soup!


Kairiche Saar - Green Mango Soup

Ingredients:
2 Green/raw mangoes
4-5 Red chilis - adjust according to your liking
1/4 Teaspoon red chili powder
1 Strand of curry leaves
1/2-3/4 Teaspoon cumin seeds
A few whole fenugreek seeds
1 Cube jaggery/1-2 Teaspoons brown sugar
~1 Tablespoon grated coconut
1 Teaspoon ghee/butter
  • Soak a few fenugreek seeds in water so they get soft until you work on the rest.
  • Steam the green mangoes in a pressure cooker or in the microwave (not directly in the water - keep the whole mangoes in a container and keep it in a larger container with water and steam) until the mangoes are soft and the skin has turned a pale yellowish green color.
  • Let the mangoes cool. Discard the skin which should peel off easily, take out all the flesh and keep the seeds aside. You can throw the seeds away but I usually let them boil with the saar/soup which gives it a distinct flavor. Moreover, the seeds are a lot of fun to suck on after :D - give them to kids. Mash the pulp to remove any lumps.
  • Heat ghee in a cooking pot and add the cumin seeds, curry leaves, red chilis and lastly the drained fenugreek seeds. Once cumin gives out a nice aroma, add the mango pulp and seeds, jaggery and coconut. Adjust the amount of jaggery depending on how sour the mangoes are.
  • I added just a little bit of red chili powder for the color and a slight kick. The soup has lots of different flavors and spicy should definitely be one of them.
  • Add about 3 cups of water (or however thin you want it - it tastes better a little watery) and let it boil for a good 5-7 minutes on medium-high. The mango is already cooked so you just want all the flavors to come together.
Drink hot just as soup or with some rice. Simply delicious!!

You can make it a little more tangy to be refreshing in hot weather.

Notes:
  • There are lots of variations to this recipe. My MIL uses coconut milk instead of grated coconut which I'm sure will taste just as fabulous.
  • Some like to use green chili paste instead of whole red chilis and some use red chili powder. I personally like whol red chilis because they add a nice roasted flavor to the dish.
  • As always, cilantro is great for garnishing.

Wednesday, June 8, 2011

Kakadicha Kayras

My favorite Persian grocery store here carries vegetables the way we used to get them in India. Not hormone injected gigantic, beautiful looking, bright colored watery flesh. I'm talking about vegetables that are small and flavorful - the way they would grow in the wild (not that I've seen them in the wild, but I assume that's how nature intended it be). I picked up a couple of Indian cucumbers the other day and I HAD to make my favorite Kayras! Slurp!

Kayras is a typical Maharashtrian side dish that lies somewhere in between chutney and koshimbir (salad with seasoning). It is made especially for festival feasts and poojas. The memories of eating kayras are somewhat mixed with the fragrance of jasmine, karpur, agarbatti and masale-bhaat! The preparation typically needs cucumber or raw guava (the latter is lightly cooked and definitely ranks over cucumber in my list). The ingredients are simple, but my memory failed me in remembering the method. I've called my mom impatiently very early in the morning to get recipes, but waking her up at 2am just didn't seem like a good idea! After searching online without much luck, I found this recipe that came very close to my mom's recipe. I called her up the first chance I got and verified the recipe - check!

 Kakadicha Kayras/Cucumber Chutney (?)
Ingredients:
2 Cucumbers
1 Tablespoon tamarind concentrate
1 Cube jaggery or 1 teaspoon brown sugar
1.5-2 Tablespoons ground peanut - lightly roasted and ground
1/3 Teaspoon cumin powder
Salt

For seasoning:
1 Tablespoon oil
1 Green chili
4-5 Curry leaves (optional)
1/3 Teaspoon mustard seeds
1/2 Teaspoon cumin seeds
1/4 Teaspoon turmeric powder
1/4 Teaspoon asafoetida - more than what we usually use

Chopped cilantro
  • Chop cucumber into small pieces.
  • Add some water to the tamarind concentrate to thin it out. Add jaggery/brown sugar (I like using jaggery more than white sugar for its earthy flavor), coarsely ground peanuts, salt to taste and toss in the chopped cucumber. Let it sit for 5-10 minutes.
  • Heat oil in a small kadhai/pan and add mustard seeds, cumin seeds, chopped green chili, asafoetida and turmeric powder in that order. Let the mustard seeds and cumin seeds splutter a bit before adding the rest. Don't let the spices burn. You can also add a few curry leaves, but I left them out this time.
  • Add this seasoning over the cucumber soaking in the tamarind mixture. The smell and the sound when oil hits watery cucumber - simply amazing!!
  • Cilantro is ubiquitous in Indian cuisine - so garnish with some chopped cilantro.  
Serve on the side with roti, rice or have it with dosa, idli or even bread.

Slightly sweet, tangy, 'khamang' from the seasoning (I have no translation for this word - please try this dish to know what I'm talking about) - I think this is the kind of food I'm going to crave when I'm pregnant! Well, let's not talk about that right now...

Tuesday, June 7, 2011

Making Mondays Merry

Let's face it..Monday isn't exactly the best of the weekdays. But it doesn't always have to be blue...

After a long day at work, I enjoy...

Walking in the night's cool breeze holding my loved one's hand...


Enchanting fragrance of flowers in bloom...

Raat Raani

Craving a fro-yo on the way and getting ectatic to find a place...


 Having a delicious fro-yo with every topping in the world!


Happy rest of the week!

Saturday, June 4, 2011

Hello Sunshine!

Sorry...not you, the real sunshine..the sun - shine sunshine...like, OMG it's finally summer sunshine! What a gorgeous day to wake up to and what better way to spend it than at the swimming pool and later basking in the sun at the beach. I 'played' in water this morning and later bathed in sunshine at the gorgeous La Jolla shore while hubby and friends went kayaking (don't tell anyone, but I'm scared of water..ok, I'll go hide my face now). Guess what? Kayaking doesn't seem all that scary after all. I've conjured up every ounce of courage in me to give it a shot before the big trip to Alaska! This is going to be an adventurous summer for me, if you can call it that. Oh well, I just can't get enough of this season - especially when my weekends start with throwing a BBQ party on Friday evening. Ah..so relaxing, so refreshing, so...Summer!
Reading a book at the beach - a perfect way to spend an afternoon!
We had to show off the new grill to our friends. Chilled drinks, yummy food, some buzzed people - that's what I'm talking about! There was a mix of omnivores and herbivores in the group. I prepared a few vegetarian dishes and hubby (how eagerly he was waiting for this!) prepared chicken and shrimp for the superior kind <rolling my eyes>. After a couple of glasses of wine and a bottle of beer, I kinda lost track of taking pictures of the cooking in process. I took some pictures of 'the before' while marinating and getting stuff ready though.

Our friends showed up soon after work battered by the usual hectic week. Of course they were in the mood to just sit around, chat and crack jokes from Family Guy and South Park. I was scurrying about ensuring there was one course after the other to accompany the sudden bursts of laughter and animated 'Did you know...exclamation, exclamation, exclamation'. For the starters, I made 
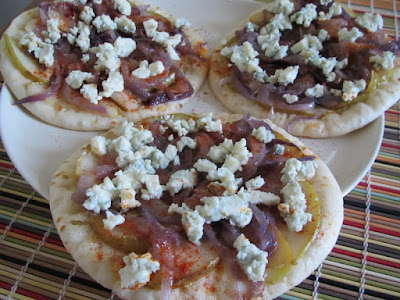
sweet potato fries (third time in two weeks) and grilled Gorgonzola-pear flatbread. I made my friends guinea pigs for my experiment of the latter who willingly tasted it - gobbled it would be more appropriate. You know how I love recreating my favorite dishes from restaurants, this was one of them. I had gorgonzola-pear flatbread at this amazing tapas place in Seattle (I forget the name). The combination of this cheese and pear is pretty classic, but toss in some caramelized onions and honey in the mix and you have something divine tasting. I remembered the flatbread having caramelized onions and the honey was my addition. This is a semi-grilled dish. Here's how I made it:

Before going on the grill - trust me, the after looked much more appetizing
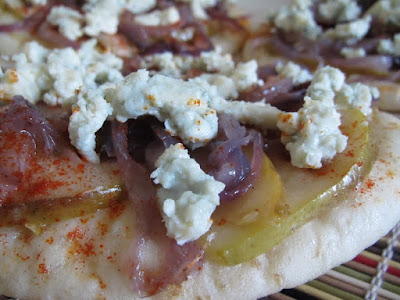
A closer look

Gorgonzola-Pear Flatbread

Ingredients:
3 Tortilla breads - or use regular flat breads
Gorgonzola cheese
1 Pear - ripe
1 Medium onion
Honey - as needed
Paprika - as needed
1 Teaspoon sugar
Olive Oil - as needed
Butter - as needed
Salt to taste

  • I used this as a guide to caramelize onions. Chop onions thinly into half moons. Heat a saute pan and cover the bottom barely with oil. Add chopped onions, saute for a couple of minutes, then sprinkle some salt and sugar. Slowly cook the onions until soft and sweet and caramelized on low heat (about 10-15 minutes).
  • Cut the pear in thin slices. Cook the sliced pear in saute pan as well in just a little bit of butter on each side (about 7-8 minutes all together). You can run these two processes in parallel. 
  • To assemble, spread some honey on flatbread with a knife or a brush, add the pear then onion and top it with gorgonzola crumbles. Sprinkle just a little bit of paprika on the top. You don't want to kill the sweetness of the pear and honey, but just a nice pop of flavor. 
  • Grill the flatbread for 2-3 minutes until the cheese melts and the bread gets crusty. You can do this in the oven as well. Cut into small pieces and serve this unbelievably delicious finger food in your favorite plate. 

After a couple of rieslings and zins, we were ready to move on to the next course. I made a berry refreshing salad as the second course - another one of those 'Oh this is so good, I must try it' restaurant items. I had a strawberry salad with strawberry vinaigrette at Souplantation a couple of days back. Nothing says 'Summer' like a salad this good.


Berry Good Salad

Ingredients:
1 Box strawberries (the standard box with ~15-20 berries depending on the size)
Spring mix greens
Macadamia nuts - I got these at the farmer's market so added some. Use any of your favorite nuts.
2 Tablespoons balsamic vinegar
2-3 Tablespoons olive oil
1 Teaspoon sugar
Salt & Pepper to taste

  • Puree 8-10 strawberries, balsamic vinegar, sugar, salt & pepper. Be a little conservative with the BV while pureeing and add later if needed. 
  • Take this puree out in a bowl and whisk in olive oil slowly. Adjust the amount of BV & OO as needed and per your liking. You should end up with a vinaigrette slightly thicker than Italian. 
  • Toss in spring mix greens, fresh sliced strawberries, some crushed macadamia nuts and drizzle a generous amount of the vinaigrette. Tastes much better cold so chill the vinaigrette for a little while before serving. This salad is like a burst of flavors in one bite! Can you believe my friends actually helped themselves to extra servings of the salad when there was this whole fare for the main course?

For the real grilling part, I made the usual Panner-Bell Pepper-Onion thing. I've grilled paneer so many times now that I just add whatever suits my mood at the time. This time it was just a yogurt, red chili, cumin-coriander powder, chaat masala, salt marinade.Don't forget to splash some lemon juice after you grill it though. That last touch does it!

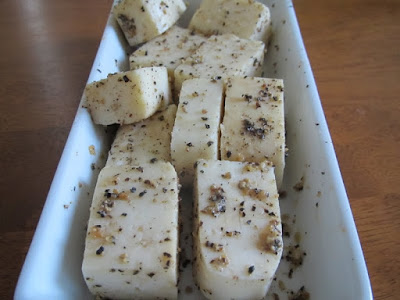
Grilling Cheese with Salt-Pepper-Lemon Pepper
I tried something new this time. I found this grilling cheese at the grocery store which looked and tasted very similar to Paneer, just a bit chewier. I wasn't really sure what I was gonna do with it. When in doubt, add salt & pepper! I just added lots of fresh cracked pepper, some salt and lemon pepper (this is my hubby's go-to seasoning) and grilled it. Quite tasty I must say.

Hubby took over the 'man kitchen' after I was done with the puny vegetarian grilling. He made Indian style grilled chicken in yogurt-ginger&garlic-red chili-garam masala marinade that soaked up flavors overnight and his signature shrimp. He marinated shrimp in a bright green paste of cilantro-mint and some other spices overnight as well. Friends raved about his preparations till the minute they drove out of the parking lot. I totally validated their sentiment by tasting some of both (shhh...). Oh c'mon! I had to be a good wife! I'm not converted though...it's okay.

Wanna feel like a kid again? How about a Popsicle!

To round up the meal, a very refreshing, all natural, homemade watermelon pops. Just fresh watermelon juice and nothing else! Mmmm..

Thursday, June 2, 2011

Soul Food

We, humans, are constantly aspiring to create something new, something unique - be it technology or something as basic as our food. After frenzied efforts of creating new dishes in my kitchen over the past week, I just wanted to slip into my comfort zone and make what's tried and tested and passed down for generations. The food I grew up eating every day, food that defines a part of who I am. The regional cuisine of the western state of Maharashtra. Much can be said about the cusine and cultural aspects but I'm afraid I'll end up with an essay. Here is not completely comprehensive yet a decent read on the cuisine of the region I belong to. The vastness of the state and its distinguishing location between the South and North India, make it difficult to categorize the cuisine. They also contribute to influences from both sides of the country. Yet, two aspects that strike me the most and make me love the food are simplicity and balance. Don't get me wrong...I can name atleast a 100 dishes off the top of my head that only the experienced cooks can make. But everyday meals are made with sparing use of spices and are well thought out with inclusion of all the nutritional components. It's all about nourishing your soul just as much as the body.

I'm going to share a few of my favorite recipes that mom made frequently. My hubby and I enjoyed these simple dishes over the last couple of days.

The first recipe is an appetizer I love love love! I guess I made my point! Every so often when the large eggplant wasn't used for making Bharit/Bharta, my mom made Vangyache Kaap (Eggplant chips). It's made fairly commonly in Maharashtrian homes as a teat-time snack or a dinner appetizer. We had coined a new name for it as kids - Vangyache Fish (Eggplant fish) for its resemblance to Konkani fish fry. Fear not, it doesn't taste anything like fish. Funnily, it doesn't taste much eggplant-y either, as if it was made to convert non-eggplant lovers.

Toss anything in a li'l bit of flour and cook in oil - it's bound to taste good!
Powder and pretty 'em up
My oil-deprived eggplant wafers/chips
Vangyache Kaap/Eggplant Chips

Ingredients:
1 Large eggplant
~3/4 Cup rice flour
1 Teaspoon red chili powder
1/2 Teaspoon cumin-coriander powder
Couple of pinches turmeric powder
A pinch asafoetida
Salt to taste
Oil for cooking

  • Cut the eggplant into thin slices and keep them in cold water. This will prevent browning as well as help the flour coating stick to the eggplants. 
  • Mix rice flour and the spices to create the coating. Adjust spices if needed. 
  • Drain the eggplant slices and dredge them in the flour-spice mix. 
  • Heat a shallow frying pan and add a little bit of oil. Helps to shake the pan so the oil spreads. Cook the eggplant slices on each side for a couple of minutes until they brown. Add oil if/as needed. Don't OD as the eggplants soak up oil and become soggy. You want to keep them crispy. 
  • Once cooked, keep them in a plate with a paper towel to soak up any extra oil. Enjoy!


Next up is one of my most favorite vegetables ever (yeah, I say that about 90% of them..but this one is really a favorite) - Bhendi/Okra. The most common/known way of making okra is similar to one of my earlier posts. However, the community I belong to has a different method that involves tamarind and jaggery. We are very big on the use of tamarind and jaggery which tone down the spices (that are already in little quantity). This recipe is a specialty of my grandma and no matter how tasty my mom makes it, my dad just won't approve of it. Guess what...my grandma's not making a 24 hr journey to feed me. So my dad can dislike anyone else's attempt all he wants but I have to make it for myself. My husband absolutely loves okra but refused to eat any preparation of it without onions and garlic. One taste of this new dish and he's raving about it!

Bhendi/Okra curried with tamarin-jaggery
Bhendichi Chincha-Gulachi Bhaaji/Okra with Tamarind-Jaggery

Ingredients:
1 1/2 Cup fresh cut okra
1 Teaspoon tamarind concentrate/pulp
1 sq inch cube of jaggery - you can substitute it with a teaspoon of brown sugar
1/4 Teaspoon mustard
1/4 Teaspoon turmeric powder
1 Pinch asafoetida
1/2 Teaspoon red chili powder
1/3 Teaspoon cumin-coriander powder
1 Teaspoon oil
Salt to taste
Water as needed

  • Heat oil in a cooking pan, add mustard seeds and let them splutter. 
  • Add turmeric powder, asafoetida and okra to the pan and saute for a 2-3 minutes on medium-high heat. 
  • Add the rest of the ingredients, mix well. Add some water barely covering the okra and cook on medium heat until the okra is soft and cooked.
  • Eat with some roti and yogurt on the side. 


The last recipe I'm going to post serves as a vegetable to accompany roti and can also replace amati/daal to eat with rice. Tasty spinach curry that is usually made for a quick dinner (even a quick dinner constitutes of atleast 3 items). Spinach shrinks up quite a bit once cooked so this recipe is good to bulk it up - useful especially when my mom had to feed a family of 6. This light, non-spicy dish is great for dinner when you shouldn't be eating anything too heavy. The curry is also made with alu/taro leaves.

Spinach Curry

Palakachi Takatali Bhaji/Spinach in Buttermilk Curry

Ingredients:
1 Bunch spinach
1 Serrano pepper/Thai green chili
1/2 Cup thick buttermilk/ 2-3 Tablespoons yogurt
1 Tablespoon besan/chickpea flour
1/2 Teaspoon cumin seeds
7-8 Curry leaves
A handful peanuts (or more if you are like me)
Turmeric powder
Asafoetida
1 Teaspoon oil
Salt to taste

  • Chop fresh spinach and one green chili and pressure cook (1 whistle). If you are cooking in an open pot, just cook for a few minutes until the spinach softens. 
  • On the side, whisk some yogurt and water and add besan to it. Make sure the besan is completely dissolved. 
  • Heat oil in a pot, add cumin seeds, curry leaves, turmeric powder, asafoetida (you probably know the deal with seasoning now) and add the cooked spinach to it. 
  • Toss in a handful of peanuts. This is another common ingredient in Maharashtrian cooking. Peanuts, whole or ground, are used in many of the traditional dishes. I personally am a sucker for them so I always add a little more! They plump up and become soft after cooking - yum.
  • Add the buttermilk/besan mix. Add some water if needed and let it boil for a few minutes. The spinach is already cooked so you just want to boil until it all comes together. 

Have the bhaji with some roti or rice or by itself. It will taste good no matter what. So so good!

There are numerous regional recipes on my 'must have's list. This is a good start. I will post more in the future. For now, I must get back into the 'experimental' mode and prepare for tomorrow's BBQ party :)

LinkWithin

Related Posts Plugin for WordPress, Blogger...