Showing posts with label summer. Show all posts

Saturday, February 21, 2015

Simple Couscous Salad

Going forward, I'll make an effort to highlight easy meal options for the busy parents. I will add keep adding to this list, which you can access by clicking on the 'Kid-friendly' label.

To give you an idea of what goes on in my kitchen, here is what I cooked this week:

Monday - Thai red curry with sauteed tofu and mixed vegetables. I bought all natural (as natural as it can get) red curry paste from the store. This dish was hardly any work after that. All I had to do was bring a can of coconut milk and red curry paste to a boil, add sauteed tofu and mixed vegetables (broccoli, carrots, red and yellow peppers, a couple of red radish) and cook for 3-4 minutes. Lots of chopped cilantro for garnishing, and it tasted great with some leftover peas pulao from the night before. 
My daughter ate cooked carrots, radish, peppers, and a little bit of tofu from the curry. 


Tuesday - Avocado and roasted red bell pepper grilled sandwich on multi-grain bread. Avocado is so creamy by itself, I didn't have to add any cheese. The girl ate avocado slices from my sandwich. 

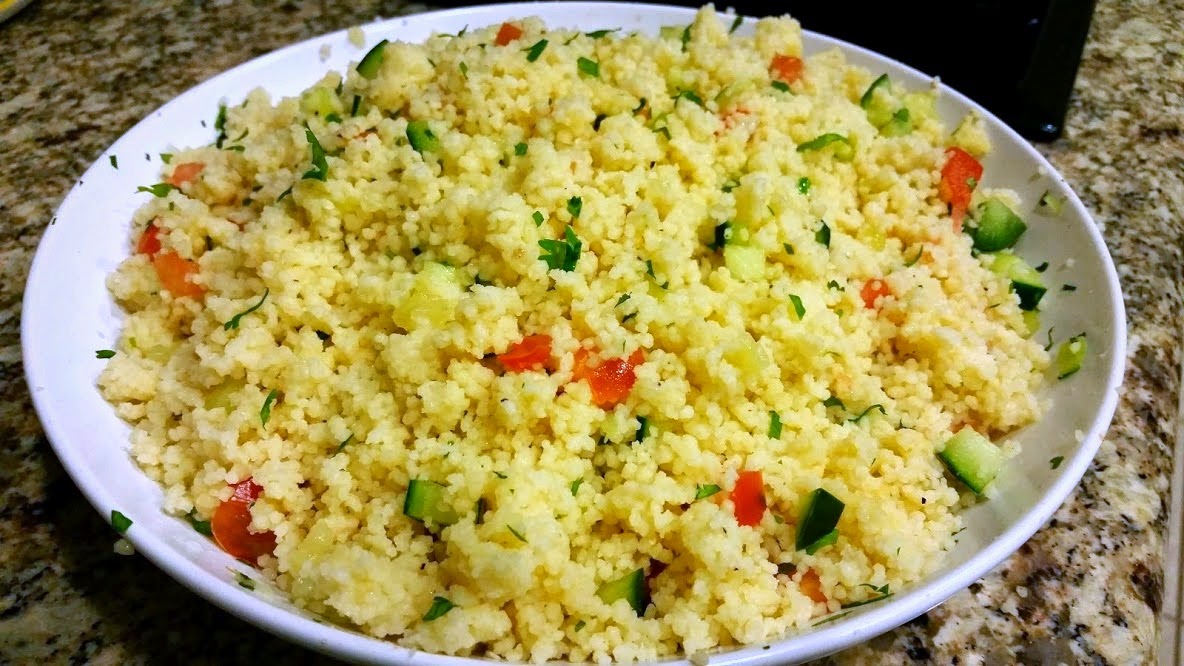
Wednesday - Couscous salad with cucumber, tomato, and cilantro. Baby girl loved this couscous salad!

Thursday - Asian style salad with mixed greens, shredded carrots and broccoli (using leftover broccoli and carrots from Thai curry), tangerine, and peanut dressing. None of the ingredients were good for the baby - she ate some pear and avocado. 

Friday - Simple cabbage sabji with roti. Then we went out for dinner to kick off the weekend. Shreya loves eating fresh roti.

Saturday - Husband made a delicious pizza with kale pesto base, lots of veggies and cheese on top. Baby girl enjoyed picking out spinach off the top. 

I make variations of the couscous salad every time. And it always tastes great. This is the basic Mediterranean style salad to which you can add many other things. In addition to cucumber and tomato, you can have olives, black beans or chickpeas, diced peppers, diced zucchini, feta cheese, chopped spinach or basil etc. The simplest version is great as a light meal. Or you can eat it with a vegetable and beans stew or lentil soup. 


Couscous Salad with Cucumber & Tomato

Ingredients:
1 Cup uncooked couscous 
1 Tablespoon olive oil
1 Small cucumber - diced (big or small depending on how you liked it)
1 Small tomato - diced
2 Tablespoons lemon juice 
Chopped cilantro for garnishing
Salt & pepper to taste
  • Cook couscous according to the package instructions. Add olive oil and salt while cooking it. 
  • Add pepper just before taking couscous off the heat. Take it out into a flat bowl, and fluff it up by running a fork through the couscous gently. 
  • Once couscous cools down a little, add diced cucumber and tomato, sprinkle lemon juice, and mix well. 
  • Garnish with cilantro. You can use your favorite herb, such as basil or parsley. 
Persian cucumbers taste the best in this recipe. You can use halved cherry tomatoes instead of regular tomatoes. They are bursting with juices and make the salad look pretty. Some toasted pine nuts or slivered almonds on top would be great for crunch. There, I just gave you a whole bunch of different permutations-combinations.

Tuesday, July 22, 2014

Four Month Birthday With Ice Cream Trifle

Our local Indian grocery store opened an ice-cream shop recently with all the Indian favorites - sitafal (custard apple), kesar, mango, pistachio etc. I excitedly tried all the flavors; and while most of them were just okay, I was certainly reminded of Indian ice-cream. It was perfectly light and airy, and not cloying sweet. I came home with a carton of one of my all time favorites - butterscotch. I made this simple trifle with the ice cream to celebrate my daughter's 4 month birthday last week (gosh, she's growing up so fast!). It was the perfect dessert for this hot summer month.


I ate this trifle at one of my aunts' place. We used to visit my dad's siblings and cousins in Thane every summer vacation. My aunt used to have all the kids over and treat us to all sorts of fun stuff - chaats, paav bhaaji, Indian desserts, and other kids favorites, like this ice-cream trifle. It was just layered pound cake, mixed fruits, and ice-cream - the easiest dessert ever - but it tasted so good! It had all the right components - dense, moist cake, fruits including the season's best mango, and good quality ice-cream. You can't go wrong with that combination! I recreated the trifle from my memory, and it was a big hit in my family. My baby girl can't eat yet, but I'll be sure to make this once she grows old enough to eat sweets (yes, I believe in spoiling kids once a while :D). I used store bought pound cake for the recipe since it didn't need much. With minimal effort, I created a great dessert everyone loved, and spent time playing with my daughter instead of fretting over baking a cake. This trifle would be great for parties - you can make it in advance, make a large batch in no time, change it up a thousand different ways to create a 'new' dessert, and appear really cool to young as well as adult guests for treating them to something this good. You can play on the flavors of ice-cream and pound cake, such as lemon cake with citrus fruits and strawberry ice-cream, or chocolate swirled pound cake with chocolate chip ice-cream, pineapple pound cake with coconut ice-cream. The combinations are countless and the joy limitless!


**Husband managed to click a few decent pictures this time. What a breath of fresh air after my rushed, poorly lit, poorly staged phone photos!


Ice Cream Trifle

Ingredients:
Good quality pound cake - I used almond flavored - cut in 1/2 inch slices
Chopped mixed fruits - I used mango, strawberry, apple, and grapes for a variety of flavors and textures
Tutti frutti (optional) - to mix with fresh fruits
Butterscotch ice-cream - softened for the ease of spreading.
Chopped dry fruits of your choice - I used almonds to resonate the flavor of the pound cake
Rectangular casserole dish, or any other flat dish, preferably glass so you can flaunt the dessert.

  • Layer pound cake at the bottom of the pan. Then spread about 3/4-1' layer of mixed fruits. On top of this, spread 1/2' (or as thick as you like) layer of softened ice-cream with a spatula. Let some of the ice-cream drizzle down into the fruits and cake. The cake tastes even better after soaking up some of the ice-cream flavor, and it ties all three components together.
  • Sprinkle a good amount of chopped dry fruits.Cover and freeze until the ice-cream is set.
  • Remove the pan from the fridge 5-7 minutes before serving so that you can slice it easily.

You can serve the trifle with some fresh fruits on the side, or a jam, or jelly, or chocolate sauce, caramel sauce. I told you - the combinations are countless!

Monday, July 14, 2014

Stuffed Padron Peppers...And Other Veggies :)

My colleagues and I were having a conversation about how to train kids not be picky eaters. To my mom's delight, I was a good eater from early on. But even when meals didn't include what I absolutely loved, mom enforced a simple rule - serve a very small portion on the plate and don't get off the table without finishing it. As tortuous as it may sound to some, it really can't kill you to eat a few bites of something you don't love. The good part was that my mother cooked delicious food. If we didn't like something, she made an effort to try different recipes to make it more palatable for us. And there was often that guilt trip - there are way too many kids out there who don't even get two meals a day, let alone choose what they eat. Be thankful that you get to try such variety of foods!

There was one vegetable for which I always made faces though -  bell peppers! The ubiquitous vegetable in the US, and something I've grown to love, was my enemy as a kid. The Indian bell peppers are much smaller, with thinner skin, and more robust flavor compared to what we get here. I thought they were too pungent. Mom cooked them many different ways - fire roasted bell pepper and yogurt raita, stir fry with crispy potatoes, or stuffed  potatoes or chickpea flour to mask their strong flavor. Her stuffed bell pepper preparation was my favorite.

I found beautiful Padron peppers at the Saturday farmer's market. They looked like smaller versions of Indian bell peppers with the same fragrance. Padron peppers originate from Spain and have a wonderful smoky flavor when charred. The seller at the market told me they are usually deep or shallow fried in olive oil and seasoned with sea salt. They don't have a lot of heat, so you can eat them whole. I asked her how they would taste stuffed with something, and she thought it was a great idea. I thought I would try the chickpea filling. The recipe is fairly simple. Chickpea flour is seasoned with garam masala and other spices and stuffed inside seeded peppers. The peppers are beautifully charred in oil on high heat. The slight heat and smoky flavor of the peppers is fabulous. The chickpea flour filling is slightly crunchy against the soft flesh of the peppers, and does a great job of taming some of the pungency. This dish can be served as an appetizer, or a side dish. It tastes great with roti, or rice and yogurt. If you don't find padron peppers, any low heat peppers such as small bell peppers, poblano, Anaheim would be great. I cooked the peppers on stovetop, but you could grill stuffed peppers in summer. It'll be a great side to all the cookouts.


Chickpea Flour Stuffed Peppers

Ingredients:
2 Dozen medium Padron peppers - destemmed and seeded
1 Cup chickpea flour
3 Tablespoons olive/vegetable oil + more for shallow frying
1/2 Cup chopped cilantro
1/2 Teaspoon mustard seeds
Pinch of asafoetida
1/2 Teaspoon turmeric powder
1 1/2 Teaspoons garam masala
1 Teaspoon red chili powder (adjust per liking)
Salt to taste
  • Heat oil in a frying pan and add mustard seeds. When they splutter, add asafoetida, turmeric powder and chickpea flour.
  • To this, add chopped cilantro, garam masala, red chili powder, and salt to taste. Roast chickpea flour till fragrant and 'cooked'. If it looks too dry, you can sprinkle some water (use very little - you don't want clumps). Taste and adjust the seasoning to your liking.
  • Once the chickpea flour filling is done, keep aside.
  • Remove the stems of peppers and take out the seeds. Fill them with chickpea flour filling.
  • Coat the frying pan with some more oil and lay all the peppers on the pan. Cover and let the peppers get charred. Covering the pan will keep the steam inside and help cook the chickpea flour further.
  • Turn the peppers with a tong and char them on the other side. Once the peppers are cooked through, turn off the heat.

Enjoy!

---***---

Speaking of stuffed veggies, I made a set of stuffed felt veggies for my baby girl. I had seen a toy veggie basket at my friend's house; her son played with them. That set was a little more 3D than my version, which is somewhere in between 2D and 3D :D. I think it's a great toy - colorful, educational, and may encourage my daughter to eat all her veggies (or so I hope).One of my friends who has a girl just a little older than Shreya loved the idea of felt toys, and asked me to make some for her baby. I wanted to send the toys just in time for her 6-month birthday which didn't leave me time to make a new veggie set, so I gifted her the one I already had. I can always make more for my daughter. Here's my satisfied customer playing with her new toys :).


Along with veggies, my friend asked if I could make an owl as well. Owls are all the rage these days. I came up with the following pattern after going through several pics on the web. Whooo wouldn't like a pink owl?


Just hangin' out!

Until next time!

Monday, July 8, 2013

Dabeli To Go & Summer Art Work

My neighbor's kids wake me up early these days with their gleeful squeals and loud splish-splash in the swimming pool. Am I complaining? Yes, but only because I can't join them...hmph! Wouldn't it be wonderful to become a kid again and enjoy carefree, summer-long vacations! Those days are never to return. Nonetheless, I made the most of my 4-day Independence Day holiday.

We decided to camp out at Coronado Island for the 4th of July fireworks. You have to reach there early and secure a spot to be able to see the fireworks. We packed a lot of munchies that my in-laws brought from India. For the 'main course', we had my favorite Dabelis. I had to find a way of transporting dabeli to the location - taking ready-made dabeli would've left them soggy, and carrying all the ingredients separately wasn't going to be efficient. I ended up making a filling 'cake' and carrying paav (bread) and sev separately. All this could fit in my bright orange beach tote - perfect for a day out.
The 'cake' was nothing but layers of everything that goes in between the paav. You can find the elaborate recipe here. I mashed potatoes with ready-made dabeli masala, and mixed in green and tamarind chutnies with the potatoes. This was the bottom layer. On top went a layer of spice-roasted peanuts, pomegranate seeds, and finely chopped onion. Chopped cilantro would've been perfect, but I had run out of it. When we were ready to eat, I dug a big scoop of this filling, taking some from each layer, and smeared it on paav, then topped it off with crunchy sev. The idea and the outcome was loved by everyone.

**Tip: Cut the onion in half and wash it in cold water before chopping it up. This will take away some of that pungency and odor.


Now that the days are getting hotter and hotter, I find it convenient to cook quick and simple meals, and use that extra time to get back to art work.

Husband had gifted me a Chinese brush painting set for Valentine's day. I finally got around to trying it. Here's my first try at it. (As you can tell, I get lazy with the pictures quite often).
There was some learning curve here, but I loved the free-style brush strokes and light color pigments. These would make great greeting cards.


I've been doing a lot of instant-gratification kind of crochet work lately.

Guess hoo? I saw these ridiculously adorable cell phone cases on Etsy. I wanted to keep mine simpler, but the eyes could've been bigger for sure. I plan to make more of these in different colors for gifts.


Husband always demands I make something for him. Whether he uses it or not is another question. I tried to make a 'man' version cell phone case for him with a football pattern. I can pretty much slap this pattern on anything and he'll love it.


I bought cotton yarn for the first time over the weekend. It was perfect to make this summery, two-colored dish towel. 


I gifted this purse to my sister, just for being the awesome self she is =). I am in love with the shell pattern I used for the flap. 


Yet another bright-colored pattern for our patio. I intended it to be a rug, but we've been using it as a patio chair throw and it looks pretty. 


Wednesday, July 3, 2013

Fresh From The Garden

The garden gods have been pretty generous lately. My plants are loving the warm weather and all the extra attention they've been getting from two new members in the house now.

Our heirloom tomato plant produced its first meaty, juicy, attractive babies. Their vibrant color won me over even before tasting them. And the taste - aah! They had the perfect balance between sweetness and tartness. Nothing like the grocery store varieties. I could eat these on their own!


Along with the prized heirloom produce, we picked a few red chilies, plenty of tiny purple tomatoes, and a whole lot of fragrant basil. Thank heavens for all these fresh veggies and herbs, or I may forget how things are supposed to taste.


What do you do when you have organic, flavorful produce? Not muddle the flavors! That's what I decided and made this simple tomato-pesto tart using puff pastry sheets lying in the freezer. Tart was a great choice to use heirloom tomatoes - they are firm and meaty, and hold up really well even after being blasted with heat. And their soft flesh contrasted the crunchy pastry sheet beautifully. These tarts made for a nice summer meal - crispy, light, full of bursting juices.


Heirloom Tomato - Pesto Tart

Ingredients:
2 Puff pastry sheets
3-4 Heirloom tomatoes (depending on their size)

For pesto:
1 Cup packed fresh basil leaves
2 Garlic cloves
1/4 Cup nuts - cashews, almonds, pine nuts, or walnuts
2 Tablespoons grated parmesan cheese
Olive Oil as required
Salt to taste

  • Preheat oven at 375F.
  • Add all the ingredients for pesto, except olive oil, to the food processor. Make a coarse paste, while adding olive oil little by little. I use minimum amount of oil to get a smooth paste.
  • Wash and cut tomatoes in 1/4 inch discs.
  • Thaw the puff pastry sheets just enough so that you can separate them. If you let them thaw for too long, the dough will start stretching in all directions! Cut each sheet in three width wise. I used Pepperidge Farm box which comes with 2 sheets - so I had 6 decent sized tarts.
  • Lay these sheets on a tray lined with parchment paper or lightly oiled aluminum foil. Divide the pesto and spread it on each sheet. Then lay the tomato slices, and bake these tarts for 15-18 minutes or until the pasty sheets are golden brown. The tarts are ready to eat. 
---

One of my very close friends, Aditi, has been a loyal reader of my blog. We keep exchanging recipes and ideas. She gave me the recipe to make Sai Bhaji - a simple mixed greens preparation using split chickpea lentils and potato for some substance. I tried it last night using fresh Swiss Chard from the garden and other greens. This recipe is a keeper. It was done in no time and just tasted 'healthy'! I was too eager to eat and took a very bad picture with my phone. 


Sai Bhaji

Ingredients:
1 Cup of spinach, swiss chard and mustard greens each - washed and chopped. Feel free to add any other greens that are smooth in texture when cooked.
2 Cup washed split chickpeas (chana daal) - soaked in water to soften
1 Small potato - peeld and cubed
1 Small onion - finely chopped
1 Tomato - cubed
2 Teaspoons minced ginger and garlic
1 Tablespoon oil
1 Teaspoon mustard seeds
1/4 Teaspoon turmeric powder
Red chili powder to taste
Salt to taste

  • Heat oil in a pressure cooker and add mustard seeds. Once they splutter, add turmeric powder, and chana daal. Saute for 2 minutes.
  • Add ginger-garlic, onion, tomatoes, and potatoes if using, and mix well. 
  • Mix in all the greens, add red chili powder and salt to taste, and add a little bit of water (just enough to cook). Pressure cook the greens for 2-3 whistles. I cooked them without the whistle just enough so the chana daal would cook but not break. 


The Bhaji is ready to be eaten with rotis. Chana daal provided a great bite to the otherwise soft bhaji. A good dose of protein too. It had a nice tang provided by tomatoes that lifted all the flavors. I'll add this recipe to my usual dinner rounds.


Sunday, June 30, 2013

Summer Recipe - Pineapple Curry

Ever since the in-laws arrived, we've been caved in trying to stay out of the 3-digit temperatures. The only solace has been walking on the beach in the evening dipping our feet in pleasantly cold waters, and eating cooling foods. It only helps that my MIL is a fantastic cook who has plenty of recipes I want to learn. We've been cooking up a storm already. As soon as she was out of jet-lag, we went and bought the ingredients to make Ananas Amti (Pineapple curry). A recipe I've wanted to learn from her first-hand ever since I got married. 


My first encounter with this tangy, sweet and sour curry was at my wedding! My MIL gave her mother's recipe to our caterer, who did a very good job making it on a large scale. If you're married, you'll know how trying it is to eat at your own wedding while greeting hundreds of guests. Yet, I remember the taste of this amti very distinctly. It was quite special. My MIL made it today, and it was even better than how I remembered it. Although it's called amti, the color, consistency and flavors are more like kadhi. It has a simple yet fragrant tempering of ghee, cumin seeds and green chili - the classic flavors of kadhi. The pineapple chunks are then cooked in a mixture of cashew paste and coconut milk to make a very smooth and creamy curry. Slurp! For all the richness, this amti is a quick fix, especially if you buy canned coconut milk and pre-cut pineapple. 


Ananas Amti - Pineapple Curry

Ingredients:
2 1/2 Cups fresh,ripe pineapple chunks - the success of this curry depends on the quality of pineapple
1/2 Cup whole cashew nuts (or halved in the center)
1 Cup coconut milk
2 Tablespoons sugar (or as required)
Salt to taste
Lime juice as required (optional)

Tempering:
2 Tablespoons ghee
1 Teaspoon cumin seeds
2 Green chilies - slit vertically in the center
1/8 Teaspoon turmeric powder

  • Cut pineapple in ~3/4 inch chunks. If the pineapple is not ripe/sweet enough, sprinkle some sugar on it and keep aside for 30 minutes. This brings out the juices and makes the pineapple taste better. You can use canned pineapple, but like anything else, fresh ones taste better. 
  • Soak cashew nuts in warm water so they soften. 
  • Once the pineapple and cashews are ready, take out 1/2 cup pineapple chunks and one third cashews and make a smooth paste. 
  • Heat ghee in a pot and add cumin seeds and green chilies. Once the cumin seeds splutter, add remaining pineapple chunks and a little bit of turmeric (only for slight color), and let the pineapple cook for a couple of minutes. 
  • Mix in pineapple-cashew paste, and the remaining cashews. Add a little bit of water if the mixture is too thick and let it boil for 4-5 minutes. 
  • Lower the heat, add coconut milk, salt to taste, and sugar you desire more sweetness. Mix everything well and turn off the heat. You don't want to cook this too long after adding coconut milk else it'll separate. 
  • Let the curry cool down a little, then sprinkle very little lime juice to add some tang. Taste and decide the balance between sweet and sour to your liking. Do not add lime juice to hot curry - it can taste bitter. 


Serve this amti with hot rotis or puris. It is heavenly with the decadence of cashew paste and coconut milk. The sweet, bursting pineapple is just perfect for a summer meal.


Tuesday, June 4, 2013

Mexico In A Bowl

For someone living in San Diego, I have surprised myself by not posting many south of the border recipes. Today I had all the right ingredients to put together a fabulous salsa using a can of black beans that was pushed to the back of the pantry. Don't you feel just as happy when you find the perfect ingredients for a dish you weren't expecting to make?? This salsa has everything you expect in Mexican cuisine - roasted corn, black beans, mango, avocado - the whole nine yards. Hence, I call it 'Mexico In A Bowl'! Of all the salsas that I have ever made/tasted, this is by far my most favorite combination. The contrasting textures and flavors marry really well. My love for using sweet fruits in savory dishes is no secret to anyone. And wouldn't one love a zesty salsa with bits of mango bursting with sweet juices? Digging into a bowl of this was like taking a vacation to a tropical paradise.


I couldn't stop myself from taking one scoop after another of the salsa while husband was clicking pictures. He sure makes my food look good! This salsa bowl, exactly like the ones in Mexican restaurants, was a gift from my company for participating in the Salsa competition last month. Thinking back, I should've made this salsa for the competition to secure a spot..oh well. The look of this bowl makes me feel like I'm dining out =D.


Roasted Corn, Mango, And Black Bean Salsa

Ingredients:
1 Corn on the cob - white or yellow
1 Ripe mango - chopped into small pieces
1 Cup cooked black beans
1 Small or 1/2 large avocado - chopped into small pieces
1/2 Small onion finely chopped
1 Small tomato finely chopped - take out the seeds
1 Whole chipotle in adobo sauce
Lots of chopped cilantro
Juice from 1 lime
Serrano hot sauce - to liking
Salt to taste

  • Roast corn on open flame until you get beautiful char marks. To separate the kernels, hold the stem of the corn in one hand and rest the tip on a cutting board (holding the corn at an angle). Now run the knife through the base of the kernels from top to bottom - away from you. 
  • Mix corn kernels, chopped mango, black beans, avocado, onion and tomato. 
  • Finely chop chipotle and add to the above. Sprinkle plenty of cilantro. 
  • Add juice from one lime, salt to taste and mix everything well. Taste the salsa and add some hot sauce if you would like. It tastes better on the milder side since it has so many sweet elements. You can add more of one or more of the ingredients - suit yourself!


Serving suggestion: 

  • The salsa is perfect with tortilla chips as an appetizer
  • I used it in hard shell tacos - All you need is sauteed red and green bell peppers (cut them in strips and saute in some oil on high flame. This will give them nice charring) and some queso. Add bell peppers to taco shells, add a big scoop of this salsa, and top it with some shredded cheese and more hot sauce if you want. The tacos were just perfect! Husband especially enjoyed them. 
  • You could make a nice burrito/burrito bowl with soft tortilla, Mexican rice, salsa, lettuce and sour cream if you like. 


Monday, June 3, 2013

Avocado Sandwich With Arugula Pesto

I get over zealous about grocery shopping every once in a while and buy more produce than we can consume. Okay, it happens more often than I would like <smh>. I stocked my fridge to its full capacity after getting back from vacation. Using up most perishable items was in order over the weekend.

I made Ghavan on saturday, using chopped spinach instead of zucchini. This is such a great item to sneak in veggies! Make a note, all you moms! The only addition to the recipe was a spoonful of toasted cumin seeds. 

A bag of baby arugula, already yellowing in one corner, was next to finish. Arugula is my all time favorite green. Its distinct peppery flavor pairs well with fruits such as pear, nectarine, or citrus in salads. Fully grown leaves can be a tad bit bitter and pungent, so I purchase the baby ones. They are much milder in comparison. Arugula, actually an herb, makes a great choice for pesto. It seemed like a great way to use up that bag of greens. There were no pine nuts in the pantry, so I settled on using walnuts after reading Elise's recipe. I prefer my pesto with lots of garlic, although I used one less clove for arugula is spicy already. This pesto slathered generously was fantastic in a sandwich. I kept it simple - just avocado for creaminess and tomatoes for a bit of acidity and let pesto take over most of the flavor part.


Avocado Sandwich With Arugula Pesto

Ingredients:
Pesto:
1 Cup packed baby arugula
1/4 Cup walnuts
2 Cloves of garlic
1/4 Cup grated Parmesan cheese
1/4 Cup olive oil
Salt to taste

Sandwich:
Ripe avocado - sliced
Tomato - sliced
Multi-grain bread.

  • Add all the ingredients to the food processor, except olive oil. 
  • Grind everything coarsely, adding oil little by little. 
  • Smear pesto on two slices of multi-grain bread. My favorite multi-grain from the local grocery store has all sorts of seeds sprinkled on them - sesame, sunflower etc. Add sliced avocados and tomatoes and grill until crispy. You can even add roasted red bell peppers to this sandwich.

The sandwich is extremely simple to make yet fancy enough that you'd order it in a fine Deli. We enjoyed it with savory banana chips on the side - our latest addiction!


~*~
On a different note - Husband recently discovered vinyl photography backdrops online. These vinyl sheets come in all sorts of wooden finish looks and are perfect to take food photos. Not that I take any effort in shooting my food, but husband has been pushing me to do better. Getting these vinyl backdrops is the first step. If you are looking for something like this, just google and you'll find plenty of sites out there selling this stuff. Mine came from Swanky Prints right here in Temecula. They are quite fabulous!


Thursday, May 23, 2013

Thanda Thanda, Cool Cool

I'm looking forward to the long weekend more eagerly than ever. It's been a very busy week here en mi casa. On top of work madness there's been lots of cleaning, reorganizing and gardening to prepare the house for the upcoming visit from my in-laws. I'm just glad the week is over. I'm saying adios to San Diego for a few days to get rejuvenated and recharged. I'll leave you with a great summer cooler recipe until then - Kairiche Panha/Panhe - a sweet and sour drink made with raw mangoes. This will be the perfect addition to your Memorial Day cookout menu. A great non-alcoholic option and perfect for all the kids.


Panha is to India as lemonade is to the US. It's a favorite summer drink sweened with jaggery and scented with cardamom powder. You can add a few saffron strands for their wonderful floral aroma. If you don't have jaggery, you can use sugar in lieu. However, I love the slightly burnt/caramel taste of jaggery. If you visit anyone's house in India, you'll typically be offered a cup of tea; but during the hot and humid summer days, cold panha will come as a much needed respite. The drink is prepared with pre-made mango pulp that stores in the fridge for 2-3 weeks. Just mix a couple of spoonfuls with cold water, even ice, and you have an instant cold drink.


Panha - Green/Raw Mango Drink

Ingredients:
2 Raw,  firm mangoes
2/3-1 cup jaggery or brown sugar
1/2 teaspoon cardamom powder
Few saffron strands
  • Cook whole raw mangoes in boiling water until fully cooked. Take out of water and let cool
  • Squeeze out all the pulp, discard the seed and skin. 
  • Add grated jaggery to the pulp. The exact amount will depend on the sourness of mangoes and your preference. Let the jaggery melt completely. You can cook it with the pulp for a few mins to help this process. Give it a quick pulse in the food processor to get the lumps out.
  • Add cardamom powder and saffron, and mix well. This is the concentrated pulp. Whenever you want a glass of panha, mix some pulp with cold water and make it as concentrated as you want.
Have a fantastic Memorial day weekend. Let there be grilling!

Wednesday, April 3, 2013

Not Exactly Mango Pickle

I just returned from a blissful, week-long vacation at my sister's in NY. When we get together, it is madness. No matter how often (twice a day to be specific) we talk to each other, we never seem to run out of topics to discuss. The most important of them all being food! Even during my rushed visit, we roamed around the 24 hour Indian grocery store oohing and aahing over our favorite produce, and came back with Kelphul (banana blossom) and Ambe-Halad (mango ginnger) among other things. My sister wanted to pick the most unique ingredients available to have fun cooking together. We made our favorite lip-smackingly good spicy-tangy-salty piquant pickle with mango ginger. I'll post the more elaborate kelphul recipe later.


Mango ginger, which has nothing to do with either mango or ginger, is fresh turmeric root. It gets its name for the resemblance to the ginger root and an unmistakable mango blossom aroma. It's called Ambe Halad (Mango Turmeric) in Marathi, also for that sweet and sour fragrance and gorgeous deep mango color.  Another variety of turmeric is quite similar to ginger in color (I have some white turmeric pickle made a couple of months ago sitting in my fridge already). While fresh turmeric can fill up your house with its fragrance, the taste is quite delicate. In fact, it doesn't taste much like anything when you bite into it. But a simple, almost instant pickle made with it can pack quite a punch. The pickle uses two ingredients only as preservatives - lime/lemon juice and salt. Some green chilies are added for heat and flavor. Once the flavors penetrate the turmeric, you get this irresistible pickle that makes you wince at first and go "mmm" after when you take a bite - much like how you would react to a sour patch! Mom/grandma used to make a big jarful of Ambe Halad pickle at the start of summer. It was important to have abundant sunlight for the pickle to marinate. My grandpa did the peeling of turmeric carefully, which bled that dark orange color all over. As long as you don't get that color on your clothes, it's totally worth having orange fingertips for a couple of days - just to remind you of all the yumminess you'll eat with your meals :D.


Ambe Halad - Mirchi Lonache (Mango Ginger & Chili Pickle)

Ingredients:
2 Cups chopped ambe-halad
3/4 Cup (or more) chopped green chilies (Thai or Serrano)
8-10 Lemons/limes
Salt to taste

  • Peel the skin of ambe halad and chop into ~1/8 inch discs. If you are worried about the color, wear thin serving gloves. Chop green chilies into 1/4 inch thickness.
  • Put the chopped chilies & turmeric in an air-tight jar/bottle. Add enough lemon/lime juice to them so they are completely submerged.
  • Add lots of salt to it - a big fistful or more. The salt will act as a preservative, so it's important to add enough. The pickle should be salty when freshly made.
  • Close the jar/bottle tightly and keep it in the sunlight for two days. This helps the marination process and penetrate flavors. 
Optional:
While I make my pickle using the method above, you can add a simple tempering to it for some more flavor. Heat a tablespoon of oil and add 1 teaspoon mustard seeds. Once they splutter, add a little less than 1/2 teaspoon asafoetida and mix into the pickle. The strong flavor of asafoetida is wonderful in the pickle. 

The pickle is ready to be eaten or stored it in the fridge to enjoy later. It lasts for months and tastes better by the day. The green chilies mellow down because of the acidity and salt. Even I can eat the chilies by themselves (and everyone knows I can't eat spicy).

Btw - you can make this pickle with green chilies only or with other firm veggies/fruits like carrots, radish, green mangoes etc.

Submitting this recipe to the Celebrate Summer event hosted by Nivedhanam.


Monday, June 11, 2012

Frozen Delight For Summer Night

Ever since mom and dad got here, we have been having a gala time planning meals, grocery shopping, cooking together and sitting in the backyard, reminiscing the good ol' days over dinner. The summer night breeze goes great with a veggie flat-bread pizza, a yummy sandwich with homegrown basil pesto, tacos or burritos or a simple rice and daal dinner. I pride in cooking healthy ; but I've been making an extra effort to cook low-cal to suit my mom's diabetic diet. Eat whatever you want, a summer meal enjoyed in the backyard warrants a dessert though; and what's better than some ice-cream? Mom doesn't care much for sweets, but ice-cream is something she loves and misses having; especially since sugar-free, fat-free ice-creams are still rare to find in India. So I turned to a much healthier and just as satisfying option to sate her craving - Frozen Yogurt. A delicious dessert to indulge in on a summer night without all that guilt.


Frozen yogurt is ridiculously easy to make as long as you have an ice-cream/FroYo maker. You just need some thick, strained yogurt and your favorite fruit for flavoring. Sugar is optional. You can also buy Greek yogurt; but I find straining yogurt just as simple as picking up a Greek yogurt container from the grocery store. Just hang some plain (low-fat or regular) yogurt in a cheese cloth for 3-4 hours and you are done. You can use a variety of fruits, such as berries, mangoes, nectarines, to make the frozen yogurt interesting. If you are a chocolate person, go for some good quality chocolate chips. I used apricots this time since my mom loves them, and they turned out to be a great choice. Apricots have that gorgeous mango color and the flesh is juicy, sweet and slightly tart. Whatever your choice of fruit may be, you are less than 5 ingredients away from this frozen treat!


Apricot Frozen Yogurt

Ingredients:
1 1/2 Cups strained yogurt/Greek yogurt
4 Apricots
2 Tablespoons honey
1/2 Teaspoon vanilla essence
2 Tablespoons water
  • Wash, pit, and chop apricots finely. Keep a little less than a 1/4 of the apricots on the side and add the rest to a saucepan.
  • Add honey, vanilla essence and a little bit of water to the saucepan and cook the mixture on low-medium heat for about 5 mins or until the apricots are soft. Vanilla is great to enhance any flavor. Cooking helps bring out the sugars in apricot and the consistency helps mix the fruit well with the yogurt. It gets you that gorgeous color too. If you want sugar in your FroYo, just add it to the fruit while cooking. 
  • Cool the cooked apricot mixture in the fridge for a few minutes and mix it with the yogurt. Add the remaining uncooked apricots as well. The uncooked fruit added a great bite. 
  • Put this mixture in an ice-cream maker and churn according to the manufacturer's instructions. 
There, you have a gorgeous looking, wonderful tasting, absolutely no-guilt dessert for a lovely summer night!

Sunday, June 26, 2011

Beat The Heat

San Diego weather is quite notorious..while the no-snow-winters are the envy of the not so privileged ones, we have to put up with May Grays and June Glooms. Just when you think of wearing that bright colored summer dress, the clouds take over making you want to put on a boring black shirt. Well, it seems to be over now..all bright and sunny..and yeah, HOT! I've been drinking water by the gallons and it just doesn't seem to do enough in this heat. For a hot day like this, there's nothing better than a glass of chilled iced-tea!

Making a pitcher of iced-tea at the start of summer has been a ritual for me for the past 3-4 years. My GF in Utah and I would get all excited about our girly summer meals of berry salads and home-made iced teas. We would put on our cute summer dresses, set up a table on the patio and talk about all nice things in the world that suddenly made appearance after a dreadful winter.

Not a cute dress today..and just some leftovers for lunch, but this iced-tea was enough to keep me and hubby happy. With layers of flavors and everything your body craves in this weather, it's a perfect summer drink!

Heaven in a glass!
I drink my iced-tea without the ice :D
Ginger-Orange Iced Tea

Ingredients:
4 Cups water
3 Teaspoons sugar - or however sweet you like it
2 Teaspoons black tea or 4 Teabags
1 Inch ginger
1 Orange
4-5 Mint leaves
Ice
  • Heat water, add sugar and thinly sliced/grated ginger to it. Turn the heat off at the brink of boiling.
  • Drop the teabags or a cloth pouch with tea leaves in the water once it gets luke-warm. I don't like my tea bitter so I let the tea flavor seep in luke-warm water for 10-15 mins until it cools off. Keeps it light.
  • Once the tea is completely cooled off, add mint leaves (crushed for more flavor), juice from half an orange and some orange slices. I had dried some mint leaves last week which I used in this tea. They added the same refreshing taste without the bold green color. Adding orange juice to hot water can turn it bitter sometimes so wait till the tea is cold.
  • Add some ice and keep refrigerated. Strain some tea and enjoy with a slice of orange whenever you please! 
Each sip of this tea will give three distinct yet harmonious flavors - first the ginger, then hits the citrusy orange and then palate cleansing mint. The combination of the three leaves a fresh floral taste in your mouth. Ahhh...I can take all the heat if I have a glass of this every day!

LinkWithin

Related Posts Plugin for WordPress, Blogger...