Tuesday, April 30, 2013

Home Style Paneer Tikka Masala

Last few days have been full of frenzy. Husband sprained his ankle while playing tennis and isn't allowed to move his leg for a few weeks. It's been crazy running a one man show. While he spent most of the week sitting in one place under a 'house arrest' (in his words), I've been managing all the 'man' activities on top of my regular chores. Hubs feels guilty making me run around to get things done, but I'm mostly worried about his recovery. He is bored out of mind sitting around not doing anything. And I realize how many things I don't have to worry about when he's taking care of them. I thought a nice meal would add some excitement to his boring schedule. Our new patio furniture was delivered just in time for this lovely meal. Hubby quite enjoyed eating out in the yard, admiring all the plants I've been taking care of in his absence :). 


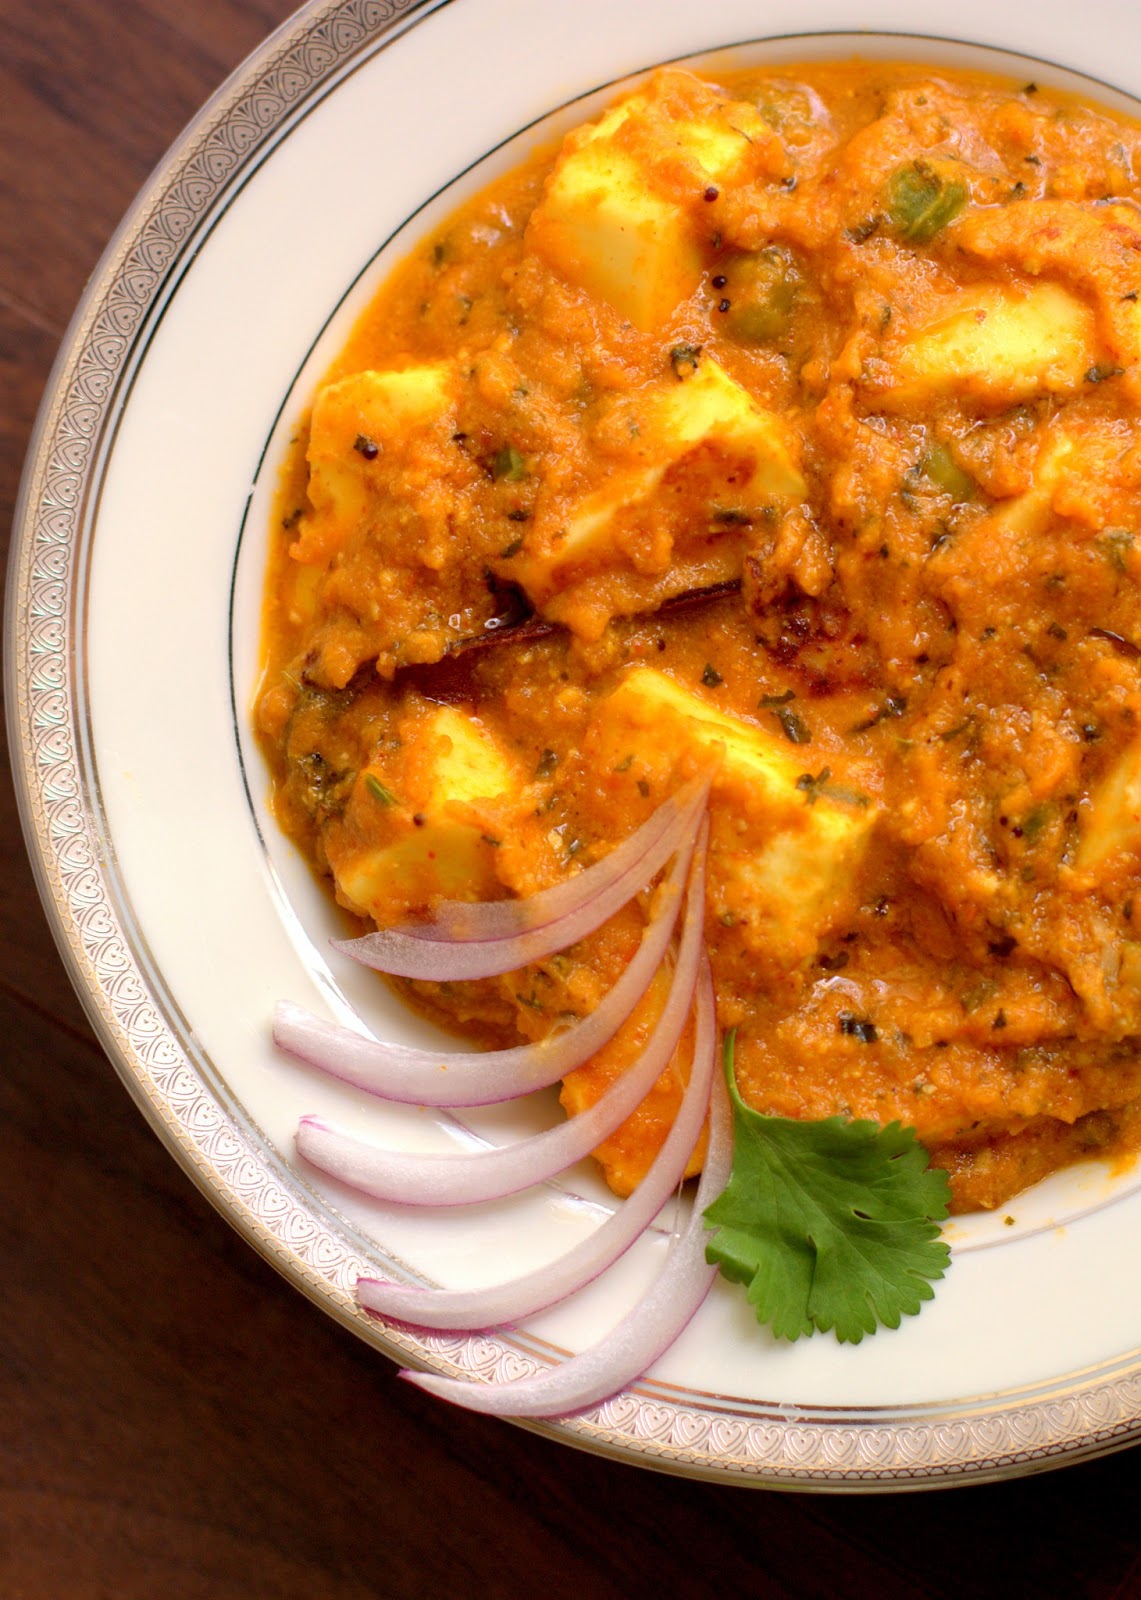
I made a nice paneer gravy for hubs - my usual choice for a 'special' meal. While most tomato-based paneer gravies taste similar, I chose to make Paneer Tikka Masala this time. Paneer Tikka, which is grilled paneer marinated in yogurt and spices, is loved widely. This dish turns the dry grilled paneer dish into a gravy. The curry base is pretty generic, but grilled paneer adds a more robust flavor. My favorite part of the gravy is karusi methi (dried fenugreek leaves) which adds plenty of fragrance and slight bitterness that balances all the tang really well. My version didn't turn that deep red color you see at the restaurants. There is nothing fancy about it - restaurants use food color which I don't care for much. We ate the Paneer Tikka Masala with parathas. I turned the leftovers into a pizza - a great way to use up all that goodness. 


Paneer Tikka Masala

Marinade:
8oz. Paneer - cut into ~ 3/4' cubes
1/2 Cup yogurt
1 Teaspoon cumin-coriander powder
1 Teaspoon red chili powder
1/2 Teaspoon chaat masala/aamchur
1 Teaspoon ginger-garlic paste
Salt to taste

Gravy:
2 Large tomatoes (or 1/4 cup tomato paste)
1/2 Small onion
2 Teaspoons ginger-garlic paste
1 Tablespoons  kasuri methi (dried fenugreek leaves)
1/4 Cup green peas (alternatively, you can add chopped green bell peppers)
1/2 Teaspoon (or to taste) garam masala
Red chili powder to taste
1 Teaspoon sugar
Salt to taste
Cream/butter - optional
Water as needed

Tempering:
1 Tablespoon oil
1/2 Teaspoon cumin seeds
1 Large bay leaf
1 Inch stick of cinnamon
1 Star anise
1/4 Teaspoon turmeric powder
Pinch of asafoetida

  • Whisk together all the ingredients for the marinade and marinate paneer cubes for ~30 mins.
  • Puree onions and tomatoes while paneer marinates. If you don't want to puree onions, chop them finely.
  • Once paneer is marinated, heat a shallow pan and drizzle some oil. Remove excess marinade from the paneer cubes and shallow fry them (keep the extra yogurt). Turn the paneer so all the sides turn golden brown. If you have a small grill or a griddle pan, you can grill the paneer cubes for a nice charred flavor. Keep the paneer aside. 
  • Heat a tablespoon of oil in a kadhai and add cumin seeds. Once they splutter, add bay leaf, cinnamon and star anise. Let the spices get fragrant. 
  • Add asafoetida, turmeric, and ginger-garlic paste and fry for a few seconds. 
  • Add tomato-onion puree, garam masala, red chili powder (I suggest adding very little at the beginning since paneer also has some), and sugar to the tempering. Sugar will balance the tang of tomatoes. Roast this paste on medium for a good 5-7 minutes, stirring constantly. 
  • Stir in the leftover yogurt marinade, kasuri methi, peas or green bell pepper, and paneer cubes, and cook for another 2-3 minutes. The yogurt will add creaminess.
  • You can add more spices and salt if you like at this point. Add some water to the gravy to get the desired consistency. 
  • Stir in a splash of cream or a pat of butter to round up all the flavors nicely. Turn the heat low and let it simmer for 2-3 minutes. 
Paneer tikka masala goes well with hot naan. Some lemon juice sprinkled on top and sliced raw onion on the side taste great. 

Submitting this recipe to Know Your Dairy - Paneer event hosted by Motions and Emotions for Jagruti's Know Your series.


Thursday, April 25, 2013

Sweet And Spice, And Everything Nice

Are you one of those who love the combination of sweet and spicy? Like jam with jalapeno or chocolate with cayenne pepper? I am certainly a fan of these contrasting flavors in one dish; but if someone asked me to try Kadhi made with sweet, ripe mango pulp, I would've made a weird face. That's exactly what I did when I was introduced to this Gujarati specialty. I was visiting my friend Amishi's Grandma in India on one of our coinciding trips. Amishi and I have been very close friends through high school all the way to grad school. We've had a lot of culinary adventures together in our dorm kitchens. So I trust her when it comes to food. Nevertheless, when she told me that Aamras Kadhi (Mango puree Kadhi) was on the menu at her Grandma's place, I couldn't hide a big question mark on my face. This kadhi totally surprised me though (in a positive way) and expanded the list of everything I love sweet n spicy. I've held onto Aamras Kadhi recipe for a while. Now that Alphonso puree is available in the Indian grocery store, I decided to have a go at it.


Aamras kadhi resonates all of the wonderful flavors of besan kadhi - slight tang from yogurt, fragrance of ghee tadka and curry leaves, earthy bite of cumin, and heat from green chilies. The addition of ripe mango puree adds a whole new dimension to this already wonderful combination. Surprisingly, It doesn't get overpoweringly sweet. The savory ingredients create a perfect balance leaving pleasant layers of flavors on your tongue. If you like sweet 'n' spice, this is a must try.  Aamras kadhi makes for a very refreshing drink  - perfect for the summer days when this mighty fruit is available. It tastes great hot or cold.


Aamras Kadhi (Mango Puree Kadhi)

Ingredients:
3/4 Cup mango puree - I used sweetened canned puree.
2 Tablespoons yogurt
A couple of pinches asafoetida
1/4 Teaspoon turmeric powder
1 Teaspoon cumin seeds
1/4 Teaspoon fenugreek seeds - Optional
2 Small Thai chilies/ 1 serrano chili  - chopped
1 Spring curry leaves
2 Teaspoons ghee/clarified butter
Salt to taste
Water as needed

  • Mix mango puree and yogurt together. 
  • Heat ghee in a kadhai. Add cumin seeds and curry leaves. 
  • Add asafoetida, turmeric and green chilies once the cumin seeds splutter. Saute for a few seconds until the tempering is fragrant. 
  • Add the mango-yogurt mixture to this tempering and season with salt. Add water to achieve desired consistency. 
  • Bring the kadhi to a boil then lower the heat to simmer for 2-3 minutes. 

The kadhi can be eaten with roti or puri. I like to drink it by itself. The perfect finish to a meal.


Wednesday, April 10, 2013

Banana Blossom

When I made Kelphul (Banana Blossom) bhaji couple of weeks back, I thought of my grandpa - or Dada as we lovingly called him - sitting inconspicuously in a corner of the kitchen, laboring over freshly picked banana blossoms from the garden. While most men in his time didn't even enter the kitchen, Dada helped with cleaning veggies, chopping them, separating stones from the grains and anything else mom or grandma needed help with. He was the designated person for the more challenging tasks of carrying heavy containers of grains to the mill, breaking and grating coconut, straining kilos and kilos of Shrikhand through food mill for aaji's home run business and such.

Although Dada was industrious even otherwise, he probably didn't mind working in the kitchen because he was a true foodie at heart. I was left aghast when I caught him gorging on mutton at his friend's once. Yes, he was married to a who woman considered even saying the word 'meat' blasphemy! Dada winked at me and said, "Don't go home announcing it to everyone", and continued feasting. But mostly, he preferred down home, rustic, wholesome foods. Some bhakri, pithala and thecha satisfied him just the same. My grandma still gets teary eyed remembering how Dada loved my cooking, especially the Bharali Wangi I had made for him when I was 14. All the years that I remember spending with him, he didn't complain once about what was cooked in the house - it must have come from the hardships he faced as a kid having to earn for his own meals. And maybe that's why he was used to working hard, always keeping himself busy with something or the other even after retirement. The house where I grew up the first 10 years of my life, the house that Dada built himself, had a beautiful garden with lots of fruit trees. He loved spending time in the garden, working like a pro on the coconut, chikoo and babana trees. When the banana trees were laden with beautiful purple blossoms, he would take them down, clean the sap, remove the flowers and ask grandma to make bhaji. It was his style of letting her know what he wanted to eat. Never demanded anything verbally. Every time I make something that he loved, like this bhaji, I miss him dearly!

Kelphul is the large vibrant colored blossom of banana plant. Each blossom contains lots of flowers. When it's fresh, the flowers are a tender pink color with yellow tips. I have never been able to find fresh kelphul here. The flowers are always black and unappetizing looking. However, I gave up looking for good kelphul and decided to make do with whatever is available. The taste and texture didn't disappoint me. The flowers don't have a very strong flavor. The core, or the heart, of kelphul is much like artichoke heart - soft and supple. If you don't have access to fresh banana blossoms, you can buy canned hearts available widely in any grocery store. Kelphul bhaji is made with some sort of beans to provide some substance. Kala vatana, which I haven't found in any grocery store yet, is my favorite option. I decided to go with vaal daal in its absence. Turned out really well.


Kelphul Bhaji (Banana Blossom Bhaji)

For tempering:
2 Teaspoons vegetable oil
1/4 Teaspoon mustard seeds
1/4 Teaspoon cumin seeds
1/4 Teaspoon turmeric powder
A pinch of asafoetida
1 Spring curry leaves
1 Teaspoon red chili powder (adjust per liking)
3/4 Teaspoon Goda Masala (adjust per liking)

Bhaji:
1 Banana blossom
3/4 Cup vaal daal (split cutlass beans) or kala vatana soaked for a few hours
1/4 Cup loosely packed grated coconut
1 Small piece of jaggery (~1 inch square)
1 Teaspoon tamarind pulp
Salt to taste


How to clean banana blossom:
  • To begin with, have a bowl of water mixed with juice from one lemon on the side. If the blossom is very fresh, there'll be a lot of sap that can stain your fingers. You can wear thin gloves or simply dip your fingers in a little oil or lemon juice while working with it. Remove the red/purple layer. You will find a bunch of banana shaped flowers inside each one. Remove these flowers from each layer - the closer you get to the heart, the smaller and more tender the flowers will get. The heart of the blossom can not be pealed any longer and is tender and white. You will only use the flowers and the heart. 
  • Soak these flowers in lemon juice-water. Alternatively, you can add tamarind pulp or sour buttermilk. The acid will stop them from turning black (too bad, the blossom I bought was already black) and remove stickiness of the sap. Keep the flowers soaked for 3-4 hours. 
  • Each flower has one large petal like cover which is closed. Once you open this cover, you'll see multiple stamens with one matchstick like stigma. There's a waxy, translucent small protective cover at the base of the stamens, right by the stem. The only edible parts of the flower are the soft stamens excluding stigma and the large outer cover if it's tender. The stigma and the protective 'petal' need to be removed from each flower. For the outer layer flowers, you may have to remove the large petals also if they are too hard and stringy. 
Making the bhaji
  • Once you have gone through the laborious part of separating the edibles from the non-edibles, chop the flowers roughly and the heart finely. Boil these in water for approximately 10 minutes. It'll cook the blossom and take away some more of that sap. Once cooked, discard all the water. 
  • On the side, cook the vaal daal until soft. Don't let the daal overcook and break else the bhaji will be mushy. 
  • Heat oil in a kadhai and add the mustard seeds and cumin seeds. Once they splutter, add turmeric powder, asafoetida, and curry leaves to the tempering. 
  • Once the tempering is fragrant, add rest of the ingredients to the kadhai - vaal daal, the spices, cooked banana blossom, jaggery, tamarind, and grated coconut and mix well. 
  • Season with salt to taste, mix well, and let it cook on medium heat for 5 minutes or so.

This bhaji goes well with roti or bhakari. 


Friday, April 5, 2013

Garden Tips

When I did a post on what I'm growing in my garden this year, Priyanka requested me to share some of my gardening experiences and tips. I should declare first thing that I am no expert and have only been gardening the past 4-5 years. There's a steep learning curve and the first couple of years go in knowing the Dos and Don'ts of it. Gardening is much like cooking - It requires paying attention to the technical details and a whole lot of TLC. If patience is a virtue, gardening will test your limits of it. But the joy of seeing a life grow in front of your eyes is extremely satisfying. And having very fresh, organically grown veggies and herbs in your plate is definitely priceless!

Before you being to plan your garden, ask yourself a few questions:
What kind of space do you have for gardening?
What is the average temperature in your area?
How much sunlight do you get during the day?

If you have a large garden, you can be more adventurous and try planting different plants. When working in a smaller area like a balcony or windowsills, you need to be more selective in what you can plant. Sunlight is very important for healthy growth of plants. For most parts of the world, it is not an issue during the summer, especially in outdoor gardens. If you plan on planting in the balcony/windows, south facing areas are ideal. If there's not enough sunlight, go for plants that thrive in partial light or shade. Maintaining controlled temperature and moisture environments is also important, especially in early spring when the weather changes frequently. Do your research based on these factors and then let the gardening begin.

Pick your plants: If you are a new gardener, pick plants that are easy to grow and yield produce soon after planting. Quick reward for your efforts is never bad, and it keeps you interested through the process. I find tomatoes very easy to grow. They are hardy, give lots of fruit, and get used in almost all cuisines. Some other plants I've had success with are zucchini, eggplants, greens such as spinach, Swiss chard and mustard greens, easy to grow herbs like basil, sage, thyme, chives, and oregano. All of these plants do well in containers, so you can start planting in small spaces as well. Chilies are among the plants that do not grow easily. So you may want to skip them until you learn the tricks of the trade. 

Know your plants: All the seed packets you get in the stores have detailed instructions on what each plant requires. Read them carefully and note them down somewhere so you don't forget. A great way to keep track of your plants is to make a chart with the date of planting and the temperature, sunlight and moisture requirements. This way, you can refer to the chart when in doubt. If I buy plants instead of seeds from nurseries, I ask one of the friendly helpers how best to take care of those plants. For everything else, there's internet!

Start seeds in seed starter: You can begin planting at the start of spring. To help germinate the seeds well, start them in seed-starters. I get wide trays of peat pellets from the Home Depot. The pellets multiply in size after soaking up water. Sow seeds 1/2-1/4 inch deep into the pellets and keep the pellets moist in a warm area, preferably in a south facing window. Cover the pellet tray with plastic wrap so it creates a controlled environment with the right moisture and temperature level. Let the plants grow in seed starters until they are a few inches tall before you transfer them to the ground/big containers. If you sow a lot of seeds in one pellet, thin out some of the plants keeping the healthiest. The best thing about these pellets is that, they can be transferred directly to your final potting area without disturbing the plant roots. 

Give them sunshine: Once the seeds germinate and grow into 2-3 inches plants, the leaves will start reaching out to the sun. Keep rotating the pellet trays so that your plants don't bend in one direction only and all the sides get equal sunlight. Don't rush to transfer the plants outside until the temperatures stabilize. If the day time temperatures are above 60 degrees, you can keep the plants outside during the day and bring them back at night if it's still too cold. It's safe to transfer the plants outside when the nighttime temperatures reach high 50's or above.

Plants like comfortable homes too: If you plan to keep your plants in pots, make sure the pots are big enough for the plants to thrive. Vegetables that have roots reaching deep in the soil should be planted in large pots with drain holes at the bottom. Herbs on the other hand do well in smaller pots that fit on windowsills as well. Make sure you use good quality potting soil which can be bought in any gardening store at a very decent price. Adding some perlite to the soil mix helps keep it aerated and avoid clumping/compacting. A layer of mulch is great in controlling weed. If planting in the ground, aerate the soil by tilling. The soil should be kept moist, but well drained. Over watering can rot the roots. Many of the potting soil brands have some fertilizers in them. But you can buy fruits & vegetable fertilizers for better growth. There are many organic brands available. Cow manure is great to mix in the soil.

Keep the bugs away: One of the biggest threats to your plants is bugs - pests & fungus. I have always had a hard time keeping my plants away from pests. They almost always show up and are quite persistent. You should always be watchful and tackle pests at the first sign of appearance. For some lazy bugs like aphids (that don't move around much), just a little forceful spray of water is effective in getting rid of them. You can try some home remedies like sprinkling soap water (hand soap diluted in lots of water), salt water, or red chili powder water over your plants. I've noticed that worms hate salt poured on them! Sometimes, you do have to use pesticides though. If you want to stay away from toxic pesticides, there are many organic, environmentally safe brands available these days. There are sprays or small pellets for bugs and slugs etc. One of the other very safe ways is to introduce good bugs to your garden. Husband let out a containerful of ladybugs in the garden recently so they would feast on pests. I have also learned that planting fragrant flowers and herbs, which attract the good bugs, next to your veggies also helps in pest control.

TLC: Last but not the least, plants need lots of love and care. Visit your plants at least once a day. Make sure they are in good condition and tend to their needs. Maybe a browning leaf needs to be trimmed or the soil in one of the pots has dried out. Your plants will thrive when you pay attention to them.

Hope this post helps those looking to plant something this year and encourages others to do so. There is a wealth of information available in gardening books/magazines or even online. Do take advantage of them. Happy gardening! 

Wednesday, April 3, 2013

Not Exactly Mango Pickle

I just returned from a blissful, week-long vacation at my sister's in NY. When we get together, it is madness. No matter how often (twice a day to be specific) we talk to each other, we never seem to run out of topics to discuss. The most important of them all being food! Even during my rushed visit, we roamed around the 24 hour Indian grocery store oohing and aahing over our favorite produce, and came back with Kelphul (banana blossom) and Ambe-Halad (mango ginnger) among other things. My sister wanted to pick the most unique ingredients available to have fun cooking together. We made our favorite lip-smackingly good spicy-tangy-salty piquant pickle with mango ginger. I'll post the more elaborate kelphul recipe later.


Mango ginger, which has nothing to do with either mango or ginger, is fresh turmeric root. It gets its name for the resemblance to the ginger root and an unmistakable mango blossom aroma. It's called Ambe Halad (Mango Turmeric) in Marathi, also for that sweet and sour fragrance and gorgeous deep mango color.  Another variety of turmeric is quite similar to ginger in color (I have some white turmeric pickle made a couple of months ago sitting in my fridge already). While fresh turmeric can fill up your house with its fragrance, the taste is quite delicate. In fact, it doesn't taste much like anything when you bite into it. But a simple, almost instant pickle made with it can pack quite a punch. The pickle uses two ingredients only as preservatives - lime/lemon juice and salt. Some green chilies are added for heat and flavor. Once the flavors penetrate the turmeric, you get this irresistible pickle that makes you wince at first and go "mmm" after when you take a bite - much like how you would react to a sour patch! Mom/grandma used to make a big jarful of Ambe Halad pickle at the start of summer. It was important to have abundant sunlight for the pickle to marinate. My grandpa did the peeling of turmeric carefully, which bled that dark orange color all over. As long as you don't get that color on your clothes, it's totally worth having orange fingertips for a couple of days - just to remind you of all the yumminess you'll eat with your meals :D.


Ambe Halad - Mirchi Lonache (Mango Ginger & Chili Pickle)

Ingredients:
2 Cups chopped ambe-halad
3/4 Cup (or more) chopped green chilies (Thai or Serrano)
8-10 Lemons/limes
Salt to taste

  • Peel the skin of ambe halad and chop into ~1/8 inch discs. If you are worried about the color, wear thin serving gloves. Chop green chilies into 1/4 inch thickness.
  • Put the chopped chilies & turmeric in an air-tight jar/bottle. Add enough lemon/lime juice to them so they are completely submerged.
  • Add lots of salt to it - a big fistful or more. The salt will act as a preservative, so it's important to add enough. The pickle should be salty when freshly made.
  • Close the jar/bottle tightly and keep it in the sunlight for two days. This helps the marination process and penetrate flavors. 
Optional:
While I make my pickle using the method above, you can add a simple tempering to it for some more flavor. Heat a tablespoon of oil and add 1 teaspoon mustard seeds. Once they splutter, add a little less than 1/2 teaspoon asafoetida and mix into the pickle. The strong flavor of asafoetida is wonderful in the pickle. 

The pickle is ready to be eaten or stored it in the fridge to enjoy later. It lasts for months and tastes better by the day. The green chilies mellow down because of the acidity and salt. Even I can eat the chilies by themselves (and everyone knows I can't eat spicy).

Btw - you can make this pickle with green chilies only or with other firm veggies/fruits like carrots, radish, green mangoes etc.

Submitting this recipe to the Celebrate Summer event hosted by Nivedhanam.


LinkWithin

Related Posts Plugin for WordPress, Blogger...