Saturday, October 27, 2012

Eggplant Bhajja

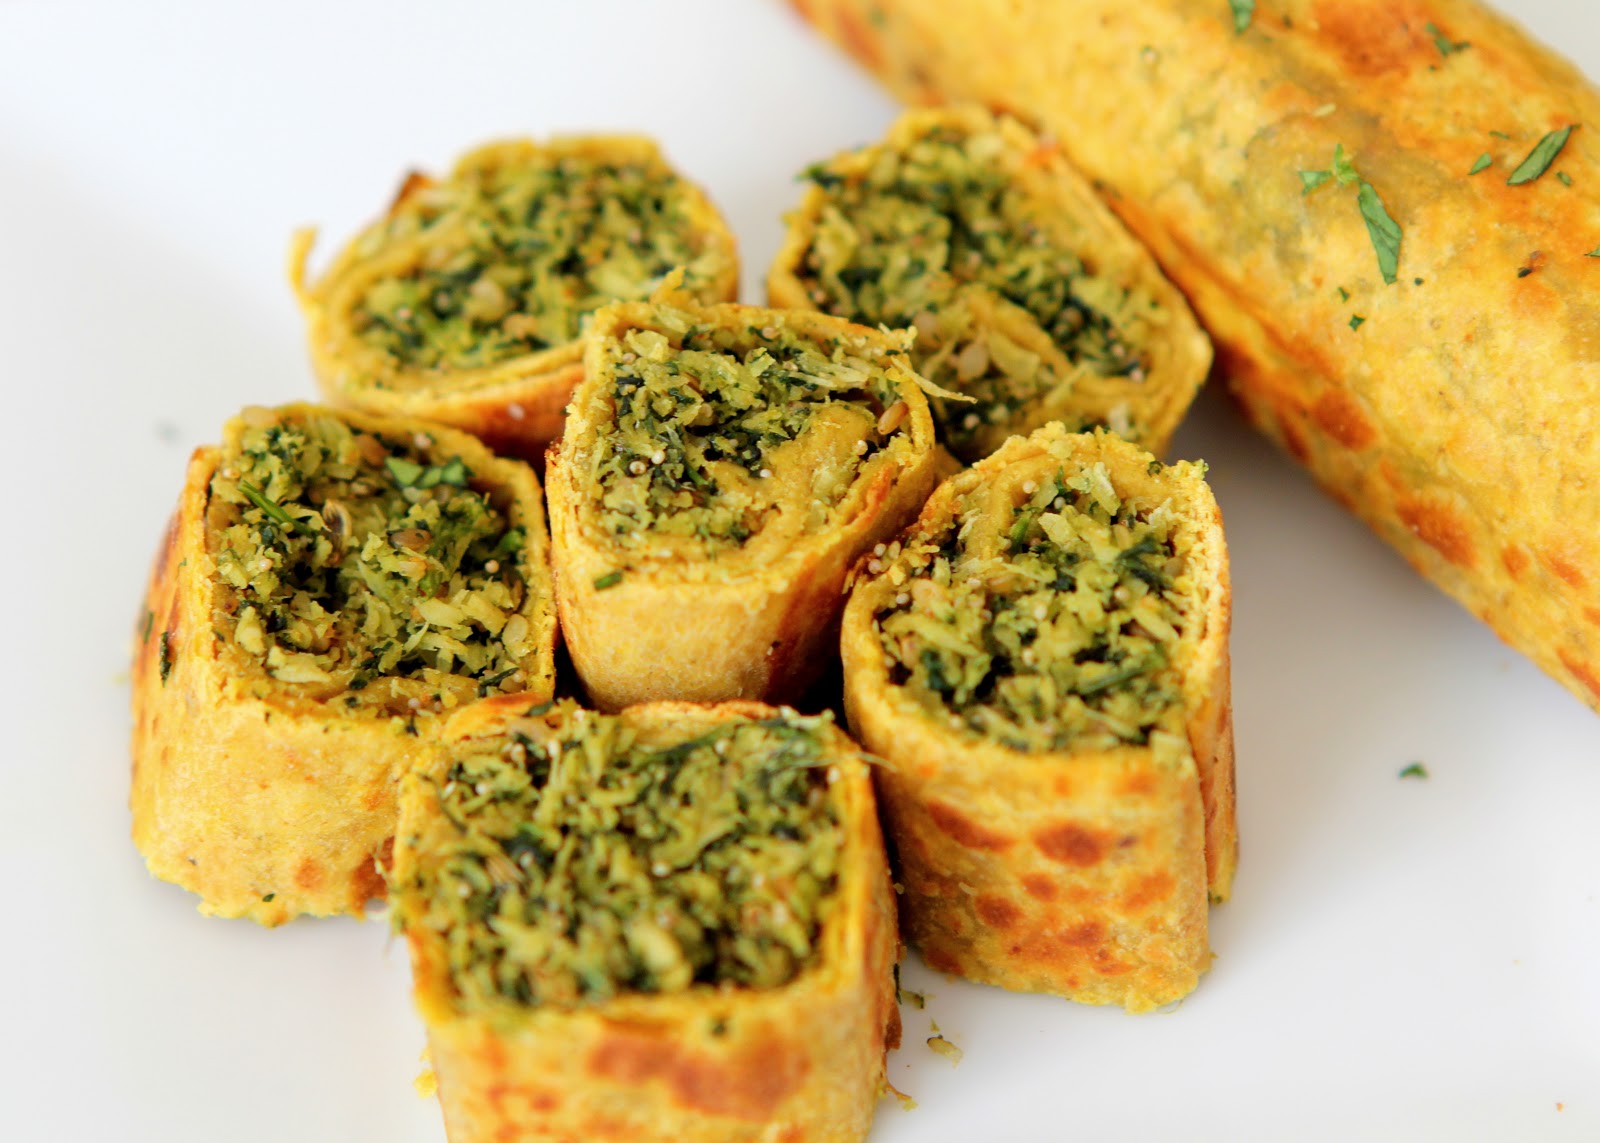
The latest choice of weekend activity among our friends has been gathering at someone's house and cooking together. Oh, the joy of communal cooking and sharing meals! It's so much better than going out - the food is fresh and much healthier (not to mention, cheaper!), we get to learn each other's culinary skills, cooking doesn't feel like a chore when you want to relax, and most importantly, it gives us opportunity to have conversations and spend more quality time with each other. 

 
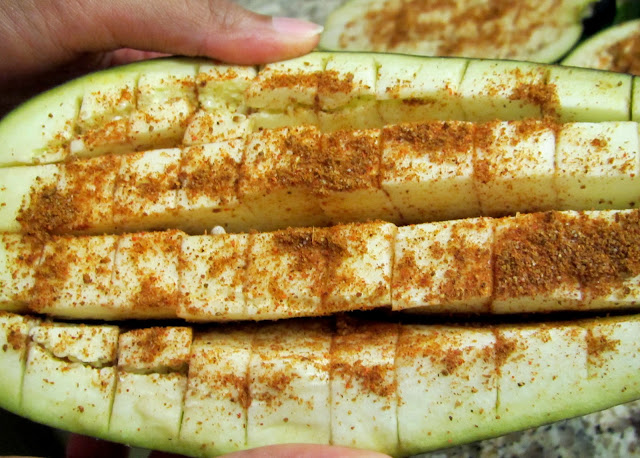
Some interesting recipes always come out of our cooking rituals. Last night when we had gathered at our place, my friend Deepti taught me what I can claim as the yummiest eggplant dish I've had. A very unique and ridiculously easy recipe that'll make the pickiest eater love eggplants! It wasn't hard for me to fall in love since I like eggplants in any form, but my other friends who don't care for them couldn't stop eating it either. This was Deepti's grandma's recipe who had learned it from her Sindhi neighbors. Her grandma made it for them as an after-school snack. The preparation is very simple - cut aubergine eggplants in the center and make grid-like slits, sprinkle some masala on top and roast for a few minutes. Done.You just scoop out the center with a spoon and enjoy the crusty-spicy eggplant that is extremely delicate and juicy inside. Amazing how something as simple as that can turn an ordinary eggplant into a gourmet dish. 

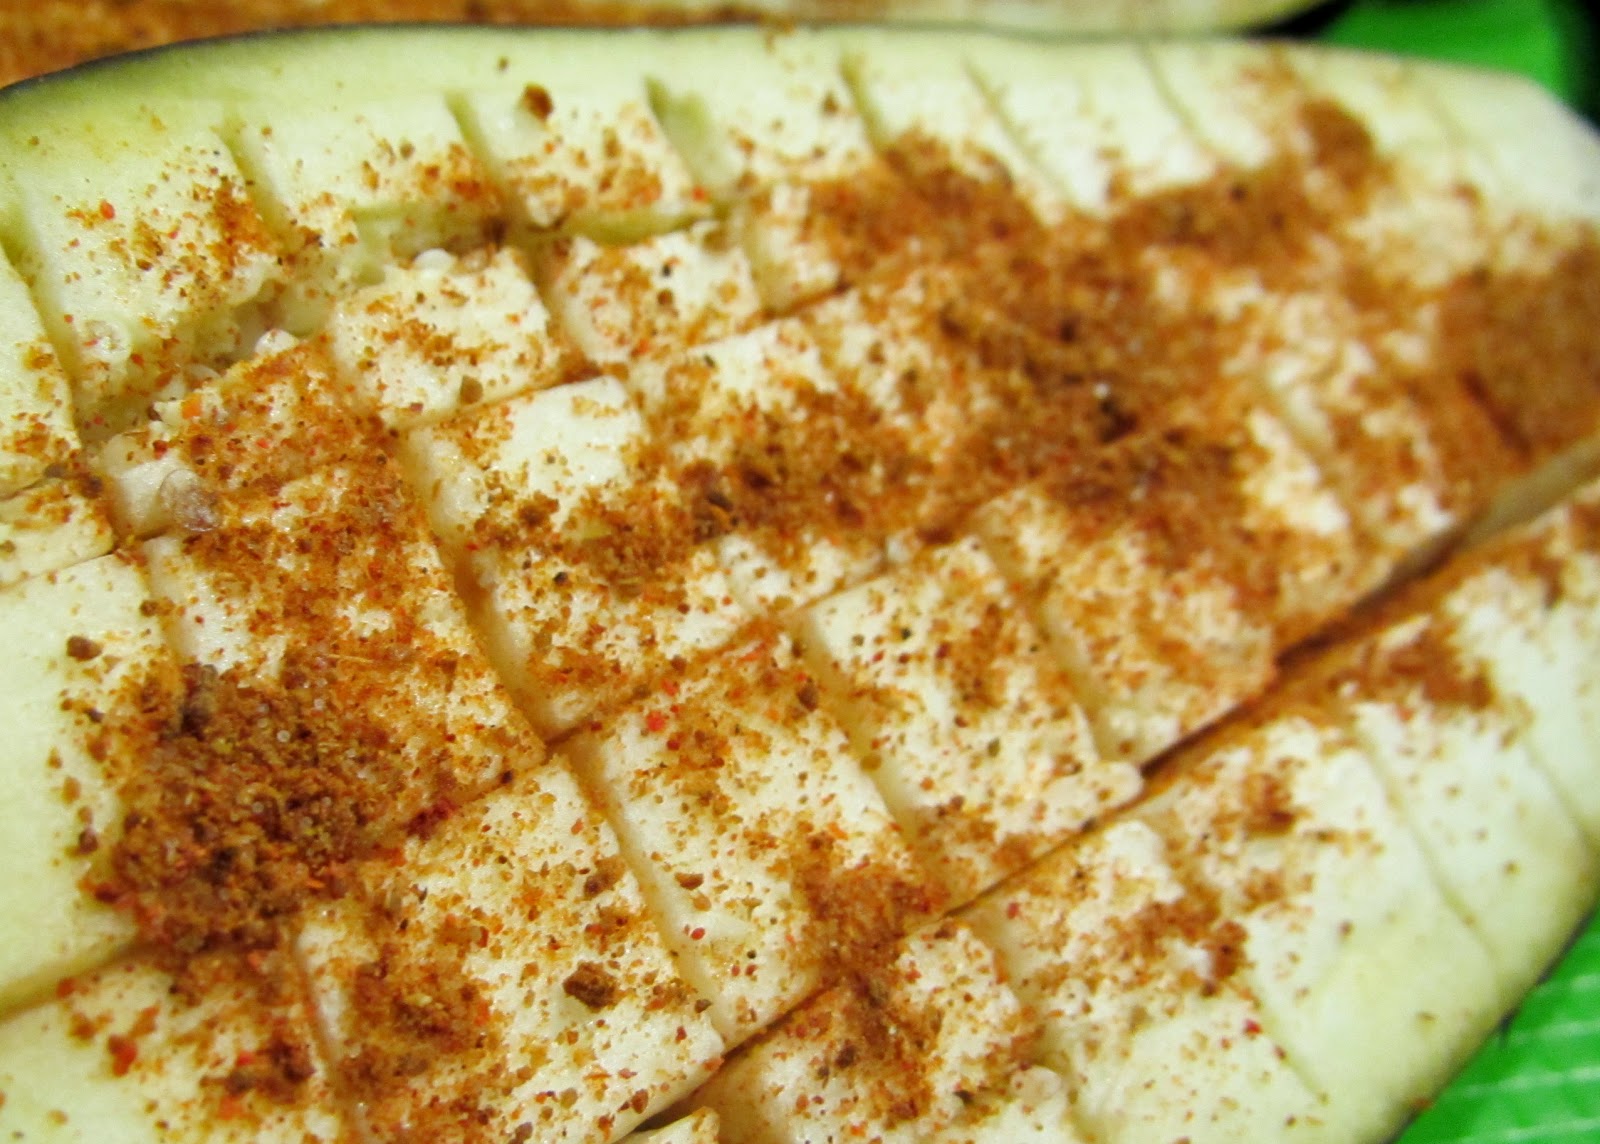
If only you could taste this through the screen - don't be fooled by the color.

Eggplant Bhajja

Ingredients:
4 Aubergine eggplants
1 1/2 Teaspoons cumin-coriander powder
1 1/2 Teaspoons garam masala/goda masala
3/4-1 Teaspoon red chili powder (depending on how spicy you want it)
Salt to taste
Oil as needed. 

  • Cut eggplants in the center lengthwise. Make vertical and horizontal grid-like slits as shown in the picture below. This way, the spice mix you sprinkle will get all the way through. 
  • Combine the spices and salt and sprinkle over the eggplants and in between the slits. You can adjust the level of spices according to your liking. My friend uses garam masala for this recipe but I prefer goda masala for the slight sweetness coconut adds. 
  • Microwave the eggplants keeping face up for 2-3 minutes. This speeds up the cooking process. The eggplants should feel soft to touch. The cooking time may vary depending on the eggplants size. 
  • Heat a pan on medium-high, drizzle a little bit of oil (very little - you are not shallow frying them) and keep the eggplants face down (the side of spices touching the pan). Cover the pan and let the eggplants roast for 2-3 minutes. Once they are slightly charred on that side, turn them, cover and cook for a couple of minutes more. 
Serve while hot. It can be eaten as an appetizer or just a side dish. Just take a spoon and dig in!

Friday, October 26, 2012

Chana With A South Indian Twist

We always associate Chana/Chickpeas with the North Indian style preparation of chhole/chana masala. Chhole can be quite luxurious and sinful - especially served with fried bhature. Not that I don't love chhole, but it's a dish for rare occasions in my house. The other day, I tasted chana prepared in a very different manner using the South Indian essentials - curry leaves and coconut! This dish was served at the temple as prasad on one of the Navratri days. Being offered as naivedyam it had to be satvik and devoid of onoin-garlic. Give me anything infused with aromatic curry leaves and I'm instantly in love. The change of taste and the use of minimal ingredients were quite welcoming. Hubs and I couldn't stop praising the preparation. I wish I could thank and ask for the recipe to whoever brought the prasad. But it was a no brainer given the few and distinct ingredients. I wasted no time in recreating the dish in my kitchen. For the lack of a better title, I'll call this Jhatpat Chana for the ease of making it compared to Chhole! 


Jhatpat Chana

Ingredients:
1 1/2 Cups soaked Chana (chickpeas)
1-2 Teaspoons Ghee
2 Green chilies - chopped
1/2 Teaspoon cumin seeds
1/4 Teaspoon mustard seeds
Couple of pinches asafoetida
2 Springs curry leaves
1 Tablespoon grated coconut
1 Teaspoon tamarind  pulp/1 Tablespoon grated green mango
Salt to taste
Water as needed

  • Heat ghee in a kadhai, add cumin and mustard seeds and let them splutter.
  • Add asafoetida, green chilies and curry leaves. Fry for 30-40 secs.
  • Add chickpeas. Make sure the chickpeas are soaked for at least 5-6 hours for easy cooking. You can use the canned pre-soaked ones also.
  • Sprinkle grated coconut, tamarind pulp/green mango and mix well. Put a lid on and let the chickpeas cook, adding minimal water and stirring occasionally. The chickpeas should cook thoroughly without getting mushy so there's a bite to them. 

Serve as a side dish with roti/rice or enjoy as a snack!

Wednesday, October 17, 2012

Pudachi Wadi

Hi everyone! Wish you all a very happy Navratri. Hope you have your garba shoes on and are dancing the nights away :). I have a fun snack recipe for you to munch on after all that dancing. 


I wanted to make something different this festival season. Not the typical sweets and faral - I'll be making plenty of that for diwali. My mom as always came to my rescue with this tasty snack recipe - Pudachi Wadi. Pudachi wadi is somewhere between Bakarwadi and Kothimbir wadi. It has a lot of common ingredients with kothimbir wadi and is shaped like bakarwadi. Can't go wrong with that. I guess the name comes from the way you shape these - rolling the roti into a pudi (a small packet). I was so excited about the recipe that I started going through my pantry for the ingredients before mom was done talking to me. 


This wadi has a savory coconut-cilantro filling with toasty sesame seeds and poppy seeds. For additional flavor and taste, I added some fennel seeds. The sweet bite they provide balances the spicy-savoriness perfectly. Besan in the covering makes it very crispy and light. The original recipe calls for frying but I went with shallow-pan frying using minimal oil. I don't think there was any compromise on taste. You should just make sure that the filling is roasted well since it won't cook as much while shallow frying as in deep frying. You can deep fry the rolls before cutting if you want the real thing. I didn't try baking them, but I think they'd turn out okay that way too. The recipe will make about 20-25 pieces after cutting.  


Pudachi Wadi

Ingredients:
Filling:
1 Tablespoon sesame seeds
1 Teaspoon poppy seeds
1 Teaspoon fennel seeds
2 Teaspoons oil
1 Teaspoon garlic paste
1 Teaspoon ginger paste
1 Green chili - finely chopped
1/2 Cup packed grated coconut
1 1/2 Cup loosely filled chopped cilantro
1 Teaspoon dhana-jeera powder
1 Teaspoon goda masala/garam masala
1/4 Teaspoon red chili powder for color (optional)
Salt to taste

Cover:
1/2 Cup whole wheat flour
1/4 Cup besan/chickpea flour
1/2 Teaspoon dhana-jeera powder
1/2 Teaspoon red chili powder
Salt to taste
Water as needed

  • First, knead the dough by combining all the ingredients for the cover. Add just enough water to form a stiff dough you can roll out. 
  • For the filling, roast the sesame and poppy seeds until slightly darker and aromatic and keep aside. 
  • Heat oil in a kadhai and add ginger, garlic, green chili and roast for about a minute. Then add rest of the ingredients except the cilantro and roast, stirring constantly. 
  • Add cilantro once the coconut is roasted well and let it all come together for another minute or so. 
  • I pulsed this filling through the grinder quickly just to mix everything well. But you don't have to do that. 

To make the wadi:

  • Divide the dough as well as the filling in 4 equal parts. 
  • Roll each dough ball into a roti - not too thick. Then fill the center with the filling. Fold the small sides in so the filling doesn't come out and roll the roti into a tight roll. 
  • Heat a pan and drizzle some oil. Pan-fry the wadi rolls turning on each side until the cover is crispy. 
  • Once completely cooled, cut the rolls into small pieces and serve with some tamarind chutney. 


Monday, October 15, 2012

Instant Idli

I have always loved having soft,fluffy idlis dunked in sambar and chutney. It must be all those Sundays spent as a kid eating a brunch of idlis while watching my favorite 'Potli Babaki Kahani' or some other show that makes it my favorite Sunday meal. But to be honest, I don't always have the patience to soak rice and urad daal, grind and ferment the batter in advance. As a quick and delicious alternative, I make rava idlis. Rava idlis, as the name suggests, are made completely out of rava. There's no soaking and fermenting for hours required; but you'll be surprised how pillowy soft these idlis turn out. Yogurt provides that slight tang you'd get from fermenting. The best part is, there's lots of flavor in the idlis themselves, so you can do with a quick chutney on the side. You can add all sorts of stuff the the batter - I usually go with peas and onion. Grated carrots go really well also - they add flavor as well as some color.
I made rava idlis for a potluck at my friend's yesterday. The picture was taken under very low light with my phone, hence the poor quality.

The recipe below makes enough idlis for 2 people.


Rava Idli

Ingredients:
2 Teaspoons oil
1 Tablespoon urad daal
1 Teaspoon grated ginger
2 Small green chilies - finely chopped
1/2 Small onion - finely chopped
1 Spring curry leaves - roughly chopped (add cilantro alternatively)
Handful of green peas
1 Cup rava/semolina
1 Cup yogurt
A pinch baking soda (optional)
Salt to taste
Water as needed.

  • Heat oil in a wok/kadhai and roast urad daal until golden brown.
  • Add ginger, chilies, curry leaves, peas and onion and saute for a few seconds.
  • Add rava and roast, stirring constantly, on medium heat  until the rava turns a darker hue and becomes fragrant (~10 mins). The key to good, soft idlis is roasting the rava well. Don't keep the heat too high as you don't want it to burn.
  • Take it off the heat and mix with yogurt. Add water little by little until you have a thick batter. Rava will soak up water and puff up. Add salt to taste and baking soda.
  • Let the batter rest for 45 mins to an hour.
  • Make idlis in an idli patra just like you would the regular idlis. 


Enjoy with your favorite chutney or sambar. 

Friday, October 12, 2012

Fall Flavors

On a recent trip up north to Pismo Beach, our hotel manager informed us about this lovely farm called Avila Valley Barn. I am so glad we shifted our other plans to visit this place! It wasn't just a farm - they had a market full of fresh produce and a petting zoo with cute farm animals. The market was teeming with the season's best - pumpkins of every size, color and shape imaginable. Although we had a whole day left to roam around, I couldn't help but pick up a few veggies and a gorgeous plump sugar pumpkin! After getting home, I simply roasted and pureed the pumpkin. This way I can use it for different recipes. Time for some fall cooking!

Pumpkins at Avila Valley Barn
Some warm, fluffy pancakes seemed like the perfect dish to start off the season. If I had to sum up fall flavors in one dish, I would make these pancakes - ultimately comforting pumpkin-spice pancakes with some chocolate chip goodness! I used 100% whole wheat flour and used no eggs. The pancakes turned out pillowy soft with the help of pumpkin puree and milk. The chocolate in the batter melted as the pancakes cooked and oozed out of each bite. Super delicious. These pancakes didn't even need much syrup to go with them. Just sprinkle some powdered sugar and let some butter melt on top. This is the kind of breakfast you should be eating on a fall weekend! 

Some powdered sugar on top!

Pumpkin Spice - Chocolate Pancakes

Ingredients:
1 Cup whole wheat flour
3/4 Cup pumpkin puree from sugar pumpkin
1 Cup milk
1/2 Teaspoon baking soda
1/4 Cup brown sugar (adjust depending on the sweetness of pumpkin puree)
2 Tablespoons melted butter
1/4 Teaspoon cinnamon powder
A hint of nutmeg powder
1 Oz good quality semi-sweet chocolate chips/chunks

Making pumpkin puree:
Preheat oven to 350F.
Cut the pumpkin in half and remove the strings and seeds (don't throw the seeds away - you can roast them for a healthy snack :).
Roast the pumpkin for about 45 mins or until the flesh is fork tender. You can brush the inside of pumpkin with some butter to lock in moisture and add flavor. I let it roast just as is.
Cool the pumpkin, scoop out the flesh (which should be really easy after roasting it) and puree in the food processor. You may need to add a little bit of water to help the processor, but don't make it too thin.

If you don't want to go through the trouble of making your own puree, simply use canned one. But trust me, the fresh puree tastes so much better :).

Making the pancakes:
Mix the dry ingredients - whole wheat flour, baking soda, sugar, chocolate chunks, cinnamon and nutmeg in a bowl.
Add the wet ingredients - pumpkin puree, milk and butter, and mix well.
Heat a pan on medium and pour a ladleful of the batter. Cook on each side for a couple of minutes or until each side turns a light brown.

Enjoy the pancakes with some powdered sugar, butter or maple syrup!


I'm submitting this recipe to B-O-O-O-O Halloween Event @ AnuzHealthyKitchen.


Monday, October 1, 2012

Chutneys and Condiments


Growing up, my house was always buzzing with guests and visitors. Like any other typical Indian family, we were used to unannounced guests dropping in for chai or staying over for dinner after mom or grandma insisted. I remember my dad inviting his friends over for dinner on many occasions with barely any warning. There was hardly any time to come up with a fancy menu. But the women of the house never worried or complained, for they were always armed with an abundant supply of condiments. All sorts of pickles, chutneys, papads and other mouthwatering stuff! Think about it, these condiments are served in the smallest quantity on a plate, and yet add the most pizzazz to a meal. The simplest potato sabji served with piquant mango pickle, some sweet lemon pickle on top of upma, green chutney spread on a sandwich, curry leaves chutney sprinkled on a roti, or an assortment of papads cumbled with warm khichadi - these condiments make up for any flavors your plate may be lacking.


When I want a quick and easy meal, I rely on fresh chutneys or metkut (Maharashtrian style poodi chutney) to spruce up some rice and yogurt. Utterly satisfying and comforting. I made a big batch of green/raw mango chutney yesterday (the only upside to not getting alphonso is having access to Mexican mangoes most of the year). Green mango chutney is quite unique as it is complete with all the basic tastes our taste buds recognize - sourness, saltiness, sweetness, bitterness and - for all the Indianness in me - spiciness! It's one of the easiest condiments to make and boy, does it pack flavor! My mom used to add a little bit of grated onion to make this chutney extra strong, but you can't store it for long since onion starts smelling right away. Without it, the chutney lasts for 2 weeks or more. I love this chutney with roti, rice or even bread. It'll surely tickle your taste buds.


Green Mango Chutney/ Kairichi Chutney

Ingredients:
2 Green Mangoes
1 Tablespoon grated jaggery
1 Teaspoon red chili powder
1 Teaspoon mustard seeds
1/2 Teaspoon fenugreek/methi seeds powder
1/2 Teaspoon asafoetida powder
1 Tablespoon oil
Salt to taste

  • Pick firm, raw mangoes for this chutney. Peel and grate mangoes. 
  • Add jaggery and red chili powder. The exact amount of jaggery and chili powder will depend on the sourness of the mango and your preference. So make adjustments as needed. 
  • Heat oil in a kadhai, add mustard seeds and let them splutter. 
  • Turn off the heat, add asafoetida and fenugreek seeds powder (so they don't burn) and add this tempering to the grated mangoes. You want asafoetida to impart its strong pungent fragrance. 
  • Add salt to taste, mix well and let the chutney sit for about an hour so all the flavors penetrate the mango. 

There - complete with all the flavors, this chatpati chutney will make any meal special!

LinkWithin

Related Posts Plugin for WordPress, Blogger...