Wednesday, November 30, 2011

My Continued Thanksgiving

Hello everyone! Hope you all had a fantastic Thanksgiving with your near and dear ones, and had a big indulgent meal. A few of our friends gathered at our place for a pot-luck dinner. The celebration continued for me till today with yet another pot-luck at work. Thanksgiving gives us the opportunity to reflect on life and count the many ways we are blessed. I had much to be thankful for this year as we celebrated one wonderful year of marriage last week! God has blessed me with a loving, caring husband who has changed my life for the better. And how can I not thank Him for making me a part of two beautiful families, friends I can count on, a job I can depend on, and the beautiful city of San Diego I call my home now.

We didn't cook Turkey, but it was at the dinner table nonetheless =D
A few of us friends gathered for a rather non-traditional Thanksgiving dinner this year. Everyone decided to bring their favorite dish (or anything they could make, pretty much :D). Since most of our friends are fishatarians, hubby went on to prepare his favorite shrimp and pardon a turkey! Don't underestimate the shrimp on Thanksgiving though, it definitely became the start of the show.


We started off with a kick-ass guacamole our friend NK prepared right in front of us. I made my favorite stuffed mushrooms with garlic, onion and more mushrooms. Another friend NP, whose sister works for Sanjeev Kapoor (google Anupa Das for her recipes), got fruits & cheese on skewers. All the while we were munching on appetizers, hubby was hard at work bar-tending, making sure everyone was getting enough alcohol in their systems =D.


NP also made this amazingly delicious salad with orange, pomegranate, goat cheese and honey dressing using her sister's recipe. I'm a big fan of fruits in salads and it was definitely one of the best salads I've had. SM made a yummy penne pasta with pesto sauce. The garlic bread he brought with it made it a perfect combo. I contributed to the main course by making baked cauliflower. And of course, everyone gorged on the hubby's grilled shrimp.


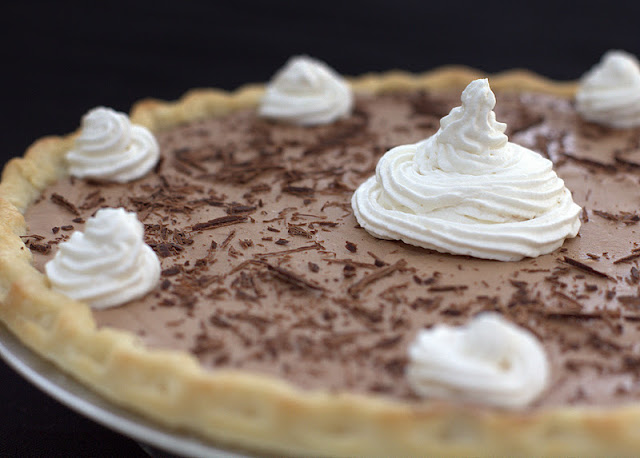
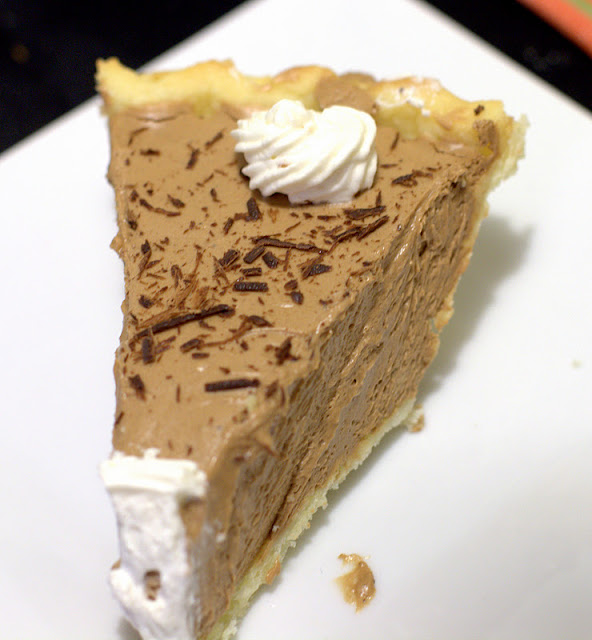
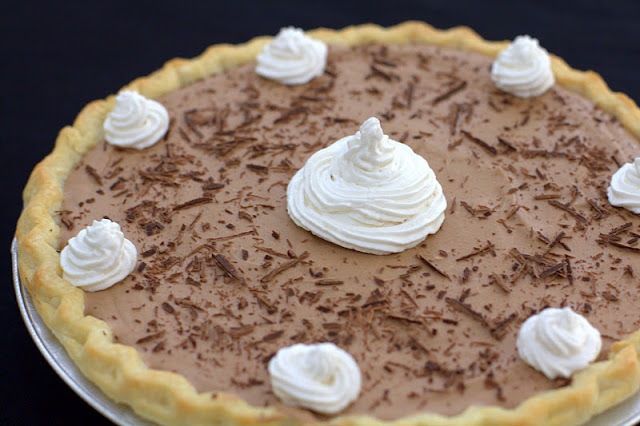
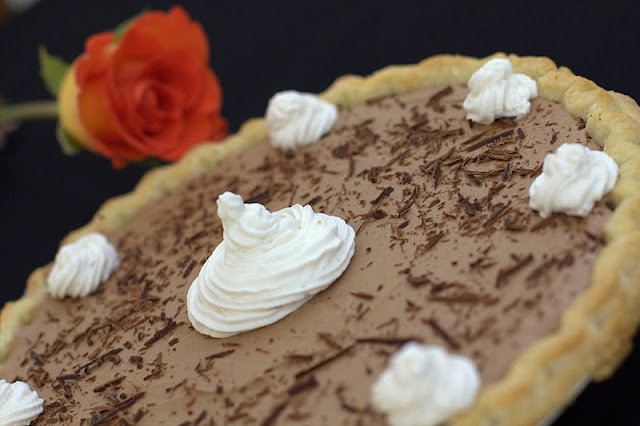
We were almost in food coma by the end of it, but what's a Thanksgiving meal without a pie?? Since we didn't stick to the traditional Thanksgiving theme, I skipped the usual pecan-pumpkin and made a coffee-chocolate silk pie - my take on French silk pie! This was my first time making a pie and I was nervous about the outcome, especially when I modified the original recipe. But it was oh-so-good!!! I made it again for my colleagues today and they loved it too. I used this recipe and modified it a bit to have the perfect filling for a 9 inch crust. The addition of coffee was perfect - it helped cut through the sweetness and added some depth to the flavor. The pie was silky smooth, totally sinful and extremely luxurious!


Coffee Chocolate Silk Pie

Ingredients:
9" Pastry shell - baked according to the package directions
3/4 Cup sugar
2 Large eggs
2.5-3 oz Baking chocolate (depending on how chocolaty you want it)
1 Tablespoon brewed coffee
1/2 Teaspoon vanilla essence
1/2 Cup unsalted butter
1/2 Cup heavy whipping cream
Extra whipped cream & chocolate shavings (optional)

  • Combine sugar and eggs in a sauce pan and heat on medium, stirring constantly, until the mixture covers the back of the spoon without dripping right off (~5 mins). Remove from heat, add chocolate, vanilla and coffee and stir until mixed well. Let the mixture cool till lukewarm.
  • In a bowl, cream butter until fluffy. Whipping is the key to getting that light, smooth pie filling. Add the cooled mixture and beat again on high until fluffy.
  • In a separate bowl, whip the heavy cream until firm,stiff peaks form. Fold the whipped cream into the chocolate mixture gently.
  • Pour the mixture into the baked crust and chill for a minimum 6 hours. I kept the pie in the fridge for almost 24 hours and it was just the perfect consistency and texture when I served it.
  • Garnish with some whipped cream and chocolate shavings if you like. 

Monday, November 21, 2011

A Warm Winter Soup

Others may think it's always bright and sunny in San Diego, but we do get our fair share of cold days. Like the bone-chilling 60 degrees weather we had today ;). Jokes apart, it's getting cold here now and with Thanksgiving just around the corner, winter is in the air (literally). Well, I'm totally loving the crisp morning air, signs of the holiday season and how the heavenly aromas of cinnamon, nutmeg, and toasty pecans engulf me when I step into the grocery store. Squash of every color, shape, and size have replaced summer produce on the racks just in the two weeks I was gone to India. Pumpkin, of course, is the king of squash around this time. I got a gorgeous bright orange slice of pumpkin last week to initiate my winter cooking!

There's nothing more comforting in this season than a pot of soup simmering away in the kitchen. The waft of aromatic spices going around the house makes you feel all warm and cozy inside. I came across this pumpkin soup recipe by Rachael Ray and loved the idea of garnishing the soup with crispy apple and cranberry relish. Knowing that I'll be consuming (a lot) more than needed calories in the ensuing weeks, I wanted to make my soup low on calories. I replaced the heavy cream with a little bit of milk and added a small potato to get that smooth, rich texture. Also, I reduced the amount of liquid quite a bit to make it thick and full of pumpkin flavor. It was a perfect winter soup with all the wonderful holiday elements in it!

The recipe looks long, but it's literally as simple as tossing ingredients together and letting them simmer until you have a hearty flavorful soup. 

Colorful pumpkin soup with apple-cranberry relish - full of all the wonderful holiday flavors!
Pumpkin Soup with Apple-Cranberry Relish

Soup:
1 Tbsp butter
1 Small onion - chopped
1-2 Garlic cloves - chopped
1 Bay leaf
1 Inch cinnamon stick
1 Small russet potato - peeled and cut into small pieces
Salt & Pepper
1 Tspn cumin-coriander powder
2-3 Tspns paprika - adjust per your liking
2 Teaspoons all purpose flour
1 Wedge of pumpkin / 28 oz can of pumpkin puree
2 Cups water
1 Cup Vegetable stock (optional)
A pinch of nutmeg
1/4 Cup whole milk

Relish:
Red apple - finely chopped
Handful of dried sweetened cranberries - finely chopped (no particular measure here, add as many or as little as you want)
1 Tspn chili powder
2 Tspns honey
Chopped almond (optional)

  • If you have fresh pumpkin, cut it into 2 inch pieces and pressure cook them in a little bit of water. The peel comes right off after cooking. Mash it slightly. 
  • Heat a soup pot on medium, add butter and let it melt. 
  • Add bay leaf, cinnamon stick, garlic, potato and onion and season with salt & pepper. Saute for a few minutes until the potato and onion are tender (~5 mins). 
  • Add cumin-coriander powder, paprika, pumpkin mash/puree, 1 cup water & 1 cup vegetable stock. I didn't use all vegetable stock because I didn't want the pumpkin flavor to be overpowered by the stock. However, some stock provides a little bit of body to and extra flavor. Add another cup of water if needed.
  • Sprinkle a pinch of nutmeg. Add milk and let the soup simmer for 10 mins or so. 
  • Take out the bay leaf and cinnamon and puree the soup in the food processor or by using a hand mixie. 

  • Mix chopped apple, chopped dried cranberries, honey and a little bit of paprika. Top the soup with this relish.  For some more nutty flavor to the soup, I sprinkled some chopped almond. 


Thursday, November 10, 2011

Coconut Creamed Corn - From Jenny of Vintage Sugarcube

Hello everyone! I'm back from a wonderful vacation to India. Just as I recover from all the Diwali festivities, I can smell Thanksgiving in the air here. While I've taken a long break from cooking, I'll share a lip-smacking good creamed corn recipe by my blogger friend Jenny of Vintage Sugarcube.

The monthly meet-ups of San Diego Food Bloggers has given me the opportunity to meet some amazing bloggers and try their scrumptious dishes. Jenny and I met at the Bake Sale that initiated the food bloggers meetings and I've been an admirer of her blog since. As the name suggests, her blog is very vintage with some  delicious dessert recipes. Each of her recipes is woven through a funny story accompanied by fabulous pictures, like this or this. The effort she puts into each post is evident and her witty personality shines through them all. Check out her 'About Me' page for her published recipes.

Jenny brought this creamed corn dish to the bloggers meet a couple of months back, and everyone was raving about it. Not only does she know her desserts, she can cook. It was the best creamed corn I had ever had. Of course I helped myself to a few handsome spoonfuls of it. The secret ingredient? Coconut milk! Creamed corn is already yummy, but coconut milk takes it to a whole new level. The fresh corn and lime zest made it a perfect summer dish then. But I don't see why you wouldn't skip baked corn this Thanksgiving and make this utterly delicious creamy, fragrant, melt in the mouth corn dish instead. I asked Jenny to share the recipe on her blog, but she only posts dessert recipes. I immediately offered to do a guest post (a recipe this good needs to be shared with the world). Jenny was extremely kind to make the creamed corn again - twice, to get it perfect - and share the pictures and recipe with me. I was supposed to post it before leaving for India, but work schedule did not permit. Better late than never though, and just in time for the holidays.

Thanks, Jenny, for sharing this wonderful recipe with me and my readers.


Coconut Creamed Corn
By Jenny (www.vintagesugarcube.com)

Serves 6
Found and adapted via www.shutterbean.com  / Ad Hoc at Home Cookbook
  • 6 ears corn, shucked
  • 1 lime
  • 3 tablespoons butter
  • ½ cup heavy cream (no cheating, gotta buy the heavy cream)
  • ½ cup coconut milk (please don’t buy the light/lite)
  • Few shakes or more of cayenne (I haven’t a clue how spicy you like it!)
  • ½ tsp salt
Cut corn off cobs and set aside.  I place a couple large pieces of wax paper under the cutting board to catch any flying kernels.  
Zest lime and set zest aside.
Melt butter in stock pan or medium skillet.  Microwave whole zested lime to soften it up a bit (30-45 seconds).  
Add corn and juice from lime to sizzling butter and sauté for 5 minutes.  
Then add cream and coconut milk, cayenne and salt.  Cook until creamy (approx 15-20 minutes) over low-medium heat.   
Stir in lime zest prior to serving.  

Tuesday, October 25, 2011

Happy Diwali!

Sparkling diwali wishes to everyone!!! Today is the Hindu festival of lights - Diwali. For those who are not familiar with the festival, you can find some information here.

I'm celebrating this joyous festival in India today! I surprised my parents 4 days back by dropping in unannounced :). Waking up bright and early to the sound of firecrackers, decorating the house with rangoli, diyas and flowers, relishing the delicious sweets prepared specially on this day and spending time with the most important people in my life, my family - this is real diwali! 

I'm absolutely busy enjoying the festivities here. While I'm taking a break from cooking, I'll be posting a lovely recipe ASAP shared by one of my favorite blogger friends. Stay tuned .

Diyas - to light up our lives.

My rangoli in my in-laws house :)

Rangoli in my house

Lantern decorations in my house

Tuesday, October 11, 2011

Puff of Magic

Long before I was introduced to the wide array of pastries, I drooled over Veg Puffs at the Corner Bakery by our house. Puff pastry sheets were completely unknown to me at the time, not available at any grocery stores. It amazed me endlessly how someone managed to get SO many paper-thin layers on the crust. The only logical explanation I had come up with was, someone rolled the dough into ridiculously thin sheets and layered them. Well, I was naive and ignorant. Veg Puff was one of those things I believed only bakeries could magically produce. Something home cooks couldn't fathom recreating. Of course, it dawned upon me later that making a delicious puff pastry was as easy as 1-2-3. 1: Buy pastry sheets 2: Bake with your favorite filling 3: Gobble, gobble, gobble! One could make the pastry dough at home, but sometimes I go for convenience.


Veg Puff is a popular pastry pocket with a flaky, golden brown crust that everyone loves. Tucked inside is a mashed vegetables filling seasoned with all the aromatic spices we Indians love. And of course, what's not to love about that combination! The fluffy, slightly sweet buttery crust tones down all the spices and the crunch from it provides a great contrast to the mashed vegetables. You sink your teeth into it and without fail give out that 'ohh, this is so comforting' sigh. The filling has all sorts of vegetables and they are so wonderfully masked that any picky eater will love them. It has mashed potatoes, cauliflower, carrots, peas and onion. You can add bell peppers, beets or I imagine cabbage too! You can change up the quantities of vegetables per your liking. Veg puffs were one of my favorite (yes, B+I) after school snacks. Recreating childhood 'magic' in my very own kitchen was simply marvelous! The list of ingredient looks long, but trust me, it's a very simple recipe. 


Veg Puff 

Crust:
Frozen puff pastry sheets. Thaw for 8-10 minutes or until they are soft and pliable. Cut them into 5'x5' or 6'x6' squares. Alternatively, you can buy the pre-cut square sheets.

Filling:
2 Medium white/yellow potatoes - boiled and mashed
1/2 Small onion - finely chopped
Handful of green peas
1/2 Cup finely chopped vegetables - I used cauliflower and carrot
1 Teaspoon ginger-garlic paste (optional)
Finely chopped cilantro
1/2 Teaspoon cumin seeds
1/2 - 1 Teaspoon red chili powder - adjust according to taste
1/2 Teaspoon cumin-coriander powder
1/2 Teaspoon Garam masala
1/4 Teaspoon Chaat masala/Aamchur powder
Pinch of asafoetida
Pinch of turmeric
Salt to taste
2 Teaspoons oil

  • Preheat oven at 350F
  • Heat oil in a pan, add cumin seeds and let them splutter. 
  • Add asafoetida, turmeric, ginger-garlic paste and onion and saute for a couple of minutes until the onion is golden brown. 
  • Add all the vegetables except mashed potatoes, all the spices and salt and let the vegetables cook for 2-3 minutes. 
  • Then add mashed potatoes, a splash of water if the mixture is too dry, mix and let everything cook together for 3-4 minutes. The cooking will make all the spices and vegetables come together. 
  • Sprinkle some finely chopped cilantro on the filling. 


  • Place about two tablespoons of the filling at the center of the puff pastry sheet, fold it in center to form a rectangle and close the ends by pressing together. You can make triangles alternatively, or any creative shape you can come up with. 
  • Bake the pastry in the oven until golden brown. You may have to turn it once (carefully) to make sure the bottom of the pastry is baked also. 


Enjoy the warm, flaky pastry with some ketchup! Yes, that's the 'sauce' of choice for most Indian snacks.

Wednesday, October 5, 2011

Quick Corn Usal

Today, I'm going to leave you with a quick and easy recipe for a great snack. That's it. No blabber. And I will more than make-up for the void of stories very soon, I promise.


Usal is a generic name for spicy curried or sauteed beans or sprouts. Corn comes under the grain category, but I guess this dish is called Usal because of the other common ingredients used in the preparation. It's a popular Maharashtrian dish prepared especially in early winter when corn is bountiful. The cooking process enhances the sweetness of corn, and is wonderfully balanced by the touch of spiciness. A dish of warm savory corn usal is very comforting on balmy fall evenings.


Corn Usal/Kanasachi Usal

2 Large sweet corn cobs/ 1 packet frozen corn
1/2 Small onion - finely chopped
1 Serrano chili
2-3 Garlic cloves
1/2 Inch fresh ginger
1 Tablespoon grated coconut
1/3 Teaspoon mustard seeds
1/4 Teaspoon turmeric
A pinch of asafoetida
Salt to taste
Chopped cilantro for garnishing
Lemon juice
  • Husk and clean the corn. Hold the stem in your hand, rest the other end on the cutting board and cut off the kernels with a sharp knife. Or, just open a bag of thawed frozen corn :D.  
  • Run your knife through the kernels to give them a rough chop. The starchy juice that comes out helps it cook well, bring the dish together and give it that wonderful caramelization. You can also give the kernels a quick pulse in the food processor. 
  • Grind chili, garlic and ginger to a paste.
  • Heat a couple of teaspoons of oil in a wok/kadhai. Add mustard seeds and let them splutter. Then add asafoetida, turmeric, onion and chili-ginger-garlic paste and saute for a a couple of minutes.
  • Add corn, grated coconut and salt and mix everything well. If the corn is dry, you can add a splash of water. 
  • Cover and cook, checking and stirring occasionally, on medium heat. 
  • The dish is done when the corn is cooked completely, most of the water content will evaporate(8-10 minutes). Don't worry if the corn gets slightly brown and caramelized. This is the tastiest part of the dish! 
  • Garnish with lots of chopped cilantro, some lemon juice and more grated coconut if you like. 

Wednesday, September 21, 2011

Tea Time

Fall has finally made its first appearance. Even in my ever warm city, every sign says the long bright days we take for granted are not here to stay for long. The days have begun to start with dense, dreamy fogs and the cool night breezes have forced us to pull out those dusty jackets. And more than anything else, my body has warned me about the change in season already. I've got flue - hmph! But there are two things that console me even when I've got burning eyes, sore throat and body ache:

1. Fall sets the mood for a multitude of festivals.
2. I'm all ready to tackle the cold season with a few heartwarming baking recipes under my belt!


This kind of weather (and a sore throat) makes me crave a super soothing cup of Indian tea with lots of ginger and some cardamom. But what's some tea without a few crispy cookies biscuits to dunk in it? Of course, my already scarce supply of Good-Day had vanished last week and I was left with an unsatisfied craving for some tea-biscuits. Well, what do you know - I pulled my baker's hat and made a batch of nutty, crispy, crumbly Nankatai biscuits to go with my tea!


Nankatai is a simple Indian sugar cookie, except it's toastier and crispier and doesn't have eggs. I remember our local bakery in India carrying home-made nankati neatly stacked in a tight jar, sitting right in one corner of the counter. Every time we ordered the cookies by the grams, the owner would remove them with utmost care, not breaking any, and pack them in a brown bag for us. You could smell the wonderful buttery aroma infused with cardamom powder and toasty nuts all the way to the house. They came with a variety of nuts, such as pistachios, cashews or almonds, or sometimes a few golden orange saffron strands. Then my mom would make us some tea, which none of us really cared to drink otherwise, and we would most usually finish the cookies with one cup of tea.

My mom never cared to bake, but I remember my aunt baking nankatai at home. I would hardly call it Baking, because they are so ridiculously simple to make! The overall preparation + baking time is hardly 15-20 minutes. The cookies crack open to let out that buttery whiff of steam as they bake. You can add a little more butter to make them softer, but they can break easily. I like the crispy ones with my tea much better. This recipe makes about 10-12 cookies.

This recipe is going to the Friday Potluck hosted by Vatsala of Show and Tell.


Nankatai - Indian Sugar Cookie

Ingredients:
3/4 Cup All purpose flour and whole wheat flour (half and half)
1 1/2 Teaspoon semolina
1/3 Cup Butter
1/4 Cup sugar - or a little less based on how sweet you would want them
1/4 Teaspoon baking soda
2-3 Pinches cardamom powder
Couple of teaspoons chopped nuts - I used cashew + few for garnishing

  • Preheat oven to 375F
  • Beat butter and sugar together until soft and creamy. 
  • Sift the flour and baking soda and all the ingredients to the butter+sugar mixture. Mix well until the dough comes together.
  • Make round balls of the dough and flatten a little and keep them on a baking sheet. Press a piece of cashew on top for garnish and sprinkle a little bit of sugar. 
  • Bake for 12 minutes or so or until the cookies turn golden. They may still feel a little soft in the center. Take them out and let them cool for a few minutes. The cookies will harden perfectly while cooling. 

The whole wheat flour makes nankatai very toasty, what I would call 'khuskhushit' in Marathi. That touch of semolina provides a wonderful bite. These are perfect with a cup of tea or warm milk!

LinkWithin

Related Posts Plugin for WordPress, Blogger...