Tuesday, October 7, 2014

Batata Bhaji With Yogurt

It seems I only get to post from one major festival to another these days. There is no time to eat food peacefully, much less take pictures and blog about it. But I'm thoroughly content spending time with and watching my baby girl grow. She turns 7 months today according to the Hindu calendar, and what a fun little thing she is to play with! We also have a full house with my parents visiting us currently - which is why we prepared a feast for Dashera on Friday. Such a bliss being with your near and dear ones on festivals! I meant to post about it right away, but here we are into Kojagiri Pournima and I already have something new cooking in the kitchen. Expect more posts during this festival season.

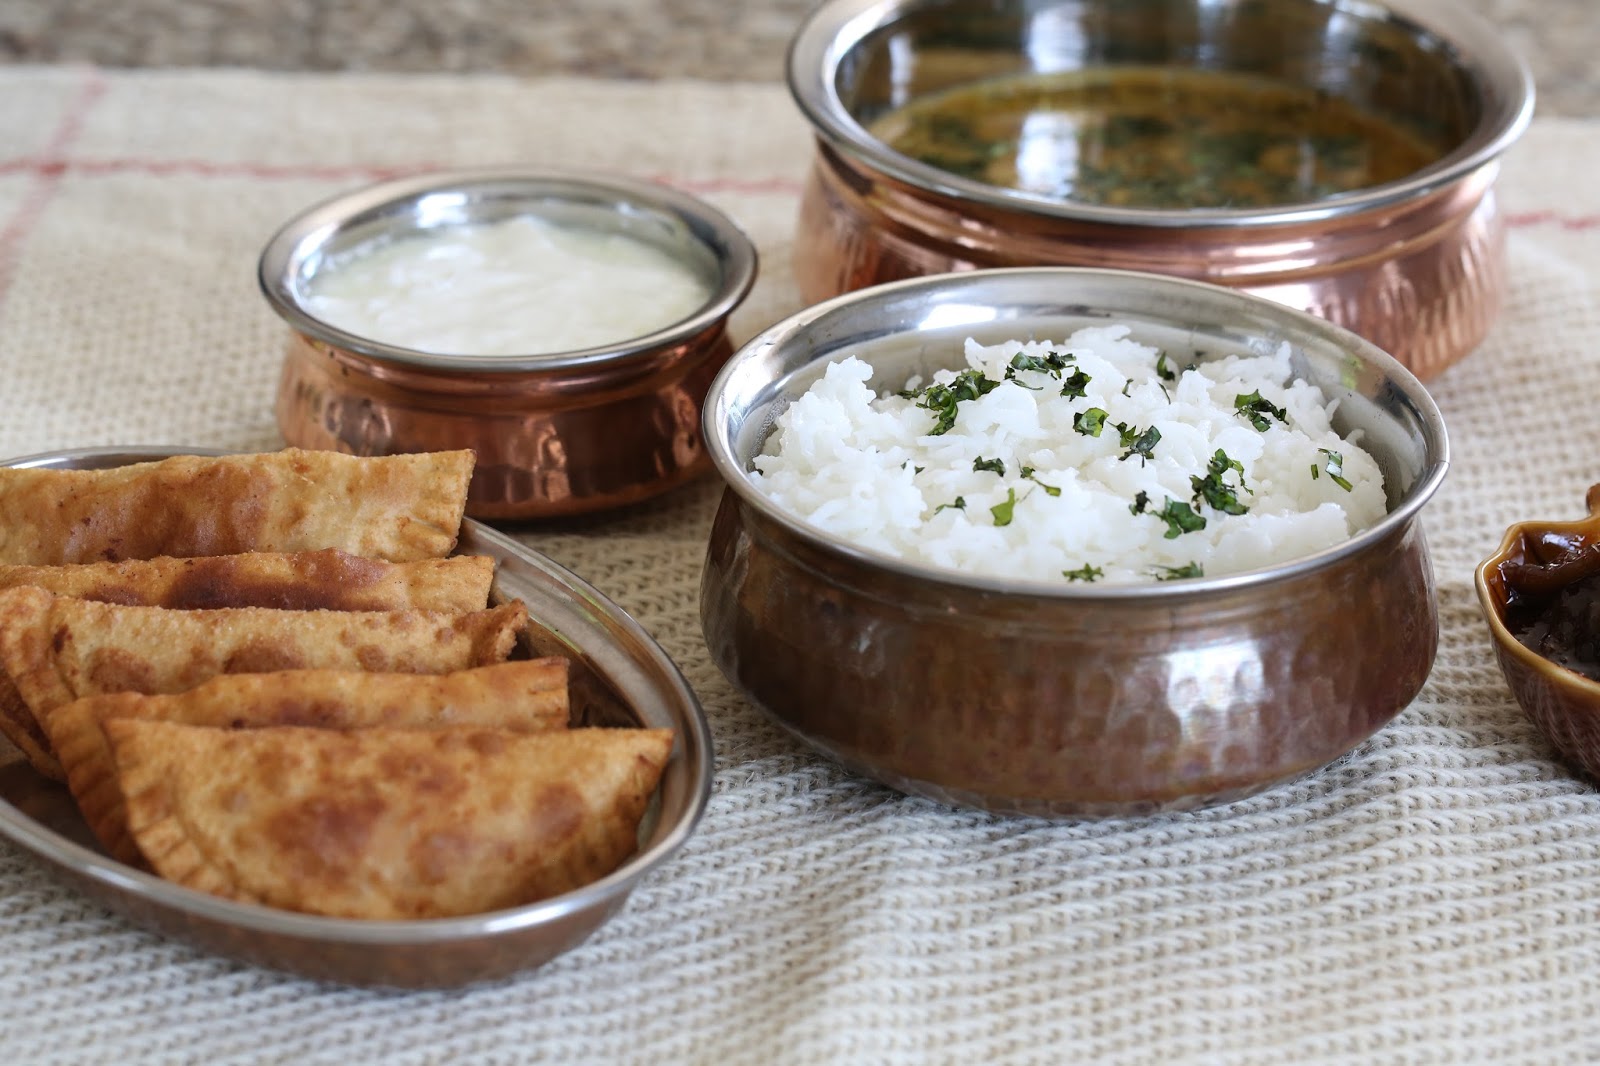
For us Maharashtrians, Shrikhand-puri is must for the Dashera feast. I made Shrikhand using my Grandma's foolproof recipe. I don't strain the 'chakka' if it's not too lumpy - I like that slightly grainy texture it leaves. There were other traditional dishes on the menu - Batata bhaji/aalu sabji, green beans stir fry/sabji, carrot koshimbir/Maharashtrian style salad, cucumber kayras , masoor amati, and rice. The kayras recipe I posted in the past was taken from somewhere else. Now that mom is here, I made it under her guidance, and it was just how I like it. Her recipe is easier as well. I'll repost it now.

Below is the picture of everything I prepared - how a traditional Maharashtrian thali is served. Of course, you don't expect a square plate,  but I did the best using available resources :D.


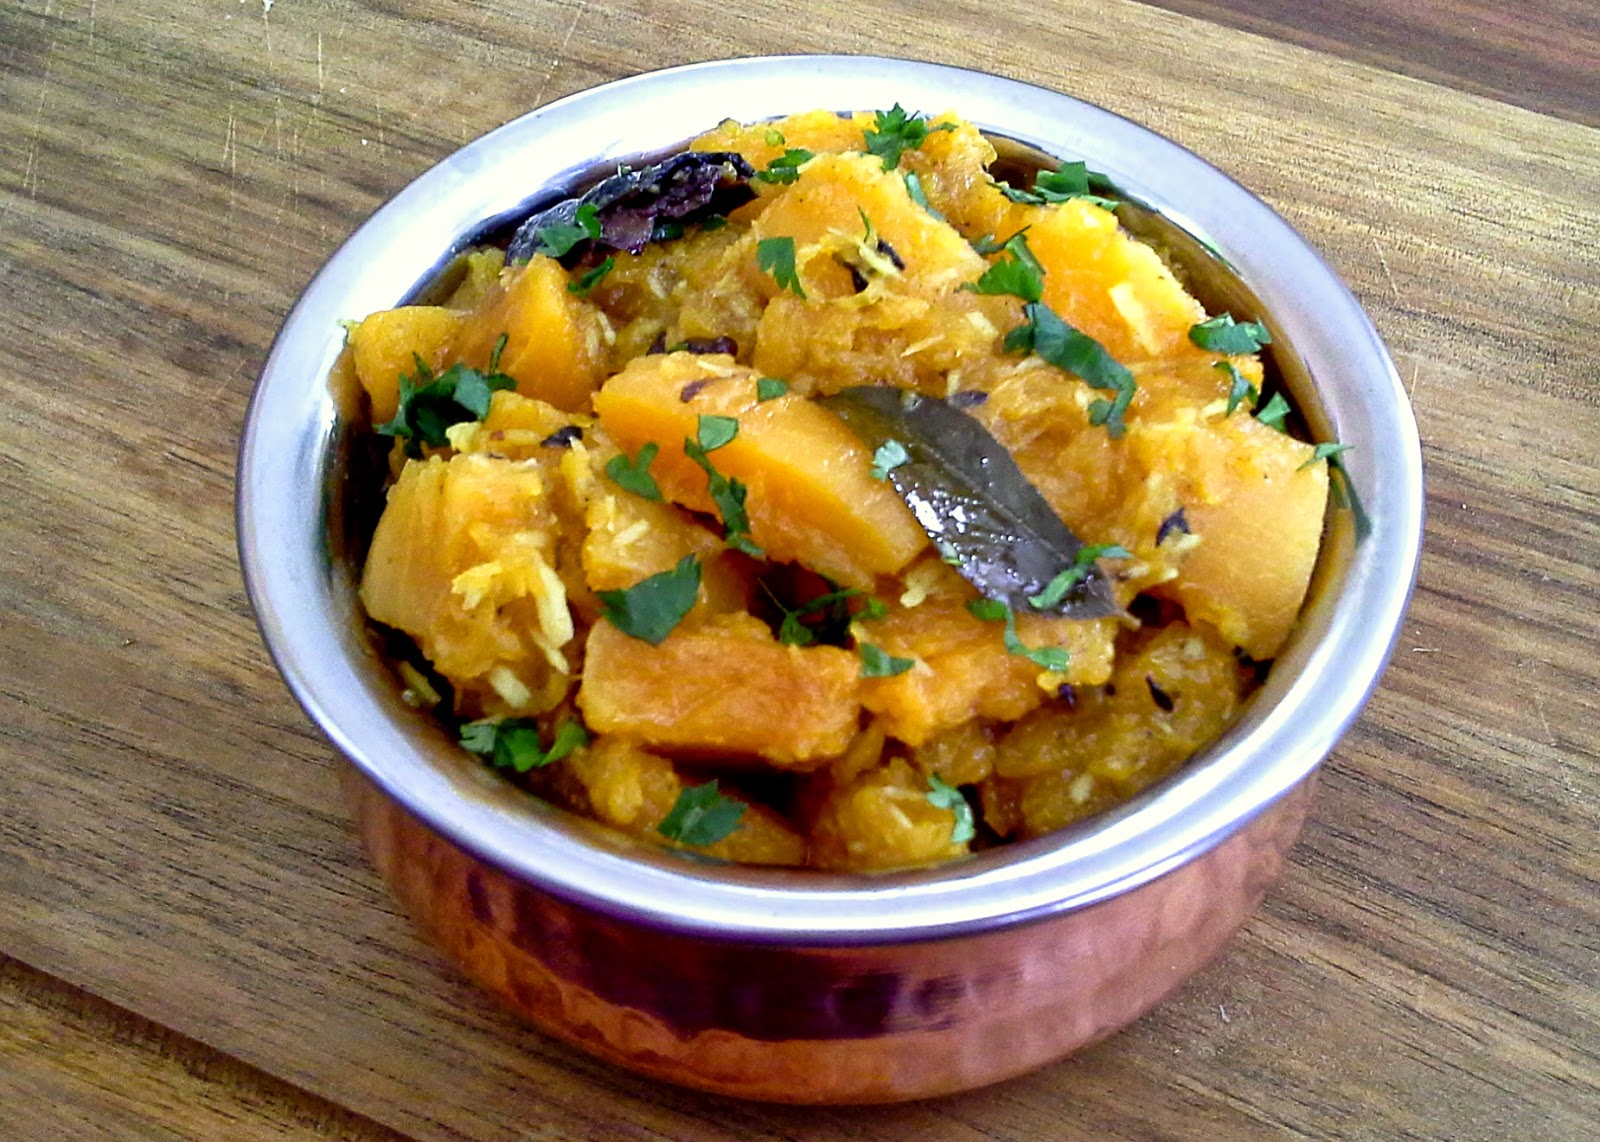
Batata bhaji goes really well with shrikhand-puri. Our traditional recipe has a tempering of green chilies and curry leaves. Mom suggested trying something different this time. She taught me a really simple and absolutely delicious recipe for Batata Bhaji in Yogurt. Like everything my mom makes, I loved the preparation. The yogurt taste is not too prominent, but it adds a slight tang and creaminess, and helps in bringing all the flavors together. The recipe below is for a dry sabji, but you can make a thinner gravy by adding more yogurt and adjusting the spices accordingly. There's one more potato recipe added to my repertoire now.


Dahyatali Bhatata Bhaji/Aalu Sabji with Yogurt

Ingredients:
3 Large or 4 medium white/golden potatoes.
1/2 Cup yogurt
1 Teaspoon Garam Masala
1 1/2 Teaspoons cumin-coriander powder
1 Teaspoon green reen chili powder/ to taste
Salt to taste
Water if needed.

Tempering:
1 Tablespoon oil
1/2 Teaspoon mustard seeds
1/4 Teaspoon asafoetida
1/2 Teaspoon turmeric powder.

  • Boil potatoes till fork tender. Peel and cut into 3/4'' cubes. Keep aside.
  • Heat oil in a pan, and add mustard seeds. Once they splutter, add asafoetida, turmeric, and yogurt and let cook for about a minute.
  • Add potatoes, garam masala, cumin-coriander powder, green chili powder, and salt. Mix everything well. If the potatoes seem too dry, add a little water.
  • Cover and cook for 2-3 minutes.
  • Garnish sabji with chopped cilantro. Done!

With Diwali just around the corner, we're getting ready to make Faraal. What's happening on your side?

Saturday, August 30, 2014

Naralachi Vadi for Baal Ganesh

My most favorite time of the year is here - Ganpati Bappa arrived in our house yesterday on the occasion of Ganesh Chaturthi, and will stay with us the next 4 days. Oh, so much joy and good eats this festival brings!


I celebrate Ganesh chaturthi with much enthusiasm and glee, while trying to stay as eco-friendly as possible. See this hand-made clay idol and decor with used cardboard boxes from last year? The celebration this year is low-key, as I hardly have time to do anything with a baby and work. But my baby's first big festival needed something to make it memorable. Keeping the tradition, I made the idol at home. As a quick and simple alternative to clay, I thought of using play dough - the perfect medium to make idol for my baby's first Ganpati! Thanks to Pinterest, I knew I could make play dough at home. I used the no-cook play dough recipe on this site, with only half the measurements. I skipped cream of tartar (used for elasticity) and glycerin (used for shine). The preparation of making the dough with all purpose flour, salt, oil, and water took  10 mins all together. The key to getting good play dough is kneading it really well. Making the idol was equally quick as I skipped adding too many details. Our Bappa looks like Baal Ganesha (Baby Ganesha), and I was quite happy with it.


Husband asked for Modak for Naivedya. But it was too elaborate a process. I went for simple Naralachi Vadi (Coconut Barfi) instead, using one of the main ingredients from Modak. I was never a big fan of Naralachi Vadi until I tried it at one of my dad's friends' place. His wife had made the best vadi I had tried, and her secret ingredient was - potato! Who would've though?! Mashed potato gave the vadi a nice bite and chewiness. I don't like too hard, sugary and crumbly vadi, and potato added just the right texture to it. When I told the husband I was adding potato to the vadi, he thought I was joking! But he ended up loving the product, and I think Ganpati Bappa liked it too :).


Olya Naralachi Vadi/ Coconut Barfi

Ingredients:
1 Packed cup fresh/frozen grated coconut
1 Cup sugar
1/2 Cup milk
1 Small potato (~ golf ball sized) - boiled and mashed
1/2 Teaspoon cardamom powder
1 Tablespoon ghee
Dry fruits for decoration - I used Charoli. Almonds or cashews would be great.

  • Heat a pan on low flame, add ghee and grated coconut and cook for 2-3 minutes. 
  • Add sugar, milk, and mashed potato. Cook this mixture while stirring every so often. Make sure you take out all the lumps from the potato so that it's smooth. 
  • Cook the mixture down until all the sugar has dissolved and the moisture has evaporated. It should stop sticking to the pan and come together in a ball. 
  • Add cardamom powder and mix well. 
  • Grease a flat surface (plate/tray etc.) and spread the coconut mixture with a spatula into a 1/4'' cake. Sprinkle chopped dry fruits and pat gently on the cake. 
  • Once cooled slightly, cut the cake into desired sized diamonds. Let them cool completely before separating the barfi. 
Hope those of you who celebrate this festival are having a wonderful, modak-filled, celebration!

Thursday, August 7, 2014

Shravan Special - Puran Kadabu

I loved the auspicious month of Shravan as a kid for various reasons. Apart from all the holidays we got, food was certainly one of the highlights. Many women in Maharashtra observe the Jivati Vrata on Shravan Fridays by worshiping Goddess Jiviti for the health and longevity of their children. I didn't know of this vrata by its particular name, but I looked forward to eating Puran-Poli on the first Friday of the month. My mom performed 'ovalane' or 'aarati utarana', for which there is no translation in English! It's a ritual performed by offerning oil lamps to a deity/person as means of worshiping or offering respect. Details apart, mom made diyas out of Puran, the sweet split chickpea/chana daal stuffing that goes into Puran-Poli, to perform the ritual. Then we got to feast on delicious polis.

This year I got to pay it forward by praying for my daughter's well-being and long life. Of course, there was puran involved. Instead of making poli though, I prepared Kadabu - Indian style whole wheat empanadas stuffed with sweet Puran. Kadabu/Kadubu are better known in South India, although the preparation is different. While puran kadabu are made with wheat flour, other versions are either made with all purpose flour or rice flour, and the stuffing is often made of grated coconut instead of chana daal. Puran Kadabu are not very well known; for that matter my husband had never eaten them. But I am quite a fan. The good thing is you don't have to strain puran through food mill to make it smooth. In fact, coarse puran with a bite tastes really good in kadabu.


I saved the chana daal broth and some daal itself to make Katachi Amati which was served with rice, ghee, sweet lime pickle, and yogurt - yes, all home made! I can't even begin to tell you how happy I am to be making fresh yogurt at home every day since last week. Our nanny got us the starter and I couldn't have been more pleased with the results. Anyway, that may warrant its own post.


Puran Kadabu/Indian Sweet Split Chickpea-filled Empanada

Ingredients:
Puran
1 Cup split chickpea/chana daal
3/4 Cup grated jaggery
1 Teaspoon cardamom powder
Couple of pinches salt

Dough
2 Cups whole wheat flour
1 Teaspoon oil
1/4 Teaspoon salt
Water as needed

Oil for frying
  • Knead the dough by combining whole wheat flour, oil, salt, and enough water to form a stiff, firm dough. Cover and keep aside.
  • One the side, pressure cook chana daal until cooked well (4-5 whistles).
  • Once the daal is cooked, remove excess water (you can save the broth to make katachi amati). Add jaggery to the daal and start cooking until most of the water evaporates, and the mixture stops sticking to the pot. Add salt and cardamom powder and mix well. Puran or the stuffing is done.
To make kadabu:
  • Make large marble sized dough ball and roll it out thinly just like you would a puri. 
  • Take a decent amount of puran, approximately a golf ball size, so that you have a handsomely stuffed kadabu. Place it one one side of the round puri and press to form a half moon. 
  • Fold the other side of puri over and press two sides gently to seal. Make sure the kadabu is sealed properly otherwise frying oil will get inside and burn puran. 
  • To make the kadabu look pretty, gently press the tip of a fork into the sealed edges, and cut any uneven ends with a knife. Alternatively, you can use a Karanji Cutter if you have one. 
  • Fry on medium heat until golden brown. Kadabu will puff up when fried. It will soften once cooled. 
Pour some warn ghee on kadabu while serving, and enjoy!

Tuesday, July 22, 2014

Four Month Birthday With Ice Cream Trifle

Our local Indian grocery store opened an ice-cream shop recently with all the Indian favorites - sitafal (custard apple), kesar, mango, pistachio etc. I excitedly tried all the flavors; and while most of them were just okay, I was certainly reminded of Indian ice-cream. It was perfectly light and airy, and not cloying sweet. I came home with a carton of one of my all time favorites - butterscotch. I made this simple trifle with the ice cream to celebrate my daughter's 4 month birthday last week (gosh, she's growing up so fast!). It was the perfect dessert for this hot summer month.


I ate this trifle at one of my aunts' place. We used to visit my dad's siblings and cousins in Thane every summer vacation. My aunt used to have all the kids over and treat us to all sorts of fun stuff - chaats, paav bhaaji, Indian desserts, and other kids favorites, like this ice-cream trifle. It was just layered pound cake, mixed fruits, and ice-cream - the easiest dessert ever - but it tasted so good! It had all the right components - dense, moist cake, fruits including the season's best mango, and good quality ice-cream. You can't go wrong with that combination! I recreated the trifle from my memory, and it was a big hit in my family. My baby girl can't eat yet, but I'll be sure to make this once she grows old enough to eat sweets (yes, I believe in spoiling kids once a while :D). I used store bought pound cake for the recipe since it didn't need much. With minimal effort, I created a great dessert everyone loved, and spent time playing with my daughter instead of fretting over baking a cake. This trifle would be great for parties - you can make it in advance, make a large batch in no time, change it up a thousand different ways to create a 'new' dessert, and appear really cool to young as well as adult guests for treating them to something this good. You can play on the flavors of ice-cream and pound cake, such as lemon cake with citrus fruits and strawberry ice-cream, or chocolate swirled pound cake with chocolate chip ice-cream, pineapple pound cake with coconut ice-cream. The combinations are countless and the joy limitless!


**Husband managed to click a few decent pictures this time. What a breath of fresh air after my rushed, poorly lit, poorly staged phone photos!


Ice Cream Trifle

Ingredients:
Good quality pound cake - I used almond flavored - cut in 1/2 inch slices
Chopped mixed fruits - I used mango, strawberry, apple, and grapes for a variety of flavors and textures
Tutti frutti (optional) - to mix with fresh fruits
Butterscotch ice-cream - softened for the ease of spreading.
Chopped dry fruits of your choice - I used almonds to resonate the flavor of the pound cake
Rectangular casserole dish, or any other flat dish, preferably glass so you can flaunt the dessert.

  • Layer pound cake at the bottom of the pan. Then spread about 3/4-1' layer of mixed fruits. On top of this, spread 1/2' (or as thick as you like) layer of softened ice-cream with a spatula. Let some of the ice-cream drizzle down into the fruits and cake. The cake tastes even better after soaking up some of the ice-cream flavor, and it ties all three components together.
  • Sprinkle a good amount of chopped dry fruits.Cover and freeze until the ice-cream is set.
  • Remove the pan from the fridge 5-7 minutes before serving so that you can slice it easily.

You can serve the trifle with some fresh fruits on the side, or a jam, or jelly, or chocolate sauce, caramel sauce. I told you - the combinations are countless!

Monday, July 14, 2014

Stuffed Padron Peppers...And Other Veggies :)

My colleagues and I were having a conversation about how to train kids not be picky eaters. To my mom's delight, I was a good eater from early on. But even when meals didn't include what I absolutely loved, mom enforced a simple rule - serve a very small portion on the plate and don't get off the table without finishing it. As tortuous as it may sound to some, it really can't kill you to eat a few bites of something you don't love. The good part was that my mother cooked delicious food. If we didn't like something, she made an effort to try different recipes to make it more palatable for us. And there was often that guilt trip - there are way too many kids out there who don't even get two meals a day, let alone choose what they eat. Be thankful that you get to try such variety of foods!

There was one vegetable for which I always made faces though -  bell peppers! The ubiquitous vegetable in the US, and something I've grown to love, was my enemy as a kid. The Indian bell peppers are much smaller, with thinner skin, and more robust flavor compared to what we get here. I thought they were too pungent. Mom cooked them many different ways - fire roasted bell pepper and yogurt raita, stir fry with crispy potatoes, or stuffed  potatoes or chickpea flour to mask their strong flavor. Her stuffed bell pepper preparation was my favorite.

I found beautiful Padron peppers at the Saturday farmer's market. They looked like smaller versions of Indian bell peppers with the same fragrance. Padron peppers originate from Spain and have a wonderful smoky flavor when charred. The seller at the market told me they are usually deep or shallow fried in olive oil and seasoned with sea salt. They don't have a lot of heat, so you can eat them whole. I asked her how they would taste stuffed with something, and she thought it was a great idea. I thought I would try the chickpea filling. The recipe is fairly simple. Chickpea flour is seasoned with garam masala and other spices and stuffed inside seeded peppers. The peppers are beautifully charred in oil on high heat. The slight heat and smoky flavor of the peppers is fabulous. The chickpea flour filling is slightly crunchy against the soft flesh of the peppers, and does a great job of taming some of the pungency. This dish can be served as an appetizer, or a side dish. It tastes great with roti, or rice and yogurt. If you don't find padron peppers, any low heat peppers such as small bell peppers, poblano, Anaheim would be great. I cooked the peppers on stovetop, but you could grill stuffed peppers in summer. It'll be a great side to all the cookouts.


Chickpea Flour Stuffed Peppers

Ingredients:
2 Dozen medium Padron peppers - destemmed and seeded
1 Cup chickpea flour
3 Tablespoons olive/vegetable oil + more for shallow frying
1/2 Cup chopped cilantro
1/2 Teaspoon mustard seeds
Pinch of asafoetida
1/2 Teaspoon turmeric powder
1 1/2 Teaspoons garam masala
1 Teaspoon red chili powder (adjust per liking)
Salt to taste
  • Heat oil in a frying pan and add mustard seeds. When they splutter, add asafoetida, turmeric powder and chickpea flour.
  • To this, add chopped cilantro, garam masala, red chili powder, and salt to taste. Roast chickpea flour till fragrant and 'cooked'. If it looks too dry, you can sprinkle some water (use very little - you don't want clumps). Taste and adjust the seasoning to your liking.
  • Once the chickpea flour filling is done, keep aside.
  • Remove the stems of peppers and take out the seeds. Fill them with chickpea flour filling.
  • Coat the frying pan with some more oil and lay all the peppers on the pan. Cover and let the peppers get charred. Covering the pan will keep the steam inside and help cook the chickpea flour further.
  • Turn the peppers with a tong and char them on the other side. Once the peppers are cooked through, turn off the heat.

Enjoy!

---***---

Speaking of stuffed veggies, I made a set of stuffed felt veggies for my baby girl. I had seen a toy veggie basket at my friend's house; her son played with them. That set was a little more 3D than my version, which is somewhere in between 2D and 3D :D. I think it's a great toy - colorful, educational, and may encourage my daughter to eat all her veggies (or so I hope).One of my friends who has a girl just a little older than Shreya loved the idea of felt toys, and asked me to make some for her baby. I wanted to send the toys just in time for her 6-month birthday which didn't leave me time to make a new veggie set, so I gifted her the one I already had. I can always make more for my daughter. Here's my satisfied customer playing with her new toys :).


Along with veggies, my friend asked if I could make an owl as well. Owls are all the rage these days. I came up with the following pattern after going through several pics on the web. Whooo wouldn't like a pink owl?


Just hangin' out!

Until next time!

Friday, June 13, 2014

Gourd For You

As a nursing mother, it is very important that I watch what I eat. Babies have immature and sensitive digestive systems. It didn't take long for me to realize that tummy ache is the main culprit when my baby is fussy or cranky. It is best that I avoid acidic, gassy, difficult to digest foods. The common culprits of tummy troubles are dairy, sugar, and vegetables such as cauliflower, broccoli, cabbage, eggplants, etc. So what's good for a new mother? Gourd! Gourd and squash of every kind. I have eaten more gourds over the past three months than ever in my life. You name it - bitter gourd, ivy gourd, ridge gourd, bottle gourd, snake gourd, pumpkin - you get the idea! These vegetables are fibrous, nutritious, and easy to digest. Add some mung daal (split mung) when preparing and you have a dose of protein too. I have been preparing different gourds and squashes available in the grocery stores here using light Indian seasoning. Here is one of my favorites - butternut squash curry scented with ghee, curry leaves and grated coconut.


Butternut Squash Curry

Ingredients:
1 Medium butternut quash (~2 1/2-3 Cups peeled and cubed)
3 Tablespoons fresh/frozen grated coconut
2 Dried red chilies
1 Sprig curry leaves
1/2 Teaspoon mustard seeds
1/4 Teaspoon fenugreek seeds
Couple pinches asafoetida
1/2 Teaspoon turmeric powder
1 Tablespoon ghee
Salt to taste
Chopped cilantro for garnishing

  • Heat ghee in a cooking pan, and add mustard seeds.
  • Once mustard seeds splutter, add red chilies, curry leaves, and fenugreek seeds. Stir for a few seconds and add asafoetida and turmeric powder.
  • Add cubed squash and grated coconut to the tempering, and salt to taste.
  • Add a cup of water and mix everything well. Cover and cook on medium, stirring occasionally, until squash is cooked thoroughly and the flavors come together.
  • Garnish with fresh chopped cilantro.

Serve with hot rotis and yogurt on the side.


Monday, June 9, 2014

Guilt Ridden And Snacking Guilt Free

I believed sleep deprivation, zillion diaper changes, and back crushing feedings would be some of the challenges of motherhood. What proved it wrong was leaving my entirely dependent little one with a complete stranger, to go back to work. I joined work three weeks back, and it's been an emotional challenge. The baby girl is adjusting to her nanny slowly but surely, yet my heart breaks into a million pieces every day when I see the longing in her eyes. Sure, I can quit my job, some would say. But some things are easier said than done. I just hope my daughter forgives me one day when she has a similar battle of her own, or just not remember this at all!

The only consolation in this situation is that we've found a fantastic nanny. She's a loving person with two grandchildren of her own, and treats Shreya just like she would one of them. She came with a whole bunch of cute clothes for Shreya last week for no particular reason. Isn't that incredibly sweet of her? Despite all, I am comforted that my daughter is in good hands. Aunty, as we respectfully call her, hails from Gujarat, and is an enthusiastic cook like most Gujjus. I for one am a huge fan of Gujarati food. So it's a bonus that she brings us lots of freshly prepared Gujarati delicacies almost every day. She brought me a popular sweet called Sukhdi the other day. Sukhdi is a simple wheat flour 'cake' made with ghee, jaggery, and decorated with dry fruits.It tasted like wheat flour laddus, just repackaged. I enjoyed snacking on this energy packed sweet between meals. This nursing business makes me very hungry, and I always need nutritious, guilt-free snacks at hand. FYI - a healthy dose of ghee is good for your, especially postpartum. I tweaked anuty's recipe so I could add some more elements of 'healthy' and made sukhdi with ragi/nachani/finger millet flour. I also added dry grated coconut to the list of dry fruits. Ragi flour is light and toasty, and tasted even better than wheat flour. Husband admitted that this was one of my best creations; but then again, he says that a lot ;).


Ragi Sukhdi/Nachanichi Vadi

Ingredients:
1 Heaping cup raagi/nachani flour
3/4 Cup grated jaggery (or adjust per your liking)
6-8 Tablespoons warm ghee
Handful of dry fruits, coarsely ground. I used almonds and cashews
1 Heaping tablespoon grated dry coconut

  • Heat a kadhai/pan on low flame and roast ragi flour in 6 tablespoons of ghee until the flour is fragrant and doesn't taste raw. 
  • Add grated jaggery, ground dry fruits, and grated coconut. Roast for 5 more minutes. Make sure there aren't any pieces of jaggery left.
  • Once the mixture is cool to touch, mix by hand to make it consistent. Try pressing some mixture between your palms and it should form a lump and stick together. If not, add more ghee as needed. 
  • Grease a steel plate with ghee and pat the mixture tightly on it, forming a ~1/2 inch cake. Cut into diamond shaped vadi using a sharp knife. 

Alternatively, you can form laddus of the mixture.


LinkWithin

Related Posts Plugin for WordPress, Blogger...