Monday, October 1, 2012

Chutneys and Condiments


Growing up, my house was always buzzing with guests and visitors. Like any other typical Indian family, we were used to unannounced guests dropping in for chai or staying over for dinner after mom or grandma insisted. I remember my dad inviting his friends over for dinner on many occasions with barely any warning. There was hardly any time to come up with a fancy menu. But the women of the house never worried or complained, for they were always armed with an abundant supply of condiments. All sorts of pickles, chutneys, papads and other mouthwatering stuff! Think about it, these condiments are served in the smallest quantity on a plate, and yet add the most pizzazz to a meal. The simplest potato sabji served with piquant mango pickle, some sweet lemon pickle on top of upma, green chutney spread on a sandwich, curry leaves chutney sprinkled on a roti, or an assortment of papads cumbled with warm khichadi - these condiments make up for any flavors your plate may be lacking.


When I want a quick and easy meal, I rely on fresh chutneys or metkut (Maharashtrian style poodi chutney) to spruce up some rice and yogurt. Utterly satisfying and comforting. I made a big batch of green/raw mango chutney yesterday (the only upside to not getting alphonso is having access to Mexican mangoes most of the year). Green mango chutney is quite unique as it is complete with all the basic tastes our taste buds recognize - sourness, saltiness, sweetness, bitterness and - for all the Indianness in me - spiciness! It's one of the easiest condiments to make and boy, does it pack flavor! My mom used to add a little bit of grated onion to make this chutney extra strong, but you can't store it for long since onion starts smelling right away. Without it, the chutney lasts for 2 weeks or more. I love this chutney with roti, rice or even bread. It'll surely tickle your taste buds.


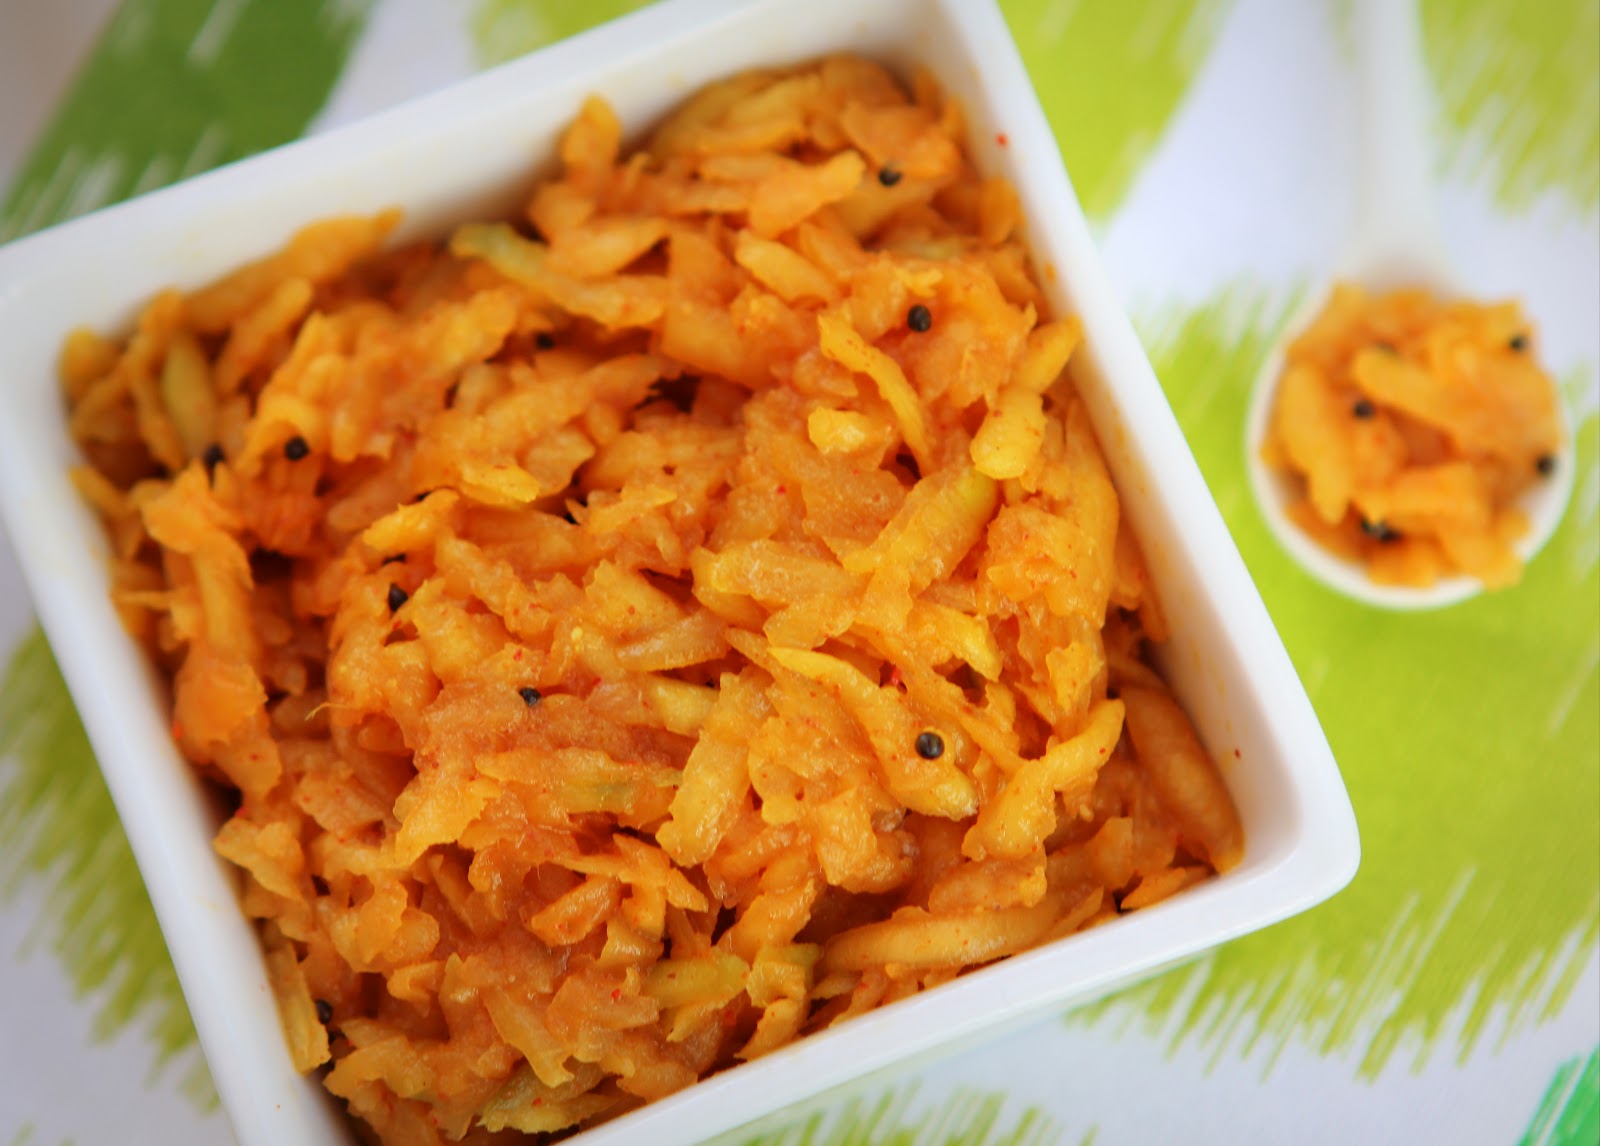
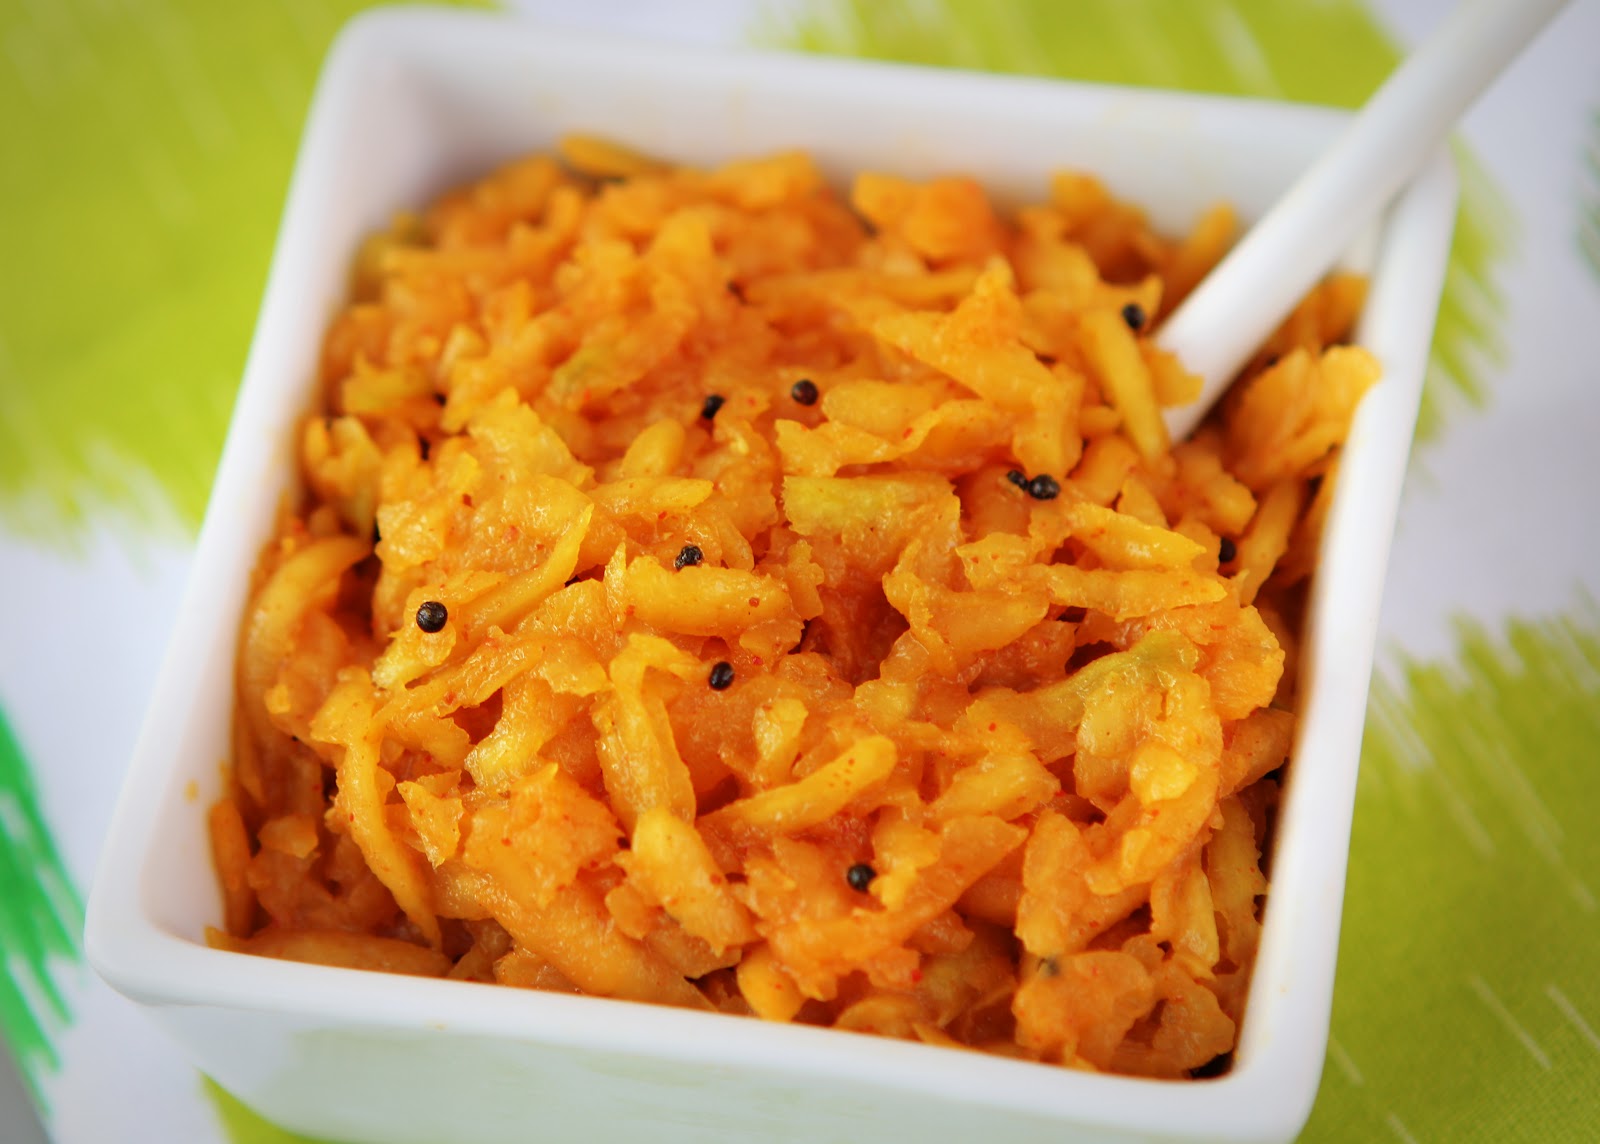
Green Mango Chutney/ Kairichi Chutney

Ingredients:
2 Green Mangoes
1 Tablespoon grated jaggery
1 Teaspoon red chili powder
1 Teaspoon mustard seeds
1/2 Teaspoon fenugreek/methi seeds powder
1/2 Teaspoon asafoetida powder
1 Tablespoon oil
Salt to taste

  • Pick firm, raw mangoes for this chutney. Peel and grate mangoes. 
  • Add jaggery and red chili powder. The exact amount of jaggery and chili powder will depend on the sourness of the mango and your preference. So make adjustments as needed. 
  • Heat oil in a kadhai, add mustard seeds and let them splutter. 
  • Turn off the heat, add asafoetida and fenugreek seeds powder (so they don't burn) and add this tempering to the grated mangoes. You want asafoetida to impart its strong pungent fragrance. 
  • Add salt to taste, mix well and let the chutney sit for about an hour so all the flavors penetrate the mango. 

There - complete with all the flavors, this chatpati chutney will make any meal special!

Wednesday, September 19, 2012

Ganesh Chaturthi Wishes

Wishing everyone a very happy Ganesh Chaturthi! May Lord Ganesh bless you with health and happiness, and remove all obstacles from your path.

My eco-friendly hand made idol with natural clay and non-toxic paint

Hope everyone is enjoying delectable modaks and other naivedya. Here are some recipes you could make
this year:


Tuesday, September 18, 2012

Haliv/Aliv Ladu

Hartalika wishes everyone! Happy fasting to those who are observing it today. Hartalika is celebrated by women in honor of Goddess Parvati on Bhadrapad tritiya (third day of the Hindu calendar month Bhadrapad). I used to observe the fast as a girl - to pray for a husband like Shiva! Now that I have found him, I skip the fasting bit of the celebration ;). Hartalika falls a day before Ganesh Chaturthi. My grandma would scurry around just before the big day trying to fill the pantry with sweets, so none of the visitors who came for Ganpati darshan left without plentiful of them. She made pedhas, barfis and all sorts of laddus. I always had my eye on the Haliv laddus, to replenish the depleted energy after a long day of fasting.


Haliv/Aliv seeds come from an herb called garden cress. They are also known as Aserio seeds. These seeds are rich in iron, calcium and protein. Grandma told us how good they were for women and said, "We didn't have all these energy tonics in my days. We ate haliv ladus or kheer for the essential nutrients." The great thing is, these laddus taste much better than any energy drink you've had! Haliv seeds swell up once soaked, just like sabja we put in faluda. They give a nice, chewy texture. The laddus are quite decadent with the generous use of coconut. The surprise element is the sweet, floral aroma from cloves. You can add some dry fruits if you like, but the laddus are quite rich on their own. Other laddu recipes, like rava and besan, require exact measurements and technique. This recipe is a lot simpler in comparison. The only tedious part is the cooking process.


 Haliv/Aliv Ladu

Ingredients:
1/2 Cup Haliv/Aliv seeds (Aserio seeds)
1 Cup coconut water (use regular water if not available)
1 Cup fresh grated coconut
3/4 Cup grated jaggery
2 Tablespoons sugar (if required)
3 Cloves
2 Teaspoons ghee (clarified butter)

  • Soak haliv seeds in coconut water for about an hour. The seeds start to puff up immediately and become slippery. They double in size once completely soaked.
  • Mix grated coconut (you can add some later if needed) and jaggery to the seeds and combine well. Let it sit for another hour. There should be equal or little more amount of coconut as the seeds. 
  • While the seeds are soaking, roast the cloves and grind them to a fine powder. 
  • Heat ghee in a kadhai and add the coconut,jaggery,haliv mixture and cloves powder and cook on low flame, stirring constantly. The seeds need to be cooked for a long time (~20-25 mins) until they become soft. 
  • Once the seeds are cooked through and the mixture comes together, turn off the heat and let it cool. 
  • Make golf ball sized laddus (you probably won't be able to eat a bigger laddu at one time since they are quite heavy). 

Notes:

  • The sweetness of jaggery depends on the quality. You can add some sugar to achieve desired sweetness. 
  • Soaking the seeds in coconut water adds more flavor. Use regular water if you don't have it. 
  • This recipe makes about 10-12 laddus.

Sunday, September 9, 2012

Pizza Night

When I lived in NY, pizza was my go-to meal. It was the most accessible food choice when I was on a time crunch, was lazy to cook one day, or made last minute dinner plans with friends. My numerous sleepovers with school buddies were never complete without ordering a variety of thin crust pizzas from the 'Famous Pizzeria' (it was famous too =D). The crispy, baked to perfection pizzas would be gobbled up amid 5-6 girls chattering all at the same time! My favorite pizza had lots of veggies and wasn't drowned in out-of-the-can tomato sauce. Post school, as I started making healthier diet choices, I cut down my pizza consumption considerably. But on Friday, when my friend came down from LA to stay over, I wanted to have some pizza for old time's sake. Only this time, I made it from scratch at home.

I love thin crust pizzas since you get to enjoy more of the good stuff (the toppings) without filling yourself with dough! Previously when I made the crust at home, it was more like a roti dough that I used. This time, it was authentic with yeast, and yet had the healthy whole wheat component. I switched things up with a creamy garlic sauce instead of the typical tomato pizza sauce. You don't have to tell anyone that there's hardly any cheese in it. The recipe is extremely easy and a favorite of mine. I often add it to my pasta when I'm craving a luscious, yet not too cheesy sauce.

Making this pizza seems like a long process. And it is, but most of it just calls for sitting and waiting for the dough to rise or the pizza to bake. Everything else is pretty simple and the effort is worth every tasty bite! The great thing about making pizza at home is you can add whatever and how many ever toppings as you like. If you have friends over, have fun with them making your own pizzas. Keep the dough and the toppings ready, and each person can build their own. The garlicky gooey goodness of the sauce tastes perfect with baked crunchy veggies.

Note: This recipe makes around 4 small or 3 medium pizzas.


Thin Crust Pizza with Creamy Garlic Sauce

Ingredients:
Crust:
1 1/2 Cups warm water
1 Packet active dry yeast
1 Teaspoon sugar
2 Cups whole wheat flour
1 Cup all purpose flour
2 Tablespoons EVOO
Salt to taste
All purpose flour/corn flour for dusting

Garlic Sauce:
1 Tablespoon butter
1 Teaspoon all purpose flour
1 Cup milk
3 Garlic cloves - grated
Fistful (about 1/4 cup) of shredded cheese - Used a 4 cheese blend. Go for simple mozzarella if you like.
Mrs. Dash seasoning blend or any other herbs and spices blend
Salt to taste

Toppings:
Any veggies you like really! I used a mix of thinly sliced mushrooms, red onions, tomatoes, green bell pepper, avocado, olives, jalapeno (as you can tell, I love my veggies!)

To make the crust:

  • Add active dry yeast and sugar to the water and keep aside for 10-15 minutes until the yeast bubbles. 
  • Once the water is frothy, add the two flours, EVOO and salt and knead really well for a few minutes. You can add a little bit of warm water if needed to form a soft, elastic dough ball. Cover the dough and let it rise for about 45 minute or until the dough doubles in size. 
  • Punch the dough and knead again for a minute until soft. Keep aside until you work on the sauce. 

To make the sauce:

  • Heat butter in a sauce pan on low-medium flame. Once the butter melts, add all purpose flour and whisk continuously until the flour cooks through and turns a golden color. 
  • Add milk and grated garlic to the pan and keep stirring, breaking any lumps. The sauce, or rue as it is called, starts to thicken quickly. Turn the heat off when you achieve the desired consistency. 
  • Season with some salt and your favorite seasoning blend (simple Italian herbs will do), and add a little bit of cheese and stir. The heat will help the cheese melt and blend into the sauce. If the sauce becomes too thick, simply add some warm milk and whisk. The sauce is ready!

To put the pizza together:

  • Preheat over at 400F. 
  • Flour a pizza stone if you have one, or a wooden surface to roll the dough. Divide your dough in three or four parts depending on how big you want the pizzas. Roll each dough ball into a thin crust (about 1/4 inch) using a gentle hand on the rolling pin. 
  • Transfer the crust to your baking tray (don't try to lift it after building your pizza - wisdom learned from a stupid mistake =D ), then spread that yummy sauce generously, your choice of thinly sliced veggies and sprinkle just a little bit of shredded cheese. I used only a tablespoon or so for each pizza. 
  • Bake for 20 minutes or until the crust is golden brown on the sides and the veggies are baked crispy. 


Some chili flakes on top, a drink on the side, and some fun conversations are all you need for great dinner time.

Wednesday, August 29, 2012

Of White & Gold

The first day of college, I entered my class with visible nervousness, and saw her reassuring face smiling at me. It was comforting to see someone giving a friendly smile in an unfamiliar place. Only I didn't know then that P and I would go on to form a strong bond of friendship that was to last all these years and many more to come. P, my BF from college, and I shared some of the best times as classmates and later as roommates in college. While I lived away from my family, I sought the love and comfort of her home. P's loving family quickly accepted me as one of them. I spent holidays at her house, had silly slumber parties, took over the basement to practice for our dance shows, celebrated many festivals there, and most of all, enjoyed home cooked food!

P is a Keralite, or Mallu, as known popularly. It was at her house that I first had a taste of Kerala cuisine. Rich with generous use of coconut, spiced with red and green chilies and scented with curry leaves, Kerala food is full of bold flavors. Every visit to P's house was filled with a delicious breakfast of dosa and a lavish lunch spread of red matta rice, beet-root or cabbage pachadi, dry veggie fry called Thoran, rich and creamy aviyal curry with a side of inji curry (ginger pickle) or chammanthi (chutney) to spice it all up. I was treated to payasam on special occasions. Imagine that all that exotic food for a college student who survived on all sorts of rice preparations. Enjoying those delicacies with the sweetest family one can have made it all the more special. 


Today, on the occasion of Onam, I cooked two of my favorite dishes. Onam is an important festival in Kerala, almost like diwali. Women dress up in the traditional white and gold settu sarees, wear jasmine garlands in their hair, adorn the door fronts with athapoo (rangoli made with flower petals), and get together for thiruvathirakali dance. The most exciting part of the celebration is the elaborate feast called Sadya. It's some serious food business! Imagine a large banana leaf filled corner to corner with one delicious dish after another.

I prepared aviyal and spinach thoran today. Aviyal is a kurma like preparation made with many different root vegetables, beans, squash and raw bananas. You can throw in anything you like, as long as the vegetables are firm and don't get watery when cooked. Thoran is any dry vegetable stir fry. I used to love thoran made with beans. Today, I tried it using spinach since I already used beans in the aviyal. Neither of these dishes use overpowering spices. They are extremely fragrant and flavorful with the use of curry leaves, coconut, shallots and chilies. Husband had never tried Kerala food. All I can say is, he is converted now :).


Aviyal

Ingredients:
2 1/2 Cups chopped vegetables - a mix of potatoes, pumpkin, green beans, carrots and eggplant
Curry leaves from one spring
2 Small green chilies - slit lengthwise in the center
1/4 Cup grated coconut
2 Shallots
1 Teaspoon cumin seeds
1/2 Cup yogurt
1/4 Teaspoon turmeric powder
Salt to taste
Red chili powder to taste
Water as needed

  • Chop vegetables into 1 inch long pieces. You can use a variety of gourds, beans and squash or yams. Make sure you choose vegetables that are firm and won't get watery when cooked. 
  • Add the vegetables, curry leaves, green chilies, turmeric powder and a little bit of water enough to cook veggies to a pot and cook until the vegetables are tender. 
  • On the side, grind the coconut, shallots and cumin seeds coarsely in a food processor. 
  • Add the coconut mixture to the veggies, mix well and cook for a couple of minutes. 
  • Add yogurt at the end, salt and red chili powder to taste, water if necessary and simmer for a few minutes. Turn off the heat and it's ready to serve.


Spinach Thoran

Ingredients:
2 Cups packed finely chopped spinach
2 Heaping tablespoons of grated coconut
1 Large shallot
1 Green chili
1 Large garlic clove - chopped
Curry leaves from one spring
2 Dry red chilies
1/2 Teaspoon mustard seeds
1/4 Teaspoon turmeric powder
2 Teaspoons oil
Salt to taste

  • Grind coconut, shallot and green chili coarsely and keep aside. 
  • Heat oil in a pan, add mustard seeds and let them splutter. 
  • Add chopped garlic, curry leaves, red chilies and turmeric powder, and saute until fragrant. 
  • Add the coconut mixture and chopped spinach, salt to taste and cook stirring regularly. 

Serve the thoran and aviyal with some long grain rice or pooris with a side of pickle and papad.


I'm submitting these recipes to the South Indian Cooking Event started by Anu.


Thursday, August 9, 2012

Blog Hopping

The blogging community has opened up a world of culinary possibilites. I bookmark about a dozen recipes every day and at least try to use an interesting technique, a new ingredient or get inspiration from them even if I can't go through them all. There are way too many awesome recipes to try and way too many great cooks to get to know for one lifetime. But the first blogger I came across about 5 years back while looking for Imperial Cold Drink House, and quickly realized the popularity of, was Nupur of One Hot Stove. Nupur is hugely popular in the blogging community, and it is very well deserved. She always has some delicious recipes and useful tips for her readers. And there are few who can write as beautifully as she does.

Her latest post talks about the mighty machines in our kitchen - food processors. It made me fall in love with the Ronald food processor my parents gifted me all over again. I can't thank this little helper of mine enough for making my life easier. I use it to knead dough when I have a large group of people to feed, make soups, chutneys, idly-dosa batters and a zillion other things. It was time to show it some love by making Nupur's red bell pepper pesto. What a fantastic recipe! I have used roasted red bell peppers in wraps, hummus, eggplant dips etc., but have never tried pesto with it. Coincidentally, I had also picked up a bunch of red bell peppers on sale from Sprouts the other day. Nupur's post came at the right time. With whatever substitutable ingredients on my hand, I made the pesto today. There was a fresh spring of basil in the garden - totally meant for pesto. The only nuts available in my pantry were almonds. They don't have an overpowering taste and blended in just perfectly. Husbby is raving about this pesto and I'm really pleased with the outcome as well. I'll surely be making this for a potluck or a party!

Updated image : I made this pesto without tomato and I think I like this better. 
Roasted Bell Pepper - Basil Pesto

Ingredients:
2 Large red bell peppers - roasted, peeled and seeded
1/2 Tomato (optional)
2 Garlic cloves
1/2 Cup almonds (you can also use a mix of almonds and cashews)
Basil - handful of leaves
1 Teaspoon paprika or to taste
Salt to taste

  • Roast bell peppers using the technique I've mentioned here. Or simply use the bottled ones.
  • Grind all the ingredients into a fine pesto. I omitted olive oil completely. The pesto tasted just perfect without it, but go ahead and add it if you like the taste. I didn't have any jalapeno. Paprika was a good substitute for smoky heat. 

We enjoyed the pesto with some chips. I'll probably be spreading the leftovers over a slice of bread tomorrow. 

Wednesday, August 8, 2012

First Zucchini!

Finally, after fighting last year's luck and some persistent slugs, my zucchini plant has yielded its first fruit. As I mentioned earlier, I knew exactly what I was going to make with the first zucchini. Hubs and I have become huge fans of this simple recipe to make zucchini fries/chips. The original inspiration was a recipe by Veggie by Season. I had tried it in my egg-aversion days and had replaced egg with some yogurt to help the breadcrumbs stick. Sadly, I ended up with a product far from being crunchy. The yogurt made it a soggy mess. Ever since, I have resorted to the good ol', comparatively healthy technique of shallow frying. I also switched to panko bread crumbs instead of the regular ones since they provide a lot more crunch. Some tweaking to the original seasoning of simple salt and pepper makes this version quite flavorful. Today we enjoyed the chips as appetizers for dinner. One zucchini was just enough to get us started on the rest of the courses. 

The picture came out sad, only because I was too hungry to spent time on photography!
Zucchini Fries/Chips

Ingredients:
1 Zucchini
1/2 Cup yogurt - whisked
3/4 Cup panko  bread crumbs
Paprika to taste
Dash of garlic powder
Salt to taste
Oil spray/oil

  • Cut zucchini in about 1/8 inch thick disks. Don't make it too thin. 
  • Whisk some yogurt (with a few drops of water if needed) so that it's smooth. Season it with paprika, salt and a dash of garlic powder. 
  • Take the bread crumbs in a plate and season them with paprika, salt and garlic powder as well. Seasoning yogurt as well as the bread crumbs will make these chips flavorful throughout. 
  • Dip the zucchini in yogurt, then press into the bread crumbs on both sides and fry in a pan using oil spray. If you don't have oil spray, simply spread some oil on the pan. Fry on both sides until golden brown. 

You can enjoy these chips with some ranch or another creamy dip, but they taste just perfect by themselves. 

LinkWithin

Related Posts Plugin for WordPress, Blogger...