Tuesday, October 29, 2013

Hunky Chunky Cookies And Halloween Fun

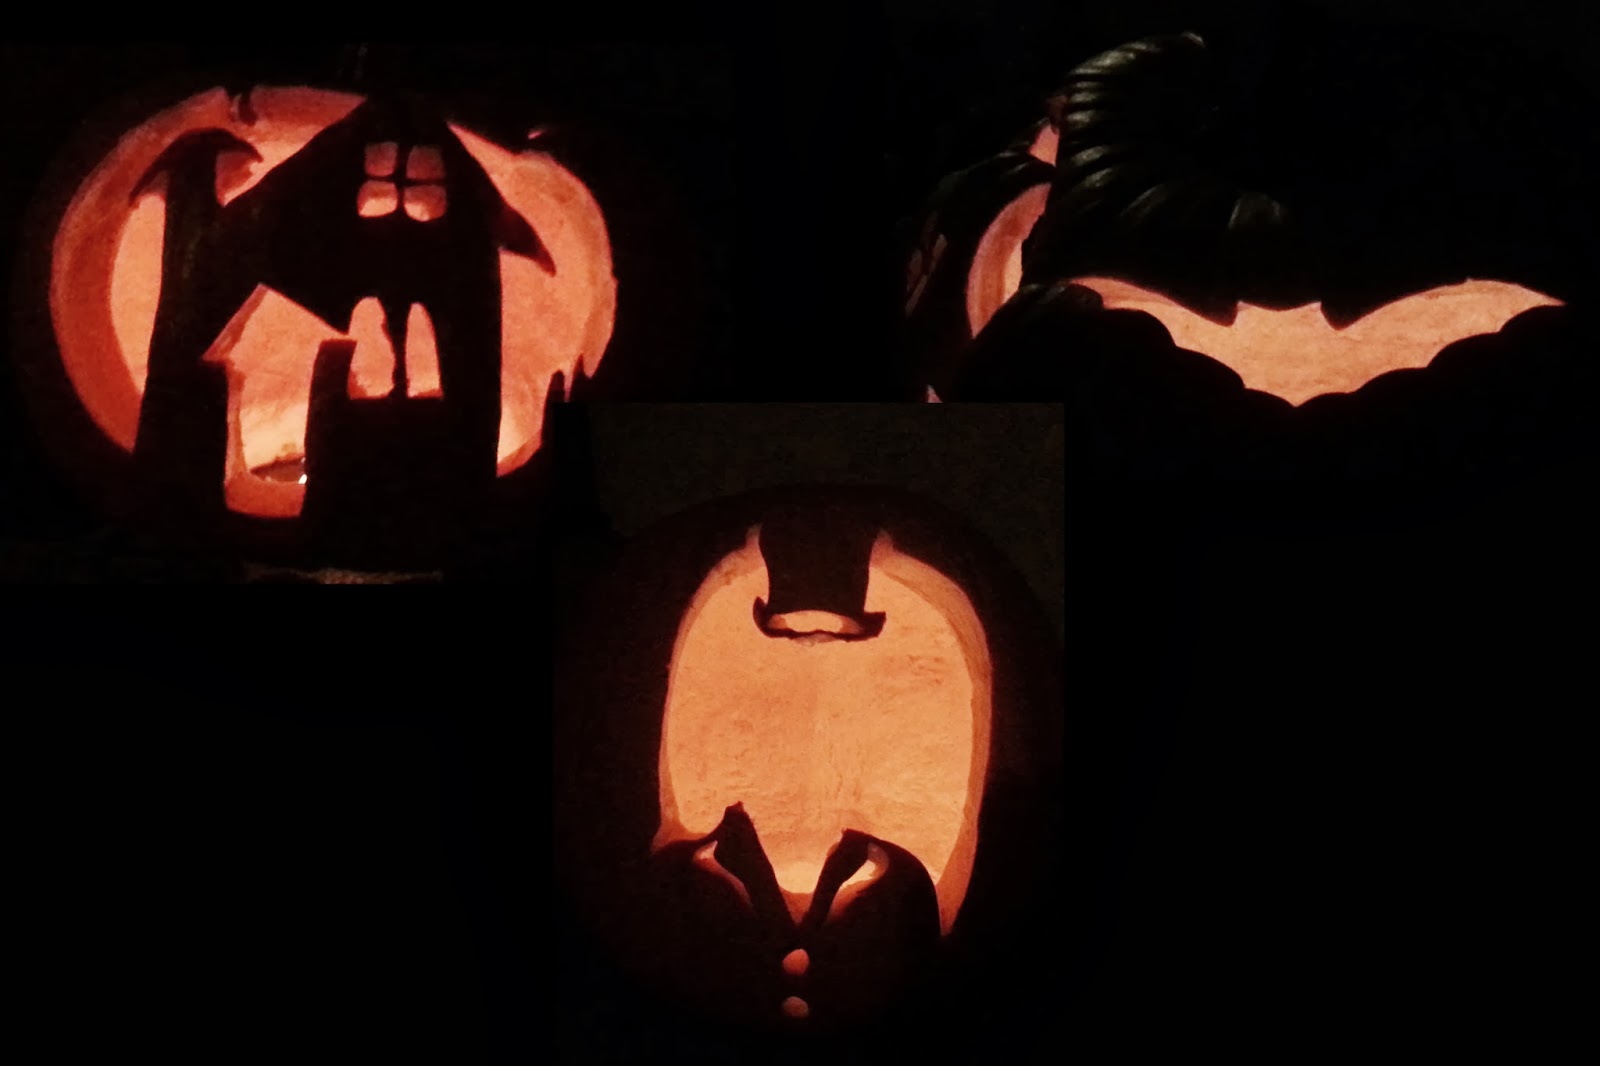
Halloween decorations have crept up (literally) in my neighborhood over the past week. Our orange and purple lights are hanging on the palm tree, finally. Better late than never. The one thing that we did have out in time, our carved pumpkins, didn't survive to see the Halloween day though. Husband was quite methodical in his approach - he bought a pumpkin carving stencil book and all the fancy tools for carving. He even made a chlorine solution to prevent pumpkins from rotting. Unfortunately, the solution dried out the pumpkin a bit too much, shriveling and cracking through some of the design. The mold didn't seem to care about chlorine either. Anyhow, our haunted house and headless man managed to spook others for almost a week.


I picked up a Halloween special magazine while waiting at the grocery check-out counter a couple of weeks back - yes, I can shop all the way to the check-out line :D. I promptly tried one of the appetizers - Potatoes stuffed with herb & garlic cheese. Tell me how you can go wrong with cheese and potatoes! I am planning to make them again for my office Halloween potluck. Recipe should follow soon.
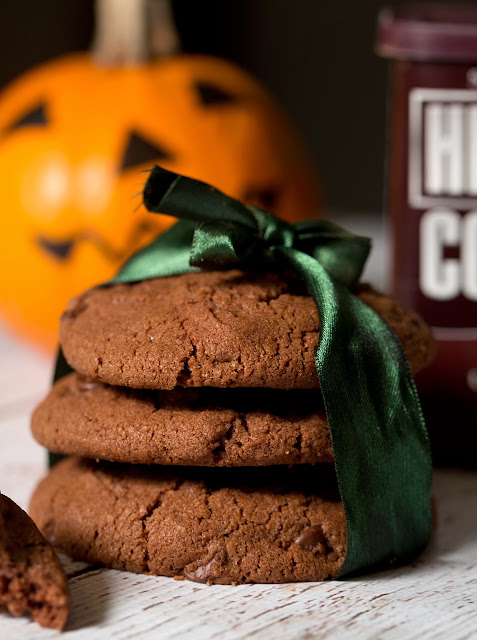

Now, what's Halloween without some lots of chocolate? Another recipe I tried for chocolate chip cookies, with a couple of modifications, was a winner! I made a fresh batch for my friends on Sunday, and also shared some with my colleagues yesterday. Everyone was all praises for the cookies, genuinely :D. The original recipe used a combination of milk, bittersweet, and white chocolate chips. I went with what was available in the pantry - bittersweet chips only. We're bigger fans of dark chocolate anyway. The cookies came out nice and big - the kind that make kids happy. So I called them Hunky Chunky cookies!


**Note: This recipe makes about 22-24 cookies

Hunky Chunky Chocolate Chip Cookies

Wet Ingredients:
1 Cup unsalted butter
2 Cups sugar (all white or half brown and half white)
1 Extra large egg
1 Teaspoon vanilla extract

Dry Ingredients:
1 Cup APF
3/4 Cup whole wheat flour
1/2 Cup unsweetened cocoa powder
1 1/2 Tsp baking powder
1 Tsp salt
1 Cup bittersweet chocolate chips

Prep: Line two baking sheets with parchment paper/aluminum file. Preheat oven to 350F.

  • In a large bowl, cream together butter and sugar with until smooth.
  • Beat in egg until the mixture if fluffy. Stir in vanilla extract.
  • In a separate bowl, sift all the dry ingredients except chocolate chips. Beat the flour into the butter-sugar mixture slowly, and fold in the chocolate chips.
  • Drop big spoonfuls of the batter on the lined sheets. I used a small ice-cream scoop to ensure the same size. Each drop was approximately the size of a golf ball.
  • Bake for 10-12 minutes. Then let the cookies cool on a rack.

I kept one of the baking sheets right at the center of the oven, and the other closer to the bottom. The center sheet cookies turned perfectly chewy. The bottom ones were more on the crispy side. Still delicious, but I wouldn't put the sheet right by the heating coils. I would like to add macadamia nuts next time - that'll make these cookies just perrrfect!

Hope you have a spooktacular, sugar-filled Halloween!!!


Thursday, October 17, 2013

Laddu Love

I find it challenging to plan for late afternoon-early evening snacks, especially when I'm ready to chomp down anything after getting home from work. But then, I don't like to kill my appetite for dinner either. It's not too much work to whip up guacamole or make veg cutlets or something else. Still, it would be nice not having to think about it every day. For quick energy boost between meals, I liked all sorts of khau (snack/treat) grandma used to keep ready - bhadang or healthy chivda to eat with yogurt, or one of her wholesome laddus made with moong, haliv (aserio) or whole wheat. How easy life used to be when mom or grandma had to worry about such things...*sigh*!

Now that I'm working up an appetite with the cooling Fall weather (and in preparation for the holiday season ;), I wanted to have something ready in the house for the occasional hunger pangs. Kanakeche Ladu (Whole Wheat Laddus) seemed to suit my mood, and the lack of enthusiasm for making anything elaborate, the other day. These laddus are quite nutritious, with golden roasted whole wheat flour, dry fruits, and a good dose of ghee. They are made with my favorite sweetener jaggery - always happy to forgo refined sugar. Most importantly, unlike besan or rava laddus, there's very little that can go wrong in the preparation. And you don't have to fret if you can't roll laddus, because the churma, or the coarse mixture, tastes fantastic by itself. Just don't tell anyone you attempted to make laddus :D.

Ladies, these laddus will be great to break your Karwa Chauth fast. Sweet, and energy packed when you are ready to faint after a long day of fasting =).

**The recipe below makes approximately 12 laddus.


Kanakeche Ladu/Whole Wheat Laddu

Ingredients:
2 Cups whole wheat flour
1/2 Cup ghee
3/4 Cup grated jaggery
Chopped dry fruits per your liking - almonds, cashews, raisins
1/2 Teaspoon cardamom powder

  • Heat 3 tablespoons of ghee in a kadhai on low flame. Add whole wheat flour and roast until golden and aromatic (~10 mins). Keep the stove on low and stir the flour so it doesn't burn. Once done, keep aside.
  • Add the remaining ghee and grated jaggery to the kadhai and heat just until the jaggery melts completely. Don't overcook. Be very careful -jaggery can really burn once hot!
  • Pour this ghee-jaggery mixture in roasted whole wheat flour. Add chopped dry fruits and cardamom powder. Mix everything well with a spatula.
  • Once the mixture cools enough to touch, break all the lumps with your hands and make golf-ball size laddus. If you find it difficult to roll laddus, add a little bit of ghee (although 1/2 cup should enough really).

If the laddus harden (because ghee can solidify in cold weather), just pop them in the microwave for a few seconds and they'll be as good as fresh. 

Sunday, October 13, 2013

Hello Again!

First of all, a big HELLO to you all! I've been away so long, I don't even know where to begin this post. Let me start by wishing a very happy Dashera! What did you do this Navratri season?

I've been neck deep in work lately. I don't want to whine, but it's been an uninspiring couple of months. We finally caught a much needed break last weekend and escaped to a beautiful mountain log cabin. After recuperating, this weekend was all about cleaning, reorganizing, and decorating the house for the holiday season. We're ready to celebrate fall, Halloween, Diwali, and whatever other holiday that's coming up :). Doing something festive cheered me up to finally write a post. A bright wreath with fall hues adorns our front door now, carved pumpkins are ready to spook passersby, and a big star shaped lantern will be hung up soon. Fun times are here again!

I asked husband what he wanted for Dashera today, and he sounded pretty unenthusiastic about any sweets. There was no time to make a big feast among all the chores either. So I kept the menu simple yet special - a fragrant pulao, daal fry, with papad and pickle on the side. I often make peas pulao to add a touch of  'special'. Today, I tried my mom's favorite khada masala pulao (whole spices pulao) topped with decadent ghee fried potatoes and onions. I certainly care more about the topping than the rice itself :D. This pulao is all the fancy without much work. And it's a big crowd pleaser, loved by kids and adults alike. It'll be a great addition to your Diwali party menu.


Whole Spices Pulao with Fried Potatoes & Onions

Ingredients:
4 Small red potatoes - peeled and cut into 8 wedges each
1/2 Red onion thinly sliced
1 1/2 Cups Basmati rice
2 Green chillies (slit in the center)
1 Teaspoon cumin seeds
2 Bay leaves
1 Cinnamon stick (~ 2 in)
5-6 Cardamom pods
4-5 Cloves
1/2 Teaspoon whole black peppercorns
2-3 Tablespoons ghee
Salt to taste

**Use a cast iron pot for making pulao. If not, use any thick bottom cooking pot.
  • Wash and drain rice and keep aside. 
  • Heat the cooking pot on medium-high and add 2 tablespoons ghee to it. Fry potatoes in ghee until golden brown (2-3 minutes) on each side. The potatoes should get crispy on the outside. Make sure they are tender when poked. Take them out and keep aside. 
  • Fry thinly sliced red onion (enough to garnish pulao) until brown in the remaining ghee. Keep aside.
  • You should still have enough ghee left in the pot for pulao. If not, add some more. If the ghee you fried potatoes and onions in smells burnt, replace it with a tablespoon of fresh ghee. 
  • Add all the whole spices, and green chilies to the pot and roast for a few seconds. Once the spices are fragrant, add washed rice and roast for another minute. 
  • Add 2 cups of water, salt to taste, and let the rice cook. It should cook fairly quickly after soaking, and cooking in ghee. You can cover it for some time, but take the lid off once it is half way done so that it doesn't get clumpy. Add a little bit of water if needed. 
  • Take out the rice in a serving bowl/dish and layer with fried potatoes and onion. 
**You can add peas, carrots, or green beans to the pulao if you like.

Serve with raita, daal fry, or your favorite curry. It tastes quite great by itself too. I prefer it this way.

Now that I'm back, stay tuned for more updates!

Tuesday, September 10, 2013

Ganpati Wishes

Dear readers,

I know I have been a bad blogger the last couple of months. I will be returning soon. For now, here's a belated wish for Ganesh Chaturthi. Hope you spend the next few days in good company, eating good food.

My decor this year -


Monday, July 8, 2013

Dabeli To Go & Summer Art Work

My neighbor's kids wake me up early these days with their gleeful squeals and loud splish-splash in the swimming pool. Am I complaining? Yes, but only because I can't join them...hmph! Wouldn't it be wonderful to become a kid again and enjoy carefree, summer-long vacations! Those days are never to return. Nonetheless, I made the most of my 4-day Independence Day holiday.

We decided to camp out at Coronado Island for the 4th of July fireworks. You have to reach there early and secure a spot to be able to see the fireworks. We packed a lot of munchies that my in-laws brought from India. For the 'main course', we had my favorite Dabelis. I had to find a way of transporting dabeli to the location - taking ready-made dabeli would've left them soggy, and carrying all the ingredients separately wasn't going to be efficient. I ended up making a filling 'cake' and carrying paav (bread) and sev separately. All this could fit in my bright orange beach tote - perfect for a day out.
The 'cake' was nothing but layers of everything that goes in between the paav. You can find the elaborate recipe here. I mashed potatoes with ready-made dabeli masala, and mixed in green and tamarind chutnies with the potatoes. This was the bottom layer. On top went a layer of spice-roasted peanuts, pomegranate seeds, and finely chopped onion. Chopped cilantro would've been perfect, but I had run out of it. When we were ready to eat, I dug a big scoop of this filling, taking some from each layer, and smeared it on paav, then topped it off with crunchy sev. The idea and the outcome was loved by everyone.

**Tip: Cut the onion in half and wash it in cold water before chopping it up. This will take away some of that pungency and odor.


Now that the days are getting hotter and hotter, I find it convenient to cook quick and simple meals, and use that extra time to get back to art work.

Husband had gifted me a Chinese brush painting set for Valentine's day. I finally got around to trying it. Here's my first try at it. (As you can tell, I get lazy with the pictures quite often).
There was some learning curve here, but I loved the free-style brush strokes and light color pigments. These would make great greeting cards.


I've been doing a lot of instant-gratification kind of crochet work lately.

Guess hoo? I saw these ridiculously adorable cell phone cases on Etsy. I wanted to keep mine simpler, but the eyes could've been bigger for sure. I plan to make more of these in different colors for gifts.


Husband always demands I make something for him. Whether he uses it or not is another question. I tried to make a 'man' version cell phone case for him with a football pattern. I can pretty much slap this pattern on anything and he'll love it.


I bought cotton yarn for the first time over the weekend. It was perfect to make this summery, two-colored dish towel. 


I gifted this purse to my sister, just for being the awesome self she is =). I am in love with the shell pattern I used for the flap. 


Yet another bright-colored pattern for our patio. I intended it to be a rug, but we've been using it as a patio chair throw and it looks pretty. 


Wednesday, July 3, 2013

Fresh From The Garden

The garden gods have been pretty generous lately. My plants are loving the warm weather and all the extra attention they've been getting from two new members in the house now.

Our heirloom tomato plant produced its first meaty, juicy, attractive babies. Their vibrant color won me over even before tasting them. And the taste - aah! They had the perfect balance between sweetness and tartness. Nothing like the grocery store varieties. I could eat these on their own!


Along with the prized heirloom produce, we picked a few red chilies, plenty of tiny purple tomatoes, and a whole lot of fragrant basil. Thank heavens for all these fresh veggies and herbs, or I may forget how things are supposed to taste.


What do you do when you have organic, flavorful produce? Not muddle the flavors! That's what I decided and made this simple tomato-pesto tart using puff pastry sheets lying in the freezer. Tart was a great choice to use heirloom tomatoes - they are firm and meaty, and hold up really well even after being blasted with heat. And their soft flesh contrasted the crunchy pastry sheet beautifully. These tarts made for a nice summer meal - crispy, light, full of bursting juices.


Heirloom Tomato - Pesto Tart

Ingredients:
2 Puff pastry sheets
3-4 Heirloom tomatoes (depending on their size)

For pesto:
1 Cup packed fresh basil leaves
2 Garlic cloves
1/4 Cup nuts - cashews, almonds, pine nuts, or walnuts
2 Tablespoons grated parmesan cheese
Olive Oil as required
Salt to taste

  • Preheat oven at 375F.
  • Add all the ingredients for pesto, except olive oil, to the food processor. Make a coarse paste, while adding olive oil little by little. I use minimum amount of oil to get a smooth paste.
  • Wash and cut tomatoes in 1/4 inch discs.
  • Thaw the puff pastry sheets just enough so that you can separate them. If you let them thaw for too long, the dough will start stretching in all directions! Cut each sheet in three width wise. I used Pepperidge Farm box which comes with 2 sheets - so I had 6 decent sized tarts.
  • Lay these sheets on a tray lined with parchment paper or lightly oiled aluminum foil. Divide the pesto and spread it on each sheet. Then lay the tomato slices, and bake these tarts for 15-18 minutes or until the pasty sheets are golden brown. The tarts are ready to eat. 
---

One of my very close friends, Aditi, has been a loyal reader of my blog. We keep exchanging recipes and ideas. She gave me the recipe to make Sai Bhaji - a simple mixed greens preparation using split chickpea lentils and potato for some substance. I tried it last night using fresh Swiss Chard from the garden and other greens. This recipe is a keeper. It was done in no time and just tasted 'healthy'! I was too eager to eat and took a very bad picture with my phone. 


Sai Bhaji

Ingredients:
1 Cup of spinach, swiss chard and mustard greens each - washed and chopped. Feel free to add any other greens that are smooth in texture when cooked.
2 Cup washed split chickpeas (chana daal) - soaked in water to soften
1 Small potato - peeld and cubed
1 Small onion - finely chopped
1 Tomato - cubed
2 Teaspoons minced ginger and garlic
1 Tablespoon oil
1 Teaspoon mustard seeds
1/4 Teaspoon turmeric powder
Red chili powder to taste
Salt to taste

  • Heat oil in a pressure cooker and add mustard seeds. Once they splutter, add turmeric powder, and chana daal. Saute for 2 minutes.
  • Add ginger-garlic, onion, tomatoes, and potatoes if using, and mix well. 
  • Mix in all the greens, add red chili powder and salt to taste, and add a little bit of water (just enough to cook). Pressure cook the greens for 2-3 whistles. I cooked them without the whistle just enough so the chana daal would cook but not break. 


The Bhaji is ready to be eaten with rotis. Chana daal provided a great bite to the otherwise soft bhaji. A good dose of protein too. It had a nice tang provided by tomatoes that lifted all the flavors. I'll add this recipe to my usual dinner rounds.


Sunday, June 30, 2013

Summer Recipe - Pineapple Curry

Ever since the in-laws arrived, we've been caved in trying to stay out of the 3-digit temperatures. The only solace has been walking on the beach in the evening dipping our feet in pleasantly cold waters, and eating cooling foods. It only helps that my MIL is a fantastic cook who has plenty of recipes I want to learn. We've been cooking up a storm already. As soon as she was out of jet-lag, we went and bought the ingredients to make Ananas Amti (Pineapple curry). A recipe I've wanted to learn from her first-hand ever since I got married. 


My first encounter with this tangy, sweet and sour curry was at my wedding! My MIL gave her mother's recipe to our caterer, who did a very good job making it on a large scale. If you're married, you'll know how trying it is to eat at your own wedding while greeting hundreds of guests. Yet, I remember the taste of this amti very distinctly. It was quite special. My MIL made it today, and it was even better than how I remembered it. Although it's called amti, the color, consistency and flavors are more like kadhi. It has a simple yet fragrant tempering of ghee, cumin seeds and green chili - the classic flavors of kadhi. The pineapple chunks are then cooked in a mixture of cashew paste and coconut milk to make a very smooth and creamy curry. Slurp! For all the richness, this amti is a quick fix, especially if you buy canned coconut milk and pre-cut pineapple. 


Ananas Amti - Pineapple Curry

Ingredients:
2 1/2 Cups fresh,ripe pineapple chunks - the success of this curry depends on the quality of pineapple
1/2 Cup whole cashew nuts (or halved in the center)
1 Cup coconut milk
2 Tablespoons sugar (or as required)
Salt to taste
Lime juice as required (optional)

Tempering:
2 Tablespoons ghee
1 Teaspoon cumin seeds
2 Green chilies - slit vertically in the center
1/8 Teaspoon turmeric powder

  • Cut pineapple in ~3/4 inch chunks. If the pineapple is not ripe/sweet enough, sprinkle some sugar on it and keep aside for 30 minutes. This brings out the juices and makes the pineapple taste better. You can use canned pineapple, but like anything else, fresh ones taste better. 
  • Soak cashew nuts in warm water so they soften. 
  • Once the pineapple and cashews are ready, take out 1/2 cup pineapple chunks and one third cashews and make a smooth paste. 
  • Heat ghee in a pot and add cumin seeds and green chilies. Once the cumin seeds splutter, add remaining pineapple chunks and a little bit of turmeric (only for slight color), and let the pineapple cook for a couple of minutes. 
  • Mix in pineapple-cashew paste, and the remaining cashews. Add a little bit of water if the mixture is too thick and let it boil for 4-5 minutes. 
  • Lower the heat, add coconut milk, salt to taste, and sugar you desire more sweetness. Mix everything well and turn off the heat. You don't want to cook this too long after adding coconut milk else it'll separate. 
  • Let the curry cool down a little, then sprinkle very little lime juice to add some tang. Taste and decide the balance between sweet and sour to your liking. Do not add lime juice to hot curry - it can taste bitter. 


Serve this amti with hot rotis or puris. It is heavenly with the decadence of cashew paste and coconut milk. The sweet, bursting pineapple is just perfect for a summer meal.


LinkWithin

Related Posts Plugin for WordPress, Blogger...