Showing posts with label Entree. Show all posts

Friday, January 30, 2015

Kale Pesto

If you follow the latest food trends, you'll know there is a new 'superfood' popping up every now and then. It seemed like everyone had jumped on the flaxseed wagon some time ago before Chia seeds stole the limelight. Then there was the barley to quinoa shift. And while spinach remains one of the most popular greens thanks to Popeye, kale has been 'the' green to consume lately! I'm not crazy about going by the latest food trends; in fact I believe in eating a variety. But adding a new green to my diet, especially one rich in vitamins and minerals, can never hurt. Another reason to eat kale is it's abundant in winter, when other vegetables are scares. I have been making an effort to eat more of it. My problem with kale though is that it can be bitter and stringy if the leaves are not absolutely fresh and tender. For that reason I had mostly been making kale chips in the oven for the longest time. Now I have found another recipe that will get me to eat more of the green. I was browsing through the cookbook that came along with my Vitamix, and came across a basil kale pesto recipe. I didn't have basil or pine nuts on hand, so I made the pesto using kale entirely, and swapped walnuts for pine nuts. The result was delicious. I tossed together some cooked penne pasta, fresh tomatoes, broccoli, and pesto for a satisfying and healthy week night dinner. The leftover pesto made a great smear for a veggie sandwich.


Kale Pesto

Ingredients:
2 Cups Kale leaves - torn
2 Cloves of garlic
1/4 Cup walnuts - you can also use pine nuts or almonds
2/3 Cup Parmesan cheese
~1/4 Olive oil
1/2 Teaspoon red chili flakes
Salt per taste

  • Wash kale leaves thoroughly. Tear the leaves off the stock. If there are any veins that are tough, remove them. 
  • Toss in kale leaves, garlic, walnuts, Parmesan, salt, and red chili flakes in a food processor. Pulse a few times until all the ingredients are combined and the leaves are roughly chopped.
  • Slowly drizzle in olive oil while grinding until you have smooth pesto. 


Serving suggestion:
Cook your favorite pasta. Add chopped fresh tomatoes, blanched broccoli florets, kale pesto, and mix well. Serve with some grated Parmesan on top. You can add any other veggies or meat you like. 

Tuesday, November 25, 2014

Turnip With Tadka

Thanksgiving week has arrived. Winter or not in San Diego, there are winter vegetables galore in my house. This is the first time my parents are truly experiencing all the winter foods. I've made stuffed acorn (which I plan to make again for our Thanksgiving feast), apple-fennel salad, pumpkin-leek soup, roasted sweet potatoes etc. for them so far. They've all been hit with the parents. Winter produce is not new to my mom, but she has rarely tried the non-Indian recipes. I am so glad that my parents are open to trying new foods, and that they actually like it! As I mentioned before, mom had experimented with different ingredients when she lived in the US for a few years. In order to incorporate the local produce into our daily meals, she had Indianized many ingredients; like this cranberry pickle. This simple turnip sabji is one of them. Mom makes turnips with just cumin-coriander, and chili powder for flavor. A simple tempering and little use of spices makes this a soulful dish.


Indian Style Turnip/ Turnip Sabji

Ingredients:
3 Medium turnips
2 Teaspoons oil
1/2 Teaspoon mustard seeds
1/4 Teaspoon asafoetida
1/2 Teaspoon turmeric powder
1 Teaspoon cumin-coriander powder
1 Teaspoon red chili powder
Salt to taste
Chopped cilantro for garnishing
  • Wash, peel, and cut turnips into 1/4 inch cubes. 
  • Heat oil in a pan, and add mustard seeds. 
  • Add asafoetida and turmeric powder once mustard seeds splutter, and add turnip. 
  • Add cumin-coriander, chili powder, salt, and mix well. 
  • Cover the pan and let turnip cook in its own moisture, adding 2-3 tablespoons water if necessary. Stir occasionally. 
  • Turn off heat once turnips are fork tender. Garnish with cilantro, and serve with rotis. 

We will be celebrating Thanksgiving with the family of one of my friends. I'm looking forward to our big meal.

What are you doing this Thanksgiving?

Tuesday, October 7, 2014

Batata Bhaji With Yogurt

It seems I only get to post from one major festival to another these days. There is no time to eat food peacefully, much less take pictures and blog about it. But I'm thoroughly content spending time with and watching my baby girl grow. She turns 7 months today according to the Hindu calendar, and what a fun little thing she is to play with! We also have a full house with my parents visiting us currently - which is why we prepared a feast for Dashera on Friday. Such a bliss being with your near and dear ones on festivals! I meant to post about it right away, but here we are into Kojagiri Pournima and I already have something new cooking in the kitchen. Expect more posts during this festival season.

For us Maharashtrians, Shrikhand-puri is must for the Dashera feast. I made Shrikhand using my Grandma's foolproof recipe. I don't strain the 'chakka' if it's not too lumpy - I like that slightly grainy texture it leaves. There were other traditional dishes on the menu - Batata bhaji/aalu sabji, green beans stir fry/sabji, carrot koshimbir/Maharashtrian style salad, cucumber kayras , masoor amati, and rice. The kayras recipe I posted in the past was taken from somewhere else. Now that mom is here, I made it under her guidance, and it was just how I like it. Her recipe is easier as well. I'll repost it now.

Below is the picture of everything I prepared - how a traditional Maharashtrian thali is served. Of course, you don't expect a square plate,  but I did the best using available resources :D.


Batata bhaji goes really well with shrikhand-puri. Our traditional recipe has a tempering of green chilies and curry leaves. Mom suggested trying something different this time. She taught me a really simple and absolutely delicious recipe for Batata Bhaji in Yogurt. Like everything my mom makes, I loved the preparation. The yogurt taste is not too prominent, but it adds a slight tang and creaminess, and helps in bringing all the flavors together. The recipe below is for a dry sabji, but you can make a thinner gravy by adding more yogurt and adjusting the spices accordingly. There's one more potato recipe added to my repertoire now.


Dahyatali Bhatata Bhaji/Aalu Sabji with Yogurt

Ingredients:
3 Large or 4 medium white/golden potatoes.
1/2 Cup yogurt
1 Teaspoon Garam Masala
1 1/2 Teaspoons cumin-coriander powder
1 Teaspoon green reen chili powder/ to taste
Salt to taste
Water if needed.

Tempering:
1 Tablespoon oil
1/2 Teaspoon mustard seeds
1/4 Teaspoon asafoetida
1/2 Teaspoon turmeric powder.

  • Boil potatoes till fork tender. Peel and cut into 3/4'' cubes. Keep aside.
  • Heat oil in a pan, and add mustard seeds. Once they splutter, add asafoetida, turmeric, and yogurt and let cook for about a minute.
  • Add potatoes, garam masala, cumin-coriander powder, green chili powder, and salt. Mix everything well. If the potatoes seem too dry, add a little water.
  • Cover and cook for 2-3 minutes.
  • Garnish sabji with chopped cilantro. Done!

With Diwali just around the corner, we're getting ready to make Faraal. What's happening on your side?

Friday, June 13, 2014

Gourd For You

As a nursing mother, it is very important that I watch what I eat. Babies have immature and sensitive digestive systems. It didn't take long for me to realize that tummy ache is the main culprit when my baby is fussy or cranky. It is best that I avoid acidic, gassy, difficult to digest foods. The common culprits of tummy troubles are dairy, sugar, and vegetables such as cauliflower, broccoli, cabbage, eggplants, etc. So what's good for a new mother? Gourd! Gourd and squash of every kind. I have eaten more gourds over the past three months than ever in my life. You name it - bitter gourd, ivy gourd, ridge gourd, bottle gourd, snake gourd, pumpkin - you get the idea! These vegetables are fibrous, nutritious, and easy to digest. Add some mung daal (split mung) when preparing and you have a dose of protein too. I have been preparing different gourds and squashes available in the grocery stores here using light Indian seasoning. Here is one of my favorites - butternut squash curry scented with ghee, curry leaves and grated coconut.


Butternut Squash Curry

Ingredients:
1 Medium butternut quash (~2 1/2-3 Cups peeled and cubed)
3 Tablespoons fresh/frozen grated coconut
2 Dried red chilies
1 Sprig curry leaves
1/2 Teaspoon mustard seeds
1/4 Teaspoon fenugreek seeds
Couple pinches asafoetida
1/2 Teaspoon turmeric powder
1 Tablespoon ghee
Salt to taste
Chopped cilantro for garnishing

  • Heat ghee in a cooking pan, and add mustard seeds.
  • Once mustard seeds splutter, add red chilies, curry leaves, and fenugreek seeds. Stir for a few seconds and add asafoetida and turmeric powder.
  • Add cubed squash and grated coconut to the tempering, and salt to taste.
  • Add a cup of water and mix everything well. Cover and cook on medium, stirring occasionally, until squash is cooked thoroughly and the flavors come together.
  • Garnish with fresh chopped cilantro.

Serve with hot rotis and yogurt on the side.


Thursday, November 21, 2013

Winter Cooking

I used to sulk over the drab winter days before moving to San Diego. Now I cherish whatever cold days we get. It is the perfect time to crank up the oven and make something hearty. Here's what was on the menu Monday night - Stuffed Bell Peppers, with Maple Roasted Sweet Potatoes on the side. A combination of savory and sweet dishes. The great thing was, I baked both the dishes at once - saving some energy. What a comforting dinner that was!

Sweet potatoes usually turn into baked fries (the contradiction of that makes me laugh), or get pressure cooked with jaggery in my kitchen. I've wanted to try roasting them with maple syrup for a long time. As the sweet potatoes were baking, I decided to add a crisp apple to the dish on a whim - just because it was sitting there on the counter. It seemed like a natural pairing - apples and maple syrup taste great together, and they'd provide some crunch to soft roasted sweet potatoes. Husband, although skeptical of my creation at first, couldn't get enough of this dish. That's a victory in my opinion!

**The below recipes make 2 servings.


Maple Roasted Sweet Potatoes & Apples

Ingredients:
1 Large Sweet Potato
1 Apple (pick your favorite. I always buy Pink Lady)
1 Tablespoon olive oil
4 Tablespoons maple syrup (depending on how thick it is)
Salt to taste
Paprika to taste
  • Preheat oven at 375F. 
  • Peel and dice sweet potato in ~1 inch cubes.
  • Mix olive oil, 2 tablespoons of maple syrup, salt, and paprika, and toss the diced sweet potatoes in them. 
  • Cut the apple in similar sized cubes and toss them in the remaining maple syrup. 
  • Spread the sweet potatoes on a baking sheet and bake until tender, yet not fully done. Add apples at this point, and bake until the sweet potatoes are fork tender. The apples should be slightly crispy when the dishe is ready. 


Stuffed Peppers With Brown Rice & Lentils

Ingredients:
2 Medium red bell peppers - pick plump ones.
1/2 Cup brown rice
1/2 Cup whole lentils (Masoor)
1 Large garlic clove - minced
1/4 Cup finely diced onion
1 Tomato - diced
1/4 Cup finely diced carrot
1 Spring onion diced (optional)
1 Chipotle in adobo sauce - finely chopped
1 Tablespoon oil
Salt to taste
  • Preheat oven at 375F. 
  • Wash and cook brown rice and lentils together. 
  • Thinly cut the top off the peppers from the stem side. Remove seeds and ribs. Save the tops.  
  • Heat oil in a saute pan and saute garlic and onion until onions turn translucent. 
  • Add chopped tomato, carrot, spring onion, chipotle pepper, and saute until everything comes together (2-3 minutes)
  • Add cooked brown rice and lentils, and salt to taste. 
  • Stuff peppers with the rice mixture. Spray peppers with oil, or lightly brush some oil from the outside. This will help retain moisture. Close the pepper with the top that you chopped. 
  • Keep the peppers in a baking pan and bake for 30 mins, or until the peppers are soft and slightly wrinkled. 
Serving suggestion - Once you take the bell peppers out of the oven, top them off with some grated cheese (I used mozzarella) and let it melt on hot stuffing.

Sunday, June 30, 2013

Summer Recipe - Pineapple Curry

Ever since the in-laws arrived, we've been caved in trying to stay out of the 3-digit temperatures. The only solace has been walking on the beach in the evening dipping our feet in pleasantly cold waters, and eating cooling foods. It only helps that my MIL is a fantastic cook who has plenty of recipes I want to learn. We've been cooking up a storm already. As soon as she was out of jet-lag, we went and bought the ingredients to make Ananas Amti (Pineapple curry). A recipe I've wanted to learn from her first-hand ever since I got married. 


My first encounter with this tangy, sweet and sour curry was at my wedding! My MIL gave her mother's recipe to our caterer, who did a very good job making it on a large scale. If you're married, you'll know how trying it is to eat at your own wedding while greeting hundreds of guests. Yet, I remember the taste of this amti very distinctly. It was quite special. My MIL made it today, and it was even better than how I remembered it. Although it's called amti, the color, consistency and flavors are more like kadhi. It has a simple yet fragrant tempering of ghee, cumin seeds and green chili - the classic flavors of kadhi. The pineapple chunks are then cooked in a mixture of cashew paste and coconut milk to make a very smooth and creamy curry. Slurp! For all the richness, this amti is a quick fix, especially if you buy canned coconut milk and pre-cut pineapple. 


Ananas Amti - Pineapple Curry

Ingredients:
2 1/2 Cups fresh,ripe pineapple chunks - the success of this curry depends on the quality of pineapple
1/2 Cup whole cashew nuts (or halved in the center)
1 Cup coconut milk
2 Tablespoons sugar (or as required)
Salt to taste
Lime juice as required (optional)

Tempering:
2 Tablespoons ghee
1 Teaspoon cumin seeds
2 Green chilies - slit vertically in the center
1/8 Teaspoon turmeric powder

  • Cut pineapple in ~3/4 inch chunks. If the pineapple is not ripe/sweet enough, sprinkle some sugar on it and keep aside for 30 minutes. This brings out the juices and makes the pineapple taste better. You can use canned pineapple, but like anything else, fresh ones taste better. 
  • Soak cashew nuts in warm water so they soften. 
  • Once the pineapple and cashews are ready, take out 1/2 cup pineapple chunks and one third cashews and make a smooth paste. 
  • Heat ghee in a pot and add cumin seeds and green chilies. Once the cumin seeds splutter, add remaining pineapple chunks and a little bit of turmeric (only for slight color), and let the pineapple cook for a couple of minutes. 
  • Mix in pineapple-cashew paste, and the remaining cashews. Add a little bit of water if the mixture is too thick and let it boil for 4-5 minutes. 
  • Lower the heat, add coconut milk, salt to taste, and sugar you desire more sweetness. Mix everything well and turn off the heat. You don't want to cook this too long after adding coconut milk else it'll separate. 
  • Let the curry cool down a little, then sprinkle very little lime juice to add some tang. Taste and decide the balance between sweet and sour to your liking. Do not add lime juice to hot curry - it can taste bitter. 


Serve this amti with hot rotis or puris. It is heavenly with the decadence of cashew paste and coconut milk. The sweet, bursting pineapple is just perfect for a summer meal.


Tuesday, April 30, 2013

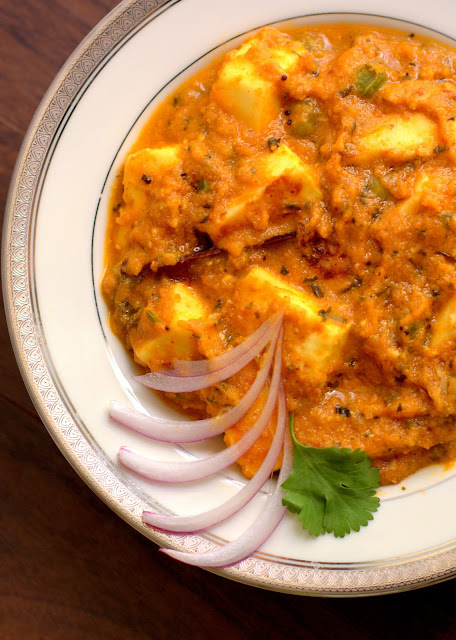
Home Style Paneer Tikka Masala

Last few days have been full of frenzy. Husband sprained his ankle while playing tennis and isn't allowed to move his leg for a few weeks. It's been crazy running a one man show. While he spent most of the week sitting in one place under a 'house arrest' (in his words), I've been managing all the 'man' activities on top of my regular chores. Hubs feels guilty making me run around to get things done, but I'm mostly worried about his recovery. He is bored out of mind sitting around not doing anything. And I realize how many things I don't have to worry about when he's taking care of them. I thought a nice meal would add some excitement to his boring schedule. Our new patio furniture was delivered just in time for this lovely meal. Hubby quite enjoyed eating out in the yard, admiring all the plants I've been taking care of in his absence :). 


I made a nice paneer gravy for hubs - my usual choice for a 'special' meal. While most tomato-based paneer gravies taste similar, I chose to make Paneer Tikka Masala this time. Paneer Tikka, which is grilled paneer marinated in yogurt and spices, is loved widely. This dish turns the dry grilled paneer dish into a gravy. The curry base is pretty generic, but grilled paneer adds a more robust flavor. My favorite part of the gravy is karusi methi (dried fenugreek leaves) which adds plenty of fragrance and slight bitterness that balances all the tang really well. My version didn't turn that deep red color you see at the restaurants. There is nothing fancy about it - restaurants use food color which I don't care for much. We ate the Paneer Tikka Masala with parathas. I turned the leftovers into a pizza - a great way to use up all that goodness. 


Paneer Tikka Masala

Marinade:
8oz. Paneer - cut into ~ 3/4' cubes
1/2 Cup yogurt
1 Teaspoon cumin-coriander powder
1 Teaspoon red chili powder
1/2 Teaspoon chaat masala/aamchur
1 Teaspoon ginger-garlic paste
Salt to taste

Gravy:
2 Large tomatoes (or 1/4 cup tomato paste)
1/2 Small onion
2 Teaspoons ginger-garlic paste
1 Tablespoons  kasuri methi (dried fenugreek leaves)
1/4 Cup green peas (alternatively, you can add chopped green bell peppers)
1/2 Teaspoon (or to taste) garam masala
Red chili powder to taste
1 Teaspoon sugar
Salt to taste
Cream/butter - optional
Water as needed

Tempering:
1 Tablespoon oil
1/2 Teaspoon cumin seeds
1 Large bay leaf
1 Inch stick of cinnamon
1 Star anise
1/4 Teaspoon turmeric powder
Pinch of asafoetida

  • Whisk together all the ingredients for the marinade and marinate paneer cubes for ~30 mins.
  • Puree onions and tomatoes while paneer marinates. If you don't want to puree onions, chop them finely.
  • Once paneer is marinated, heat a shallow pan and drizzle some oil. Remove excess marinade from the paneer cubes and shallow fry them (keep the extra yogurt). Turn the paneer so all the sides turn golden brown. If you have a small grill or a griddle pan, you can grill the paneer cubes for a nice charred flavor. Keep the paneer aside. 
  • Heat a tablespoon of oil in a kadhai and add cumin seeds. Once they splutter, add bay leaf, cinnamon and star anise. Let the spices get fragrant. 
  • Add asafoetida, turmeric, and ginger-garlic paste and fry for a few seconds. 
  • Add tomato-onion puree, garam masala, red chili powder (I suggest adding very little at the beginning since paneer also has some), and sugar to the tempering. Sugar will balance the tang of tomatoes. Roast this paste on medium for a good 5-7 minutes, stirring constantly. 
  • Stir in the leftover yogurt marinade, kasuri methi, peas or green bell pepper, and paneer cubes, and cook for another 2-3 minutes. The yogurt will add creaminess.
  • You can add more spices and salt if you like at this point. Add some water to the gravy to get the desired consistency. 
  • Stir in a splash of cream or a pat of butter to round up all the flavors nicely. Turn the heat low and let it simmer for 2-3 minutes. 
Paneer tikka masala goes well with hot naan. Some lemon juice sprinkled on top and sliced raw onion on the side taste great. 

Submitting this recipe to Know Your Dairy - Paneer event hosted by Motions and Emotions for Jagruti's Know Your series.


Sunday, September 9, 2012

Pizza Night

When I lived in NY, pizza was my go-to meal. It was the most accessible food choice when I was on a time crunch, was lazy to cook one day, or made last minute dinner plans with friends. My numerous sleepovers with school buddies were never complete without ordering a variety of thin crust pizzas from the 'Famous Pizzeria' (it was famous too =D). The crispy, baked to perfection pizzas would be gobbled up amid 5-6 girls chattering all at the same time! My favorite pizza had lots of veggies and wasn't drowned in out-of-the-can tomato sauce. Post school, as I started making healthier diet choices, I cut down my pizza consumption considerably. But on Friday, when my friend came down from LA to stay over, I wanted to have some pizza for old time's sake. Only this time, I made it from scratch at home.

I love thin crust pizzas since you get to enjoy more of the good stuff (the toppings) without filling yourself with dough! Previously when I made the crust at home, it was more like a roti dough that I used. This time, it was authentic with yeast, and yet had the healthy whole wheat component. I switched things up with a creamy garlic sauce instead of the typical tomato pizza sauce. You don't have to tell anyone that there's hardly any cheese in it. The recipe is extremely easy and a favorite of mine. I often add it to my pasta when I'm craving a luscious, yet not too cheesy sauce.

Making this pizza seems like a long process. And it is, but most of it just calls for sitting and waiting for the dough to rise or the pizza to bake. Everything else is pretty simple and the effort is worth every tasty bite! The great thing about making pizza at home is you can add whatever and how many ever toppings as you like. If you have friends over, have fun with them making your own pizzas. Keep the dough and the toppings ready, and each person can build their own. The garlicky gooey goodness of the sauce tastes perfect with baked crunchy veggies.

Note: This recipe makes around 4 small or 3 medium pizzas.


Thin Crust Pizza with Creamy Garlic Sauce

Ingredients:
Crust:
1 1/2 Cups warm water
1 Packet active dry yeast
1 Teaspoon sugar
2 Cups whole wheat flour
1 Cup all purpose flour
2 Tablespoons EVOO
Salt to taste
All purpose flour/corn flour for dusting

Garlic Sauce:
1 Tablespoon butter
1 Teaspoon all purpose flour
1 Cup milk
3 Garlic cloves - grated
Fistful (about 1/4 cup) of shredded cheese - Used a 4 cheese blend. Go for simple mozzarella if you like.
Mrs. Dash seasoning blend or any other herbs and spices blend
Salt to taste

Toppings:
Any veggies you like really! I used a mix of thinly sliced mushrooms, red onions, tomatoes, green bell pepper, avocado, olives, jalapeno (as you can tell, I love my veggies!)

To make the crust:

  • Add active dry yeast and sugar to the water and keep aside for 10-15 minutes until the yeast bubbles. 
  • Once the water is frothy, add the two flours, EVOO and salt and knead really well for a few minutes. You can add a little bit of warm water if needed to form a soft, elastic dough ball. Cover the dough and let it rise for about 45 minute or until the dough doubles in size. 
  • Punch the dough and knead again for a minute until soft. Keep aside until you work on the sauce. 

To make the sauce:

  • Heat butter in a sauce pan on low-medium flame. Once the butter melts, add all purpose flour and whisk continuously until the flour cooks through and turns a golden color. 
  • Add milk and grated garlic to the pan and keep stirring, breaking any lumps. The sauce, or rue as it is called, starts to thicken quickly. Turn the heat off when you achieve the desired consistency. 
  • Season with some salt and your favorite seasoning blend (simple Italian herbs will do), and add a little bit of cheese and stir. The heat will help the cheese melt and blend into the sauce. If the sauce becomes too thick, simply add some warm milk and whisk. The sauce is ready!

To put the pizza together:

  • Preheat over at 400F. 
  • Flour a pizza stone if you have one, or a wooden surface to roll the dough. Divide your dough in three or four parts depending on how big you want the pizzas. Roll each dough ball into a thin crust (about 1/4 inch) using a gentle hand on the rolling pin. 
  • Transfer the crust to your baking tray (don't try to lift it after building your pizza - wisdom learned from a stupid mistake =D ), then spread that yummy sauce generously, your choice of thinly sliced veggies and sprinkle just a little bit of shredded cheese. I used only a tablespoon or so for each pizza. 
  • Bake for 20 minutes or until the crust is golden brown on the sides and the veggies are baked crispy. 


Some chili flakes on top, a drink on the side, and some fun conversations are all you need for great dinner time.

Wednesday, August 29, 2012

Of White & Gold

The first day of college, I entered my class with visible nervousness, and saw her reassuring face smiling at me. It was comforting to see someone giving a friendly smile in an unfamiliar place. Only I didn't know then that P and I would go on to form a strong bond of friendship that was to last all these years and many more to come. P, my BF from college, and I shared some of the best times as classmates and later as roommates in college. While I lived away from my family, I sought the love and comfort of her home. P's loving family quickly accepted me as one of them. I spent holidays at her house, had silly slumber parties, took over the basement to practice for our dance shows, celebrated many festivals there, and most of all, enjoyed home cooked food!

P is a Keralite, or Mallu, as known popularly. It was at her house that I first had a taste of Kerala cuisine. Rich with generous use of coconut, spiced with red and green chilies and scented with curry leaves, Kerala food is full of bold flavors. Every visit to P's house was filled with a delicious breakfast of dosa and a lavish lunch spread of red matta rice, beet-root or cabbage pachadi, dry veggie fry called Thoran, rich and creamy aviyal curry with a side of inji curry (ginger pickle) or chammanthi (chutney) to spice it all up. I was treated to payasam on special occasions. Imagine that all that exotic food for a college student who survived on all sorts of rice preparations. Enjoying those delicacies with the sweetest family one can have made it all the more special. 


Today, on the occasion of Onam, I cooked two of my favorite dishes. Onam is an important festival in Kerala, almost like diwali. Women dress up in the traditional white and gold settu sarees, wear jasmine garlands in their hair, adorn the door fronts with athapoo (rangoli made with flower petals), and get together for thiruvathirakali dance. The most exciting part of the celebration is the elaborate feast called Sadya. It's some serious food business! Imagine a large banana leaf filled corner to corner with one delicious dish after another.

I prepared aviyal and spinach thoran today. Aviyal is a kurma like preparation made with many different root vegetables, beans, squash and raw bananas. You can throw in anything you like, as long as the vegetables are firm and don't get watery when cooked. Thoran is any dry vegetable stir fry. I used to love thoran made with beans. Today, I tried it using spinach since I already used beans in the aviyal. Neither of these dishes use overpowering spices. They are extremely fragrant and flavorful with the use of curry leaves, coconut, shallots and chilies. Husband had never tried Kerala food. All I can say is, he is converted now :).


Aviyal

Ingredients:
2 1/2 Cups chopped vegetables - a mix of potatoes, pumpkin, green beans, carrots and eggplant
Curry leaves from one spring
2 Small green chilies - slit lengthwise in the center
1/4 Cup grated coconut
2 Shallots
1 Teaspoon cumin seeds
1/2 Cup yogurt
1/4 Teaspoon turmeric powder
Salt to taste
Red chili powder to taste
Water as needed

  • Chop vegetables into 1 inch long pieces. You can use a variety of gourds, beans and squash or yams. Make sure you choose vegetables that are firm and won't get watery when cooked. 
  • Add the vegetables, curry leaves, green chilies, turmeric powder and a little bit of water enough to cook veggies to a pot and cook until the vegetables are tender. 
  • On the side, grind the coconut, shallots and cumin seeds coarsely in a food processor. 
  • Add the coconut mixture to the veggies, mix well and cook for a couple of minutes. 
  • Add yogurt at the end, salt and red chili powder to taste, water if necessary and simmer for a few minutes. Turn off the heat and it's ready to serve.


Spinach Thoran

Ingredients:
2 Cups packed finely chopped spinach
2 Heaping tablespoons of grated coconut
1 Large shallot
1 Green chili
1 Large garlic clove - chopped
Curry leaves from one spring
2 Dry red chilies
1/2 Teaspoon mustard seeds
1/4 Teaspoon turmeric powder
2 Teaspoons oil
Salt to taste

  • Grind coconut, shallot and green chili coarsely and keep aside. 
  • Heat oil in a pan, add mustard seeds and let them splutter. 
  • Add chopped garlic, curry leaves, red chilies and turmeric powder, and saute until fragrant. 
  • Add the coconut mixture and chopped spinach, salt to taste and cook stirring regularly. 

Serve the thoran and aviyal with some long grain rice or pooris with a side of pickle and papad.


I'm submitting these recipes to the South Indian Cooking Event started by Anu.


Friday, July 27, 2012

Gongura = Ambadi!

For the longest time, I knew Gongura as the leafy green from Andhra (a south Indian state). Reddy aunty, our neighbor and family friend in NY, used to make this wonderful tangy chutney with it to go with one of her many delicious rice preparations. The Indian store here carries Gongura pretty often but I never ventured into trying it. I finally bought a couple of bunches yesterday and started looking for recipes to make that chutney. Leave the chutney aside, what do I find?? Gongura is the same vegetable we Maharashtrians love and call Ambadi! Once I got over the fact that I didn't know Gongura was my most loved Ambadi, I picked up the phone and called mom to express my joy. Mom goes, "Of course, I knew it. Don't you remember I made ambadichi bhaji in NY a few times?". I don't know why, but I don't recall it at all. The Ambadi we get in Maharashtra doesn't have stems as red as the Andhra variety, but tastes exactly the same. Sour, tangy leaves that remind you of the taste of tamarind.


Ambadi is a popular leafy vegetable, especially in the southern part of the state where I come from. The leaves are cooked thoroughly so that they get gargatta, or almost mashed. Then they are tempered with the most fragrant combination of garlic and red chilies. There are no powdered spices, garlic providing most of the flavor and smokiness. A little bit of jaggery balances the sourness of the greens perfectly. People from my hometown Kolhapur tend to use jaggery much more than sugar since it's a prime sugarcane producer.  Ambadichi bhaji with some bhakri, raw onion, garlic chutney or spicy thecha is my kind of comfort food. It's a regular lunch combination of the farmers in Maharashtra too. All the ingredients are dry enough that they can be wrapped up in a piece of cloth and carried to the farms without worrying about containers or spills. I don't have to worry about any of that, but I could eat Ambadichi bhaji every day if I had to!


Ambadichi Bhaji

Ingredients:
2 Bunches Ambadi or Gongura
Fistful of rice, toor daal and chana daal combined
1 Small piece of jaggery (~1 teaspoon grated jaggery)
3 Tablespoons oil
1/2 Teaspoon mustard seeds
1/2 Teaspoon cumin seeds
5-6 Garlic cloves - smashed and chopped into chunky pieces
3-4 Dry red chilies
1/4 Teaspoon turmeric powder
Salt to taste

  • Discard the stems of ambadi and wash the leaves well.
  • Wash the rice, toor daal and chana daal. This is just to add some body and bite to the bhaji. A fistful of the combination is enough. Take a little more of rice than the daals. 
  • Pressure cook the leaves, rice and the daals with 3-4 whistled until soft. Discard the water that it's cooked in so it takes away some sourness out of the leaves making them more palatable.
  • In a kadhai, heat oil, add mustard and cumin seeds and let them splutter. Add garlic and fry it until golden brown. Garlic smells heavenly when fried like this and adds a lot of flavor to the bhaji. Add dry red chilies cut in half and turmeric powder at the end so they don't burn.
  • Add about a tablespoon of this tempering to the cooked leaves, add jaggery and season with salt and cook for a couple of minutes, mashing with the back of your spoon.
  • While serving, pour some of that extra garlic tempering over the bhaji and enjoy with bhakari or rice. 


Wednesday, June 27, 2012

Going Green With Dosa

Time flies so quickly when you are having fun. I can't believe all the excitement of having my parents over is about to come to an end already. My initial plan was to post all the dishes we prepared; but there was only so much time to make the most of their stay. It's been a short, but blissful month enjoying the new house, the garden, beautiful San Diego weather and fresh, tasty meals with them (I say fresh because who has time to prepare every meal from scratch on a daily basis?). I cooked quite a few elaborate meals for mom and dad.  But I've been after all the simple meals I could think of now that I cook for 4 people twice a day. Dishes that spare me time to sit and chit-chat with them instead of toiling away in the kitchen. And you can't talk about simple meals without mentioning the ever-loved dosas! Or all the cousins of the batter. The great thing about dosas is, you can make a large batch of batter and you're ready to feed an army. Nobody in my house minds multiple dosa meals. I just turn them into uttapams or stuff different chutneys inside for a new look and taste each time. The traditional rice batter doesn't fit my mom's diet though. But really, I can't give up on such a great dinner option. I made Moong bean dosas the other day to keep it healthy and mom-dad loved the simple preparation. Mom makes a batter with mixed beans and lentils sometimes. However, moong beans alone make extremely flavorful dosas. The vibrant green color doesn't get muddled with other ingredients either. They are not as crispy as the real thing, but so tasty, you won't miss the crunch. Dad declared he would switch to this dosa from now on. 


Moong Bean Dosas

Ingredients:
1 1/2 Cups moong beans
1/4 Cup rice (to add some crispiness)
Handful of washed cilantro
2-3 Small (Thai) green chilies
2-3 Garlic cloves
Salt to taste
Water as needed
Oil as needed
  • Soak moong and rice in water overnight. The beans should almost double in size. I let the beans sprout by taking out excess water and letting them soak for additional few hours. 
  • Grind all the ingredients in a mixer/food processor adding water little by little until you have a batter slightly thicker than dosa batter. Cilantro adds flavor, nutrition, and helps maintain that beautiful green color. 
  • Heat a pan on medium-high heat, grease it lightly, pour a ladleful of batter at the center and spread with the back of the ladle, not too thin. Cook until brown on the bottom. Don't coax the dosa until it's nicely roasted on one side - it'll start separating from the pan by itself when it's ready. Flip and cook until you see brown spots on the inside. 
  • I learned a trick from one of my South Indian family friends - cut an onion in half and dip it in oil. Then rub the oil on the pan with the onion. This ensures spreading oil evenly while using very little. It also adds slight onion flavor to the dosa. 

We enjoyed these yummy dosas with a chatpati chutney I recently found at the Indian store - Nirav's Rajwadi Sandwich Chutney. It's like a mango pickle meets cilantro chutney meets tamarind chutney goodness. They call it a sandwich chutney, but we've been eating it with anything and everything. 

Sending this to Show Me Your HITS - Legumes and Lentils Event, event by Sangeetha's Kitchen.

Thursday, June 14, 2012

Garden Gossip

Of all the pleasures that our new house has brought us, our lovely garden has become our joy and pride. Hubby spends 95% of his time (sometimes against my wish) in the garden, tending to the newly planted veggies, fruits and flowers. But my disappointment in his excessive gardening (instead of doing the dishes) vanishes when I look at how beautifully they are growing! Of course, I can't help but love the garden myself. That's the first place I visit after getting home from work. The plants take way all my exhaustion and freshen my mind. Mom and dad have made it a ritual to check up on plants first thing in the morning and then enjoy tea in their company. Plants are like babies - they need our care and love. And give us happiness seeing them grow and flourish. Here's a peek at what's growing in my garden this year. 

Swiss Chard  has beautiful ruby red stems and veins meshing through large velvety green leaves. A simple preparation of sauteed chard with onions and garlic makes a healthy and tasty side. I like it with roti as well. 


Spinach makes Popeye strong! And it's one of the most widely loved greens. I use spinach in a myriad ways - in salads, sabjis or curries, like this or this, daals, dips, pakodas and a number of other appetizers. The culinary uses of this leafy vegetable are endless.


Most people usually either love eggplant, or hate it. There's no in between. I am in the former category. I can have eggplants in any way, shape, or form. Be it chips from large eggplants, curry with stuffed small eggplants, grilled Japanese eggplant in pizzas or sandwiches, or simply bharta from large eggplants - I like 'em all. I don't know how large this eggplant will grow before I need to pluck the fruit, but there's a little eggplant peeking through the bottom leaves!


Last year was a sad year for zucchini. The golden zucchini I planted died before the first fruit was fully grown. I hope to have better luck this time. So far my 4 plants are looking good, and one of them better give me some zucchini! (Un)fried zucchini chips have been my new craze. I'll make that first thing I have a zucchini.


I have a special place for tomatoes in my heart. That was the first vegetable I grew when I started gardening in Utah and have been growing for 4 years now. Hubby wanted to plant tomatoes no matter what other veggies we planted, because they do not disappoint you. Tomatoes are extremely hardy and love bright and sunny weather. Check out these cuties! 


Poblano pepper! My jalapeno pepper suffered the same fate as zucchini last year. This year I'm trying my luck with poblano; but I hear peppers are generally late bloomers. I've been praying to the plant gods so that  I can roast my own poblanos!


Blackberries are hubby's favorite kind of berries. Our little plant is already bearing lots of tiny fruits. I can't wait to snack on them and hopefully make some jam or preserve out of the leftovers. 


We inherited lots of fruit trees and flowers from the previous owners. I was ecstatic to see the large fig tree! Mom and I have been waiting for the dozens of figs to ripen. I am looking forward to trying some desserts and flat-bread pizzas with caramelized figs.


We had no idea there was a peach tree in the backyard! The tree is fairly small and neither of us paid too much attention to it, until recently, when the green fruits camouflaging with the leaves started turning red-orange. Peach tart sounds like a good idea.


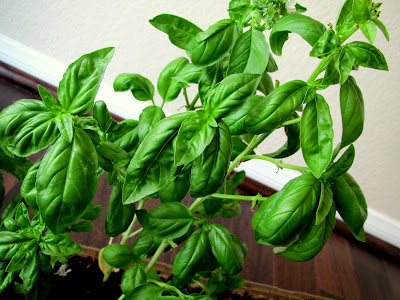
Basil has been my faithful herb. I sowed the leftover seeds from last year and they give me a big bunch of leaves every week. I love adding a few julienned leaves to pasta or making my basil-cilantro chutney for sandwiches or wraps. It adds lots of flavor and some moisture to a simple veggie wrap, like the picture below this. 

Wraps and sandwiches are our dinner favorites. Easy to put together and healthy to eat, they are quick dinner fixes. I simply use some whole wheat tortillas or flatbreads. Make a chutney by grinding basil-cilantro (2:1 ratio) leaves, garlic cloves, sometimes a spoonful of parmesan, a little EVOO, salt and pepper, and water for the right consistency. Spread this chutney generously, and add your favorite greens and veggies such as tomato, lettuce, sprouts, avocado, purple cabbage etc. My favorite among the veggies is roasted bell pepper, which adds meatiness and slight sweetness to the wraps. Simply roast red bell pepper on open flame until the skin is completely charred, cover in a container for 5-10 mins so the steam loosens the skin and then peel off the burned skin. You are left with sweet, juicy flesh. I always roast bell peppers at home instead of buying the canned ones. Wrap it all up and enjoy it with some hot sauce. 


That's about it for my garden! Have you been gardening this summer? Any recipes I should try out when I pick the veggies?

Monday, March 12, 2012

Holi Hai Bhai Holi Hai!

Hello everyone!! Hope you all had a great Holi! As I mentioned last year, the celebration doesn't end for us until 5 days after. So if you haven't played color to your heart's content, do so until you can't rub the it off your face.

I've been completely MIA in the blogosphere for a very long time now. Sometimes life throws things at you and you need to take care of one thing at a time. That is what's been happening with me lately. But you didn't think I had abandoned my blog, did you?? I certainly missed out on many events in the last 2.5 months. Most important of all, my blog's one year b'day! I'm so thankful to all the wonderful readers and fellow bloggers I've had the fortune of 'meeting'. It's been long - but what better occasion than Holi to get back in action? This festival announces the onset of spring and brings new colors and new hopes to our lives. It has certainly renewed my enthusiasm and I'm bringing you a recipe for a very colorful dish.

I had bookmarked Sanjeev Kapoor's recipe for Shaam-Savera a while ago, and I finally had a chance to make it. They say you eat with your eyes first. This recipe for palak-paneer koftas in a rich, creamy tomato sauce is a perfect example of how beautiful and colorful a dish can be. My version of the dish is somewhat simplified - mainly the koftas, which I made with rice flour. I love using rice flour in koftas/fritters since it makes them light and crispy. The other advantage of rice flour over corn flour is it doesn't get chewy after sitting for some time. The gravy recipe is pretty standard. A couple of changes I made were adding onion paste and some more whole spices for full bodied flavor. I had run out of heavy cream so I ended up making a paste out of some cashews. It made for a perfect substitute, adding creaminess and sweetness to the dish.


Shaam Savera: Palak-Paneer Kofta in Rich Tomato Gravy

Ingredients:
Kofta:
1 Bunch fresh spinach
1 Cup rice flour (use as needed)
2 Teaspoons cumin-coriander powder
2 Teaspoons red chili powder (adjust spices per your liking)
Salt to taste
Paneer
Vegetable oil for frying

Gravy:
1 Can (6 oz) tomato paste or 4-5 tomatoes finely chopped
1 Tbsp butter
3-4 Garlic cloves crushed and finely chopped
1/2 Small onion - paste or finely chopped (optional)
Khada Masala/Whole spices (3-4 cardamom cloves, 1 bay leaf, 1 inch cinnamon stick)
1 Teaspoon cumin-coriander powder
1 Teaspoon red powder (or to taste)
Salt to taste
Heavy cream/Cashew paste 

To make koftas: 

  • Clean spinach leaves and blanch in hot water for 2-3 minutes until soft. Drain well and chop finely. 
  • Add cumin-coriander powder, red chili powder and salt to chopped spinach and then start adding rice flour little by little until you have just enough to bind spinach together. 
  • Cut paneer into 3/4 inch cubes or, like I did, make small rounds with a melon baller! 
  • Take spinach mixture a little less than a golf-ball size, place a ball/cube of paneer at the center and make round koftas. Fry them until koftas are golden brown on the outside. 
Gravy:

  • Heat a wok on medium and add butter. Butter can overheat easily so don't keep the stove on high. 
  • Add the whole spices. Once they are fragrant (20-30 secs), add garlic paste and onion paste and slow roast until golden brown. 
  • I used tomato paste instead of fresh tomatoes for this recipe since it is much smoother. Add tomato paste, Garam masala, red chili powder and salt to taste and cook for 10-15 mins until all the flavors come together. Add some water if the gravy starts getting too thick.  
  • Once cooked, turn the heat to low and add 1/4 cup (or more if you like) heavy cream. Cook for 5 more mins and turn the heat off. Or to make cashew paste, simply soak them in warm water for 5 mins and grind to paste.
Now to put it all together, serve the gravy in a rather flat serving bowl. Cut koftas in half and place them on the gravy. Serve with some roti, naan or jeera rice.

Submitting this recipe to the Know Your Dairy event hosted by Motions and Emotions for Jagruti's Know Your series.


Monday, September 12, 2011

Lights Off

All hell broke lose as a massive power outage left San Diego in complete darkness last Thursday night. No electricity...what? Is the world really coming to an end?? What used to be an ordinary event in India wasn't so ordinary here. We somehow made it home through the crawling traffic with all the traffic lights out. A painful drive, a torturous hot day without a fan, no cell phone service and a lottt of pending work for a big event I had on the weekend - not the kind of Thursday night I look forward to. To add to all of this, I had not really prepared for a power outage (since, you know, that's not the first thing on my mind every morning) and my fridge and pantry were essentially empty - at least as far as cooked foods were concerned. 

I have never really been thrilled about the electric stoves in my kitchen. A power outage just reinforced the feeling! How would I cook and what would we eat?? No one was going to keep the grocery store or any restaurant open for me. I looked at the slab of paneer I had intended to grill on the labor day, but never got around to doing it. Uncooked paneer, and the fridge out of work - perfect! It would just get spoiled. Oh... but...wait. Paneer (a light bulb went off in my head) - that WAS perfect. How did I not think of my lovely grill??? Grill & paneer - that was all I needed to save the dinner. 


Luckily, my fridge is always stocked with some simple everyday ingredients. A fresh green bunch of cilantro was just the ingredient to create a bright and light dish fit for a warm summer night. I turned to my trusted mortar-pestle to grind up some ginger-garlic-chili-cilantro, created a yummy yogurt marinade with the paste and the paneer was ready to roll. Yogurt is always a great base to marinate paneer. It keeps the paneer extremely moist and adds a great tang. 


We got out in the patio and saw the hoards of people, getting some fresh air and soaking in the bright moon light. With dinner on my plate and some outside fresh air, I soon started appreciating the beauty of that night and forgot all about the million unfinished tasks for the weekend event. I'm not foolish to pass an opportunity of an unexpected break, after all. We enjoyed the delicious paneer tikka, played cards in candle light, went out for a walk and cooled off near the pool. The moon light had never seemed so  bright before - it was such a beautiful night! That bright green, juicy paneer tikka was quite the picker upper. 


Hara Bhara Paneer Tikka

Ingredients:
12-14 Oz Paneer - cut in 1" cubes
1 Small green bell pepper - cut in bite size pieces
3/4 Cup yogurt
1 Small bunch cilantro
1 Serrano chili
2-3 Garlic cloves
1" Ginger piece
1 Teaspoon cumin-coriander powder
Salt to taste
Lime juice
Cooking spray/oil

  • Grind ginger-garlic-chili-cilantro into a fine paste. I always find that using a mortar-pestle brings out some oils and flavors a mixie just can't! But go by whatever is convenient for you.
  • Mix the paste with yogurt, cumin-coriander powder (for some smokiness) and salt to taste. Remember that grilling will tone the flavors way down, so your marinade should be a little strong. 
  • Toss the cubed paneer and green bell peppers into this marinade and let it sit for 30 minutes or so. It really doesn't take a long time for paneer to soak up flavors. 
  • For the best results, lay a piece of aluminum foil on your grill, poke some holes in it and spray some cooking oil on it. 
  • Put the paneer/bell peppers on skewers, spray some more oil on them and grill. The foil keeps paneer from sticking to the grill and the holes allow just the right amount of heat and flame to get the perfect charring. 
  • Once grilled, sprinkle some lime juice and enjoy the unbelievably moist, bright and smoky paneer tikka!


Tuesday, August 9, 2011

It's Raining Tomatoes

I have an incredible luck with tomato plants. Either that, or they are just not a fussy vegetable to grow. I conveniently opt to believe in the former, but it wasn't just the beginner's luck that resulted in summer-long bountiful crop when I planted tomatoes last year. You got a glimpse of my garden here and the recipe for an aromatic tomato-basil bread. I kept plucking a couple of tomatoes here and there for sandwiches or curries, but what do you do with a bucketful of tomatoes at the peak of ripeness all at once?! The tomato plants in my garden are flourishing, although the same can not be said about zucchini and jalapeno. On the bright side, I can think of a hundred different recipes to use up the tomatoes - these many jalapenos would've been another story!


After contemplating between Italian and Mexican dishes, I circled back to what I knew the best - Mom's Tomato Rice recipe! Our fridge was almost always stocked with tomatoes and this dish appeared on dinner table in between mom's grocery visits. The monsoon season especially created scarcity of fresh vegetables and a soulful rice dish out of something readily available was a great dinner option. A serving of steaming tomato rice with home-made curd and spicy-salty pickle on the side made me a happy camper. I loved the preparation of fragrant basmati rice cooked in a rich roasted coconut-onion paste with a whiff of whole spices and of course, tomatoes!  The puff of steam, as I was cooking the rice yesterday, filled my kitchen with familiar aromas my mom's saree would pick up in the kitchen and it gave me a warm-fuzzy feeling of being somewhere very comfortable :).


Tomato Rice

Ingredients:
1 Cup Basmati rice
4-5 large or 8-10 small tomatoes
1 Heaping tablespoons fresh grated coconut
1 Small onion
1-2 Green chilies
~ 1 Teaspoon Garam masala
1 Bay leaf/7-8 Curry leaves
7-8 Black pepper corns
3-4 Cloves
1 Tablespoon oil
Salt to taste

  • Cook tomatoes in boiling water until the skin peels off. Strain the tomatoes (save the broth) and puree.
  • Wash rice and keep aside. This helps cook the rice faster. 
  • In a cooking pot, roast chopped onion for 2-3 minutes on medium heat, add grated coconut and let it get toasty. Grind the roasted onion, coconut and garam masala into a paste. You can use cumin-coriander powder if you don't have garam masala. 
  • In the same pot, heat oil, add pepper corn, cloves, bay leaf or curry leaves (I enjoy flavors of both - add either based on your preference), slit green chilies and let them roast for a few seconds.
  • Add the coconut-onion paste, rice, tomato puree, 2 cups of water (I use the broth of cooked tomatoes) and cook on medium heat covered. Stir the rice occasionally so it doesn't stick to the bottom and add water little by little if needed until the rice is cooked.

This rice is very fragrant from the whole spices. Green chilies provide just enough heat to balance the sweet-citrus-y taste of tomatoes. Roasted onions and coconut are subtle and heighten the flavors of the dish. Enjoy!

Friday, June 10, 2011

Monsoon Mélange

The long harsh summer has given way to the cooling showers of monsoons in India now. This marks the end of mango season when people scramble to lay their hands on last of the season. After 2-3 months of devouring mangoes in every single of its forms, this is the time to salvage the not so great last few. My MIL was describing excitedly to me last night how she found small green mangoes really cheap in some small town. Then like two typical women, we exchanged what all we could make with the specific kind of mangoes she bought and how my mom's recipe differs from hers and how she shouldn't eat anything too sour now that the weather is cooling down.

Coincidently, I had bought 2 green mangoes just yesterday and the weather in San Diego today is a perfect reminder of the Indian monsoons. The sun is playing hide and seek with the clouds with occasional showers. It is the perfect weather to indulge your senses in a cup of steaming and slightly spicy Kairiche Saar - Green Mango Soup!


Kairiche Saar - Green Mango Soup

Ingredients:
2 Green/raw mangoes
4-5 Red chilis - adjust according to your liking
1/4 Teaspoon red chili powder
1 Strand of curry leaves
1/2-3/4 Teaspoon cumin seeds
A few whole fenugreek seeds
1 Cube jaggery/1-2 Teaspoons brown sugar
~1 Tablespoon grated coconut
1 Teaspoon ghee/butter
  • Soak a few fenugreek seeds in water so they get soft until you work on the rest.
  • Steam the green mangoes in a pressure cooker or in the microwave (not directly in the water - keep the whole mangoes in a container and keep it in a larger container with water and steam) until the mangoes are soft and the skin has turned a pale yellowish green color.
  • Let the mangoes cool. Discard the skin which should peel off easily, take out all the flesh and keep the seeds aside. You can throw the seeds away but I usually let them boil with the saar/soup which gives it a distinct flavor. Moreover, the seeds are a lot of fun to suck on after :D - give them to kids. Mash the pulp to remove any lumps.
  • Heat ghee in a cooking pot and add the cumin seeds, curry leaves, red chilis and lastly the drained fenugreek seeds. Once cumin gives out a nice aroma, add the mango pulp and seeds, jaggery and coconut. Adjust the amount of jaggery depending on how sour the mangoes are.
  • I added just a little bit of red chili powder for the color and a slight kick. The soup has lots of different flavors and spicy should definitely be one of them.
  • Add about 3 cups of water (or however thin you want it - it tastes better a little watery) and let it boil for a good 5-7 minutes on medium-high. The mango is already cooked so you just want all the flavors to come together.
Drink hot just as soup or with some rice. Simply delicious!!

You can make it a little more tangy to be refreshing in hot weather.

Notes:
  • There are lots of variations to this recipe. My MIL uses coconut milk instead of grated coconut which I'm sure will taste just as fabulous.
  • Some like to use green chili paste instead of whole red chilis and some use red chili powder. I personally like whol red chilis because they add a nice roasted flavor to the dish.
  • As always, cilantro is great for garnishing.

Saturday, June 4, 2011

Hello Sunshine!

Sorry...not you, the real sunshine..the sun - shine sunshine...like, OMG it's finally summer sunshine! What a gorgeous day to wake up to and what better way to spend it than at the swimming pool and later basking in the sun at the beach. I 'played' in water this morning and later bathed in sunshine at the gorgeous La Jolla shore while hubby and friends went kayaking (don't tell anyone, but I'm scared of water..ok, I'll go hide my face now). Guess what? Kayaking doesn't seem all that scary after all. I've conjured up every ounce of courage in me to give it a shot before the big trip to Alaska! This is going to be an adventurous summer for me, if you can call it that. Oh well, I just can't get enough of this season - especially when my weekends start with throwing a BBQ party on Friday evening. Ah..so relaxing, so refreshing, so...Summer!
Reading a book at the beach - a perfect way to spend an afternoon!
We had to show off the new grill to our friends. Chilled drinks, yummy food, some buzzed people - that's what I'm talking about! There was a mix of omnivores and herbivores in the group. I prepared a few vegetarian dishes and hubby (how eagerly he was waiting for this!) prepared chicken and shrimp for the superior kind <rolling my eyes>. After a couple of glasses of wine and a bottle of beer, I kinda lost track of taking pictures of the cooking in process. I took some pictures of 'the before' while marinating and getting stuff ready though.

Our friends showed up soon after work battered by the usual hectic week. Of course they were in the mood to just sit around, chat and crack jokes from Family Guy and South Park. I was scurrying about ensuring there was one course after the other to accompany the sudden bursts of laughter and animated 'Did you know...exclamation, exclamation, exclamation'. For the starters, I made sweet potato fries (third time in two weeks) and grilled Gorgonzola-pear flatbread. I made my friends guinea pigs for my experiment of the latter who willingly tasted it - gobbled it would be more appropriate. You know how I love recreating my favorite dishes from restaurants, this was one of them. I had gorgonzola-pear flatbread at this amazing tapas place in Seattle (I forget the name). The combination of this cheese and pear is pretty classic, but toss in some caramelized onions and honey in the mix and you have something divine tasting. I remembered the flatbread having caramelized onions and the honey was my addition. This is a semi-grilled dish. Here's how I made it:

Before going on the grill - trust me, the after looked much more appetizing
A closer look

Gorgonzola-Pear Flatbread

Ingredients:
3 Tortilla breads - or use regular flat breads
Gorgonzola cheese
1 Pear - ripe
1 Medium onion
Honey - as needed
Paprika - as needed
1 Teaspoon sugar
Olive Oil - as needed
Butter - as needed
Salt to taste

  • I used this as a guide to caramelize onions. Chop onions thinly into half moons. Heat a saute pan and cover the bottom barely with oil. Add chopped onions, saute for a couple of minutes, then sprinkle some salt and sugar. Slowly cook the onions until soft and sweet and caramelized on low heat (about 10-15 minutes).
  • Cut the pear in thin slices. Cook the sliced pear in saute pan as well in just a little bit of butter on each side (about 7-8 minutes all together). You can run these two processes in parallel. 
  • To assemble, spread some honey on flatbread with a knife or a brush, add the pear then onion and top it with gorgonzola crumbles. Sprinkle just a little bit of paprika on the top. You don't want to kill the sweetness of the pear and honey, but just a nice pop of flavor. 
  • Grill the flatbread for 2-3 minutes until the cheese melts and the bread gets crusty. You can do this in the oven as well. Cut into small pieces and serve this unbelievably delicious finger food in your favorite plate. 

After a couple of rieslings and zins, we were ready to move on to the next course. I made a berry refreshing salad as the second course - another one of those 'Oh this is so good, I must try it' restaurant items. I had a strawberry salad with strawberry vinaigrette at Souplantation a couple of days back. Nothing says 'Summer' like a salad this good.


Berry Good Salad

Ingredients:
1 Box strawberries (the standard box with ~15-20 berries depending on the size)
Spring mix greens
Macadamia nuts - I got these at the farmer's market so added some. Use any of your favorite nuts.
2 Tablespoons balsamic vinegar
2-3 Tablespoons olive oil
1 Teaspoon sugar
Salt & Pepper to taste

  • Puree 8-10 strawberries, balsamic vinegar, sugar, salt & pepper. Be a little conservative with the BV while pureeing and add later if needed. 
  • Take this puree out in a bowl and whisk in olive oil slowly. Adjust the amount of BV & OO as needed and per your liking. You should end up with a vinaigrette slightly thicker than Italian. 
  • Toss in spring mix greens, fresh sliced strawberries, some crushed macadamia nuts and drizzle a generous amount of the vinaigrette. Tastes much better cold so chill the vinaigrette for a little while before serving. This salad is like a burst of flavors in one bite! Can you believe my friends actually helped themselves to extra servings of the salad when there was this whole fare for the main course?

For the real grilling part, I made the usual Panner-Bell Pepper-Onion thing. I've grilled paneer so many times now that I just add whatever suits my mood at the time. This time it was just a yogurt, red chili, cumin-coriander powder, chaat masala, salt marinade.Don't forget to splash some lemon juice after you grill it though. That last touch does it!

Grilling Cheese with Salt-Pepper-Lemon Pepper
I tried something new this time. I found this grilling cheese at the grocery store which looked and tasted very similar to Paneer, just a bit chewier. I wasn't really sure what I was gonna do with it. When in doubt, add salt & pepper! I just added lots of fresh cracked pepper, some salt and lemon pepper (this is my hubby's go-to seasoning) and grilled it. Quite tasty I must say.

Hubby took over the 'man kitchen' after I was done with the puny vegetarian grilling. He made Indian style grilled chicken in yogurt-ginger&garlic-red chili-garam masala marinade that soaked up flavors overnight and his signature shrimp. He marinated shrimp in a bright green paste of cilantro-mint and some other spices overnight as well. Friends raved about his preparations till the minute they drove out of the parking lot. I totally validated their sentiment by tasting some of both (shhh...). Oh c'mon! I had to be a good wife! I'm not converted though...it's okay.

Wanna feel like a kid again? How about a Popsicle!

To round up the meal, a very refreshing, all natural, homemade watermelon pops. Just fresh watermelon juice and nothing else! Mmmm..

LinkWithin

Related Posts Plugin for WordPress, Blogger...