Monday, June 3, 2013

Avocado Sandwich With Arugula Pesto

I get over zealous about grocery shopping every once in a while and buy more produce than we can consume. Okay, it happens more often than I would like <smh>. I stocked my fridge to its full capacity after getting back from vacation. Using up most perishable items was in order over the weekend.

I made Ghavan on saturday, using chopped spinach instead of zucchini. This is such a great item to sneak in veggies! Make a note, all you moms! The only addition to the recipe was a spoonful of toasted cumin seeds. 

A bag of baby arugula, already yellowing in one corner, was next to finish. Arugula is my all time favorite green. Its distinct peppery flavor pairs well with fruits such as pear, nectarine, or citrus in salads. Fully grown leaves can be a tad bit bitter and pungent, so I purchase the baby ones. They are much milder in comparison. Arugula, actually an herb, makes a great choice for pesto. It seemed like a great way to use up that bag of greens. There were no pine nuts in the pantry, so I settled on using walnuts after reading Elise's recipe. I prefer my pesto with lots of garlic, although I used one less clove for arugula is spicy already. This pesto slathered generously was fantastic in a sandwich. I kept it simple - just avocado for creaminess and tomatoes for a bit of acidity and let pesto take over most of the flavor part.


Avocado Sandwich With Arugula Pesto

Ingredients:
Pesto:
1 Cup packed baby arugula
1/4 Cup walnuts
2 Cloves of garlic
1/4 Cup grated Parmesan cheese
1/4 Cup olive oil
Salt to taste

Sandwich:
Ripe avocado - sliced
Tomato - sliced
Multi-grain bread.

  • Add all the ingredients to the food processor, except olive oil. 
  • Grind everything coarsely, adding oil little by little. 
  • Smear pesto on two slices of multi-grain bread. My favorite multi-grain from the local grocery store has all sorts of seeds sprinkled on them - sesame, sunflower etc. Add sliced avocados and tomatoes and grill until crispy. You can even add roasted red bell peppers to this sandwich.

The sandwich is extremely simple to make yet fancy enough that you'd order it in a fine Deli. We enjoyed it with savory banana chips on the side - our latest addiction!


~*~
On a different note - Husband recently discovered vinyl photography backdrops online. These vinyl sheets come in all sorts of wooden finish looks and are perfect to take food photos. Not that I take any effort in shooting my food, but husband has been pushing me to do better. Getting these vinyl backdrops is the first step. If you are looking for something like this, just google and you'll find plenty of sites out there selling this stuff. Mine came from Swanky Prints right here in Temecula. They are quite fabulous!


Wednesday, May 29, 2013

Will Travel For Food

The best way to experience a new place is through its local cuisine. I'm glad I married a guy who agrees. Husband and I just returned from a 5 day trip to Oregon. Here are some highlights:

First stop: Voodoo Doughnut! Walking around downtown Portland, you can't miss people carrying bright pink boxes written 'Good Things Come In Pink Boxes'.  After seeing this place on Food Network a number of times, I just had to know what the hype was all about. We ordered 4 different donuts after waiting in line for 20 mins or so. They all ended up having chocolate in some form -you can never have enough chocolate I guess. The donuts were good - my favorite was their Mexican hot chocolate cake batter donut sprinkled with cinnamon and chili. We went there a second time to get a better assortment of donuts which we enjoyed as well. Quite honestly though, I didn't find the donuts extraordinary. Two thumbs up for their wide selection and the overall experience. I was disappointed that the donuts were - well - just like any other donuts. Nevertheless, one place checked off my bucket list.


We headed to the quaint town of Tillamook the next day to visit a local cheese factory. I was as excited as a kid in a candy store on my first cheese factory visit. There was a self-guided tour of the cheese packaging assembly where large slabs of cheese were cut by one person and separated by another.The machines then packaged individual blocks at an impressive speed. The happy ending to this tour was the cheese sampling. Tillamook factory makes America's favorite cheeses including Cheddar and Jack. Their pepper jack and cheese curds were my favorite. When in cheese factory, one must eat grilled cheese sandwich! I ordered a Swiss cheese sandwich with roasted peppers, sauteed onion and pesto mayo at the cafe. Husband went for old fashioned cheddar cheese sandwich. Mine was fancy, but his was to die for. Their cheddar had just the right amount of sourness and the cheese literally melted in the mouth. All those calories were totally worth the taste!


All that food needs to be washed down with some drinks, and what better place than Oregon to do that? The state prides in having one of the highest number of breweries per person. Husband appreciates good beer and makes it a point to visit local breweries on every trip. We visited Alameda brewery in Portland and later Full Sail brewery in Hood River on our drive through Columbia river highway. The first one I liked more for the beer (the Stout especially was good), and the second for its setting looking right over the scenic Columbia river.

We had planned to drive on the Columbia river highway one day and loop around Mt. Hood the next. My hopes of seeing Mt. Hood were washed away by torrential downpour. As they say, 'There's no bad weather, just inappropriate clothing'. We made the best of our time by visiting various fruit farms on the Fruit Loop. Yes, it was colorful and very delicious :). The Fruit Loop is the road that connects Columbia river highway and the highway around Mt. Hood. It was a fun break journey visiting various fruit orchards, lavender farm and an Alpaca farm. Most of the orchards were just blooming, but we sampled lots of berry jams, sauces, ice-creams and other preserved fruit goodies at each of the locations. I will open the two jams and huckleberry scone mix I bought soon.

The funnest experience was a visit to some furry friends at the Alpaca farm. A place sitting on top of a hill accessible by a narrow unpaved road was a hidden gem. I got to pet and feed these fur balls of cuteness - aren't they adorable?! I bought enough Alpaca wool yarns to keep myself busy through this summer. Their wool is the softest I have ever touched, only second to the musk ox fur wool I saw in Alaska. Check out the picture of a local weaver who was making a scarf the old fashioned way - all hand made!


We concluded our trip with a fantastic lunch at Pok Pok, a mixed Asian restaurant suggested by a friend. We returned with great memories and happy tummies. 

How was your long weekend? What stories do you have to share?


Thursday, May 23, 2013

Thanda Thanda, Cool Cool

I'm looking forward to the long weekend more eagerly than ever. It's been a very busy week here en mi casa. On top of work madness there's been lots of cleaning, reorganizing and gardening to prepare the house for the upcoming visit from my in-laws. I'm just glad the week is over. I'm saying adios to San Diego for a few days to get rejuvenated and recharged. I'll leave you with a great summer cooler recipe until then - Kairiche Panha/Panhe - a sweet and sour drink made with raw mangoes. This will be the perfect addition to your Memorial Day cookout menu. A great non-alcoholic option and perfect for all the kids.


Panha is to India as lemonade is to the US. It's a favorite summer drink sweened with jaggery and scented with cardamom powder. You can add a few saffron strands for their wonderful floral aroma. If you don't have jaggery, you can use sugar in lieu. However, I love the slightly burnt/caramel taste of jaggery. If you visit anyone's house in India, you'll typically be offered a cup of tea; but during the hot and humid summer days, cold panha will come as a much needed respite. The drink is prepared with pre-made mango pulp that stores in the fridge for 2-3 weeks. Just mix a couple of spoonfuls with cold water, even ice, and you have an instant cold drink.


Panha - Green/Raw Mango Drink

Ingredients:
2 Raw,  firm mangoes
2/3-1 cup jaggery or brown sugar
1/2 teaspoon cardamom powder
Few saffron strands
  • Cook whole raw mangoes in boiling water until fully cooked. Take out of water and let cool
  • Squeeze out all the pulp, discard the seed and skin. 
  • Add grated jaggery to the pulp. The exact amount will depend on the sourness of mangoes and your preference. Let the jaggery melt completely. You can cook it with the pulp for a few mins to help this process. Give it a quick pulse in the food processor to get the lumps out.
  • Add cardamom powder and saffron, and mix well. This is the concentrated pulp. Whenever you want a glass of panha, mix some pulp with cold water and make it as concentrated as you want.
Have a fantastic Memorial day weekend. Let there be grilling!

Thursday, May 16, 2013

From The Far East - Loquat Chutney

We've been enjoying an abundant supply of loquats recently. Husband and I didn't even know what this tree in the backyard was until our Asian gardener identified it for us. Loquat, a fruit native to central China, is also known as Chinese plum. If you like peach, apricot, citrus or mango, or all of them, you'll love loquat with hints of all of these fruits. The loquat tree with yellowish ornage fruits makes our yard quite attractive to all sorts of birds. Most fruits get pecked before they ripen fully, but we still manage to keep plenty to ourselves. I love the juicy fruit with sweet-n-tart flavors, and so do all our friends who've tried. it. There were quite a few vendors selling loquat at the farmers market last week.


Loquat, unlike most other fruit trees, starts flowering in late winter and bears fully ripe fruits around late spring. So around this time, we have more fruits than we can manage to eat. I looked up if I could use the excess fruits in cooking. Turns out loquat is great for tarts, chutneys, jellies and jams. Makes total sense given the fleshy, juicy texture. I made a simple chutney with it, similar to the mango chutney made with ripe yet firm mangoes available in India around this time. It would be the perfect accompaniment to any light meal. You can make it with peaches, apricots, or firm ripe mangoes too.


Loquat Chutney

Ingredients:
2 Cups firm, ripe loquat - peeled, deseeded and chopped
1 Stick cinnamon
1 Star anise
1/2 Teaspoon cumin seeds
1/4 Cup grated jaggery/brown sugar
2-3 Tablespoons cider vinegar
1 Teaspoon red chili powder
1/2 Teaspoon cumin-coriander powder
2 Teaspoons ghee/butter
Salt to taste

Heat ghee/butter in a sauce pan and add cumin seeds, cinnamon and star anise. Let the seeds splutter and whole spices roast until fragrant. You can use a spoonful of fennel powder instead of start anise for that sweet, licorice like aroma.
Add rest of the ingredients and cook the chutney until everything comes together. You can adjust the amount of jaggery and vinegar depending on how sweet or tart the fruits are. Adjust the chili powder per preference.
Once cooled, the chutney is ready to eat. It can be stored in the fridge for upto 2 weeks.


Monday, May 6, 2013

Brunch In The Backyard

Just when I thought things couldn't get crazier with husband's right foot out of work, it did get crazier. The past week zoomed by with a lot of work in the office and home, and a few events planned for the weekend. I didn't mind the exhaustion <and some failures> because I was immersed in my two favorite activities - cooking and dancing!

I had been planning for the annual salsa cook-off in the office hosted around Cinco De Mayo. My prior recipe for a sweet 'n' savory mango salsa had bagged me two prizes. I went for a much simpler fruit salsa this year. Another sweet and spicy combination of grilled pineapple (used canned sliced pineapple to grill), tomatoes, onions, jalapeno, a little bit of pineapple juice, lime juice, cilantro and salt & sugar to taste. I loved the salsa, even if I say so myself. The competition was quite stiff this year though, and my recipe didn't win. However, I didn't mind losing a bit to other amazing recipes which I got to gorge myself with.

Grilled Pineapple Salsa
Saturday was supposed to be a big day - I had committed to participate in the San Diego Food Bloggers Bake Sale. I knew exactly what I was going to make - Orange and Cranberry bars - perfect for the warm weather. However, the craziness of the week just got to me. I got home on Friday night after dance practice and my legs just refused to move. So like a total loser, I pulled out of the Bake Sale the night before <totally embarrassed> and made a donation to No Kid Hungry, the charity we were raising donations for, instead. Husband consoled me saying it was not worth stretching myself and that the ultimate goal was to raise money anyway. After some reassurance, I decided to take Saturday morning off and slept like a baby.

In all this madness, I had totally forgotten that it was one year since we moved into our beautiful house. Husband wished me early on Saturday morning. Oh boy, time really does fly! We are still not done decorating the entire place and we were celebrating one year anniversary already! This called for a celebration (and my being home with the husband after a long long time). I cooked us a nice brunch and enjoyed it out in the yard appreciating our 'home'. And what did I decide to tackle? Eggs with Hollandaise sauce - my idea of a perfectly comforting brunch. If not done right, Hollandaise sauce can turn into a curdled egg mess. But it was worth the risk given the occasion, so I went ahead with the experiment. The sauce turned out perfect on my very first try. It was enough to undo the prior failures. The basic recipe I read on AllRecipes app barely had any details on the method. But thanks to excessive viewing of paying attention to Food Network, I was able to make some modifications, add a couple of ingredients, and work through the sauce.

Sunny-side up egg on a croissant with made from scratch Hollandaise sauce
Hollandaise Sauce 

Ingredients:
3 Egg yolks
1/4 Cup melted butter
1 Tablespoon hot water
2 Teaspoons lemon juice
1/4 Teaspoon garlic powder
Paprika to taste
Salt to taste
Cilantro for garnishing - chopped finely.

  • Simmer water in a double boiler. The water shouldn't be boiling vigorously, you want to cook the eggs very slowly. Make the water doesn't touch the pot above. 
  • Whisk egg yolks in the top pot. Keep whisking vigorously without stopping throughout the process else you'll end up with scrambled eggs. Keep a hot pan holder on the side in case you need to lift the pot from heat. 
  • Once the egg yolks thicken slightly and change color (all this happens very fast), take the pot off heat and add melted butter slowly whisking all the while. Put it back on the boiler and stir in hot water. 
  • Keep stirring the sauce, lifting the pot if the heat is too high, until the sauce thickens and becomes frothy and light (2-3 minutes). Take the sauce off the heat and whisk in lemon juice, garlic powder, paprika and salt. Sprinkle some chopped cilantro. 
  • The sauce thickens even more as it starts to cool off. Serve a poached or sunny-side egg on English muffin or croissant and drizzle the sauce generously on top. Enjoy!

Notes:

  • Don't have a double boiler? No worries - I don't either. Use two pots from your kitchen that sit on top of each other leaving room for water in between. Use stainless steel for the top pot. 
  • If you end up with some lumps in the sauce even after all that whisking giving you cramps, just strain the sauce to remove them.
  • If the sauce gets too thick after it cools down, simply whisk in a little bit of hot water until you get the desired consistency. 

On the side, I pan roasted a colorful combination of baby potatoes with fresh rosemary (from the garden), lots of garlic, paprika and salt. Hubby's favorite recipe since I made it with the first sprig of rosemary.


Things could only get better after a brunch like that. I had a dance performance yesterday. I was nervous about this one - we learned the dance in exactly 3 sessions. The dance came out really well though, and it was one of the best experiences I had learning a piece. Here's a picture from the show - I'm the girl in the center :). All the rush came to an end with the show (until it starts all over again).


Tuesday, April 30, 2013

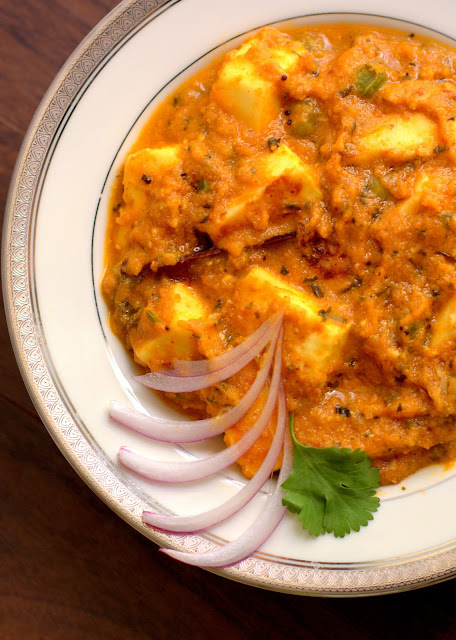
Home Style Paneer Tikka Masala

Last few days have been full of frenzy. Husband sprained his ankle while playing tennis and isn't allowed to move his leg for a few weeks. It's been crazy running a one man show. While he spent most of the week sitting in one place under a 'house arrest' (in his words), I've been managing all the 'man' activities on top of my regular chores. Hubs feels guilty making me run around to get things done, but I'm mostly worried about his recovery. He is bored out of mind sitting around not doing anything. And I realize how many things I don't have to worry about when he's taking care of them. I thought a nice meal would add some excitement to his boring schedule. Our new patio furniture was delivered just in time for this lovely meal. Hubby quite enjoyed eating out in the yard, admiring all the plants I've been taking care of in his absence :). 


I made a nice paneer gravy for hubs - my usual choice for a 'special' meal. While most tomato-based paneer gravies taste similar, I chose to make Paneer Tikka Masala this time. Paneer Tikka, which is grilled paneer marinated in yogurt and spices, is loved widely. This dish turns the dry grilled paneer dish into a gravy. The curry base is pretty generic, but grilled paneer adds a more robust flavor. My favorite part of the gravy is karusi methi (dried fenugreek leaves) which adds plenty of fragrance and slight bitterness that balances all the tang really well. My version didn't turn that deep red color you see at the restaurants. There is nothing fancy about it - restaurants use food color which I don't care for much. We ate the Paneer Tikka Masala with parathas. I turned the leftovers into a pizza - a great way to use up all that goodness. 


Paneer Tikka Masala

Marinade:
8oz. Paneer - cut into ~ 3/4' cubes
1/2 Cup yogurt
1 Teaspoon cumin-coriander powder
1 Teaspoon red chili powder
1/2 Teaspoon chaat masala/aamchur
1 Teaspoon ginger-garlic paste
Salt to taste

Gravy:
2 Large tomatoes (or 1/4 cup tomato paste)
1/2 Small onion
2 Teaspoons ginger-garlic paste
1 Tablespoons  kasuri methi (dried fenugreek leaves)
1/4 Cup green peas (alternatively, you can add chopped green bell peppers)
1/2 Teaspoon (or to taste) garam masala
Red chili powder to taste
1 Teaspoon sugar
Salt to taste
Cream/butter - optional
Water as needed

Tempering:
1 Tablespoon oil
1/2 Teaspoon cumin seeds
1 Large bay leaf
1 Inch stick of cinnamon
1 Star anise
1/4 Teaspoon turmeric powder
Pinch of asafoetida

  • Whisk together all the ingredients for the marinade and marinate paneer cubes for ~30 mins.
  • Puree onions and tomatoes while paneer marinates. If you don't want to puree onions, chop them finely.
  • Once paneer is marinated, heat a shallow pan and drizzle some oil. Remove excess marinade from the paneer cubes and shallow fry them (keep the extra yogurt). Turn the paneer so all the sides turn golden brown. If you have a small grill or a griddle pan, you can grill the paneer cubes for a nice charred flavor. Keep the paneer aside. 
  • Heat a tablespoon of oil in a kadhai and add cumin seeds. Once they splutter, add bay leaf, cinnamon and star anise. Let the spices get fragrant. 
  • Add asafoetida, turmeric, and ginger-garlic paste and fry for a few seconds. 
  • Add tomato-onion puree, garam masala, red chili powder (I suggest adding very little at the beginning since paneer also has some), and sugar to the tempering. Sugar will balance the tang of tomatoes. Roast this paste on medium for a good 5-7 minutes, stirring constantly. 
  • Stir in the leftover yogurt marinade, kasuri methi, peas or green bell pepper, and paneer cubes, and cook for another 2-3 minutes. The yogurt will add creaminess.
  • You can add more spices and salt if you like at this point. Add some water to the gravy to get the desired consistency. 
  • Stir in a splash of cream or a pat of butter to round up all the flavors nicely. Turn the heat low and let it simmer for 2-3 minutes. 
Paneer tikka masala goes well with hot naan. Some lemon juice sprinkled on top and sliced raw onion on the side taste great. 

Submitting this recipe to Know Your Dairy - Paneer event hosted by Motions and Emotions for Jagruti's Know Your series.


Thursday, April 25, 2013

Sweet And Spice, And Everything Nice

Are you one of those who love the combination of sweet and spicy? Like jam with jalapeno or chocolate with cayenne pepper? I am certainly a fan of these contrasting flavors in one dish; but if someone asked me to try Kadhi made with sweet, ripe mango pulp, I would've made a weird face. That's exactly what I did when I was introduced to this Gujarati specialty. I was visiting my friend Amishi's Grandma in India on one of our coinciding trips. Amishi and I have been very close friends through high school all the way to grad school. We've had a lot of culinary adventures together in our dorm kitchens. So I trust her when it comes to food. Nevertheless, when she told me that Aamras Kadhi (Mango puree Kadhi) was on the menu at her Grandma's place, I couldn't hide a big question mark on my face. This kadhi totally surprised me though (in a positive way) and expanded the list of everything I love sweet n spicy. I've held onto Aamras Kadhi recipe for a while. Now that Alphonso puree is available in the Indian grocery store, I decided to have a go at it.


Aamras kadhi resonates all of the wonderful flavors of besan kadhi - slight tang from yogurt, fragrance of ghee tadka and curry leaves, earthy bite of cumin, and heat from green chilies. The addition of ripe mango puree adds a whole new dimension to this already wonderful combination. Surprisingly, It doesn't get overpoweringly sweet. The savory ingredients create a perfect balance leaving pleasant layers of flavors on your tongue. If you like sweet 'n' spice, this is a must try.  Aamras kadhi makes for a very refreshing drink  - perfect for the summer days when this mighty fruit is available. It tastes great hot or cold.


Aamras Kadhi (Mango Puree Kadhi)

Ingredients:
3/4 Cup mango puree - I used sweetened canned puree.
2 Tablespoons yogurt
A couple of pinches asafoetida
1/4 Teaspoon turmeric powder
1 Teaspoon cumin seeds
1/4 Teaspoon fenugreek seeds - Optional
2 Small Thai chilies/ 1 serrano chili  - chopped
1 Spring curry leaves
2 Teaspoons ghee/clarified butter
Salt to taste
Water as needed

  • Mix mango puree and yogurt together. 
  • Heat ghee in a kadhai. Add cumin seeds and curry leaves. 
  • Add asafoetida, turmeric and green chilies once the cumin seeds splutter. Saute for a few seconds until the tempering is fragrant. 
  • Add the mango-yogurt mixture to this tempering and season with salt. Add water to achieve desired consistency. 
  • Bring the kadhi to a boil then lower the heat to simmer for 2-3 minutes. 

The kadhi can be eaten with roti or puri. I like to drink it by itself. The perfect finish to a meal.


LinkWithin

Related Posts Plugin for WordPress, Blogger...