Friday, September 16, 2011

Time For Some Chocolate!

Every girls needs her share of princess-like treatment. Ladies, I see you nodding your head in agreement (and the men can roll their eyes all they want). Between office-cooking-cleaning-entertaining-cleaning some more-cooking again, it is only fair that we crave the occasional pampering. It can be something as simple as shutting the kitchen and going out for dinner or as fancy as a day at the spa. Whatever your choice of activity, kick off your shoes and enjoy some 'you' time once in a while.

I was in a 'happy zone', as I call it, after an awesome spa treatment yesterday. It was just what I needed after a grueling week at work. As I was sitting there, getting pampered, I could think of nothing but some chocolate! A decadent chocolaty treat and maybe a glass of wine following the spa treatment would've been the epitome of self-indulgence. Maybe a chocolate dessert with alcohol - what a great idea =D.


After a few minutes of browsing my favorite bloggers' pages and some others, I settled on this recipe. It seemed like the perfect five-ingredient-fix, with my addition of the sixth to make it a little naughty ;). A rich chocolate cake with a warm, ooey-gooey chocolaty surprise in the center is pure bliss! I've always been a sucker for molten chocolate cakes. How can one resist a decadent personalized chocolate cake with some berries on the side or a big scoop of ice-cream melting on top. Then you take a bite, and there it is - a pool of pure deliciousness. Rich molten chocolate oozes out of the cake - that molten chocolate muddled cake is the best surprise package ever! If I knew this cake was so easy to make, it would've made frequent rounds of my dining table. Molten chocolate cake it was, spiked with equally delicious Baileys Irish Cream. Talk about pampering!


The original recipe made 6 individual cakes. I cut the proportions in thirds to make enough for the two of us.

Molten Chocolate Cake

Ingredients:
2 oz. Semi-sweet chocolate (2 Baker's chocolate squares)
3 1/3 Tablespoons butter
1/2 Cup powdered sugar
1/6 Cup all purpose flour
1 Whole egg
1 Egg yolk
2-3 Teaspoons Baileys Irish Cream (based on how spiked you want it)

Pre-prep:

  • Preheat oven at 425F.
  • Butter two ramekins or custard cups and keep aside (use plenty of butter so the cakes come out clean). You can also use a parchment paper to line the cups. 

Method:

  • Melt chocolate and butter in a bowl in the microwave for about 2 mins. Stir to mix well. 
  • Add sugar, all purpose flour, one whole egg, one egg yolk and Baileys and whisk together until you have a smooth batter. No hand mixie required! 
  • Pour half-and-half batter in the greased ramekins and bake for 14-15 minutes. Make sure the top of the cake is baked so it doesn't break while taking out. 
  • Let it sit for 3-4 minutes. Run a knife around the edges of the cake to remove it easily. Place the dessert plate on top of the ramekin and turn it upside down quickly. This way, your cake will come out in one piece. 

Sprinkle some powdered sugar. I had nothing to garnish the cake with, but you can serve it with some strawberries or raspberries, walnuts, chocolate sauce, caramel, berry sauce or your favorite ice-cream. The serving options are endless and the result is thoroughly satisfying.

Have a great weekend!

Monday, September 12, 2011

Lights Off

All hell broke lose as a massive power outage left San Diego in complete darkness last Thursday night. No electricity...what? Is the world really coming to an end?? What used to be an ordinary event in India wasn't so ordinary here. We somehow made it home through the crawling traffic with all the traffic lights out. A painful drive, a torturous hot day without a fan, no cell phone service and a lottt of pending work for a big event I had on the weekend - not the kind of Thursday night I look forward to. To add to all of this, I had not really prepared for a power outage (since, you know, that's not the first thing on my mind every morning) and my fridge and pantry were essentially empty - at least as far as cooked foods were concerned. 

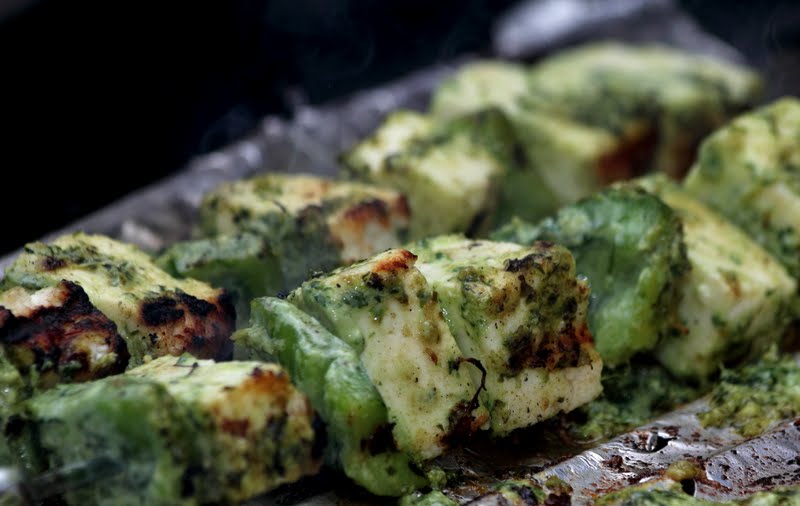
I have never really been thrilled about the electric stoves in my kitchen. A power outage just reinforced the feeling! How would I cook and what would we eat?? No one was going to keep the grocery store or any restaurant open for me. I looked at the slab of paneer I had intended to grill on the labor day, but never got around to doing it. Uncooked paneer, and the fridge out of work - perfect! It would just get spoiled. Oh... but...wait. Paneer (a light bulb went off in my head) - that WAS perfect. How did I not think of my lovely grill??? Grill & paneer - that was all I needed to save the dinner. 


Luckily, my fridge is always stocked with some simple everyday ingredients. A fresh green bunch of cilantro was just the ingredient to create a bright and light dish fit for a warm summer night. I turned to my trusted mortar-pestle to grind up some ginger-garlic-chili-cilantro, created a yummy yogurt marinade with the paste and the paneer was ready to roll. Yogurt is always a great base to marinate paneer. It keeps the paneer extremely moist and adds a great tang. 


We got out in the patio and saw the hoards of people, getting some fresh air and soaking in the bright moon light. With dinner on my plate and some outside fresh air, I soon started appreciating the beauty of that night and forgot all about the million unfinished tasks for the weekend event. I'm not foolish to pass an opportunity of an unexpected break, after all. We enjoyed the delicious paneer tikka, played cards in candle light, went out for a walk and cooled off near the pool. The moon light had never seemed so  bright before - it was such a beautiful night! That bright green, juicy paneer tikka was quite the picker upper. 


Hara Bhara Paneer Tikka

Ingredients:
12-14 Oz Paneer - cut in 1" cubes
1 Small green bell pepper - cut in bite size pieces
3/4 Cup yogurt
1 Small bunch cilantro
1 Serrano chili
2-3 Garlic cloves
1" Ginger piece
1 Teaspoon cumin-coriander powder
Salt to taste
Lime juice
Cooking spray/oil

  • Grind ginger-garlic-chili-cilantro into a fine paste. I always find that using a mortar-pestle brings out some oils and flavors a mixie just can't! But go by whatever is convenient for you.
  • Mix the paste with yogurt, cumin-coriander powder (for some smokiness) and salt to taste. Remember that grilling will tone the flavors way down, so your marinade should be a little strong. 
  • Toss the cubed paneer and green bell peppers into this marinade and let it sit for 30 minutes or so. It really doesn't take a long time for paneer to soak up flavors. 
  • For the best results, lay a piece of aluminum foil on your grill, poke some holes in it and spray some cooking oil on it. 
  • Put the paneer/bell peppers on skewers, spray some more oil on them and grill. The foil keeps paneer from sticking to the grill and the holes allow just the right amount of heat and flame to get the perfect charring. 
  • Once grilled, sprinkle some lime juice and enjoy the unbelievably moist, bright and smoky paneer tikka!


Tuesday, September 6, 2011

Ganpati Bappa Moraya!

Like every year, I anxiously awaited beloved Ganpati Bappa's arrival. And like every year, it was time to bid Him adieu before I knew it. The festivities came to an end yesterday as we sang the last aarati (prayer) and immersed the idol in the pool with teary eyes. Along with every Maharashtrian, Ganesh Chaturthi - a festival celebrating the elephant headed God Ganesh/Ganpati - is close to my heart and Ganpati is my favorite daivat (diety). Who doesn't like 5 days of non-stop festivities, aaratis-prayers, visits by family and friends and delicious food?! Decorating the house with family, planning long lists of menus, scheduling time table for aarati at every friend's place and making sure Ganpati Bappa's 'stay' is as comfortable as possible brings a lot of joy to me! 


Ganesh Chaturthi was made popular by Lokamanya Tilak in an effort to bring people together to exchange ideas and bring a sense of community. Over the years, the social aspect has gained more significance than the religious and ritualistic part. Back in India, every community or locality erects beautifully decorated mandaps with different themes depicting mythological stories, social messages or famous structures in the world. Large clay statues of Ganpati are welcomed in a procession of dhol-tasha (drums) with chanting and praises on Chaturthi - fourth day -  of the Hindu calendar month Bhadrapad. Ganpati is hosted communally for 10 days until Anant Chaturdashi when it's finally time for immersion, only to wait for his next arrival. The whole atmosphere during those 10 days is spiritual and celebratory and there’s nothing but happiness in the air!
Ganpati in my house


At home, we observe the festival for 5 days by installing a beautifully sculpted clay idol in a decorated space with colorful flower garlands, shimmery papers, fabric and lights.My heart was filled with joy as we celebrated the festival as a married couple for the first time this year J. Having my dearest friend Shraddha visit us for Ganpati was just the cherry on top! What is better than having your loved ones with you on such a special occasion?


Of all the reasons, I love this festival for the delicious food I get to cook and eat - especially Ganpati's favorite Modak! Modak is a steamed sweet dumpling made of rice flour covering with a sweet coconut filling, shaped like a garlic/onion. Another version of it is made of wheat flour covering and fried golden brown. While anything 'fried' sounds better, ukadiche (steamed) modak are far more popular, and require a lot more deft and skill. However, with some (mental) preparation and quality ingredients, you can make the most delectable modaks, perfectly soft and thin outside with a 'khamang' toasty sweet filling. The success of modaks largely depends on the quality of ingredients; so make sure you have absolutely fresh rice flour and soft jaggery. Since modaks are an inextricable part of the celebration, I'm submitting this recipe to the FSF Janmashtami & Ganesh Chaturthi event in a series of Festival Series Foods

**Note: The recipe below makes 10-12 modaks depending on the size. 


Ukadiche Modak/Steamed Modak

Filling:
¾ Cup packed grated coconut
¾ Cup jaggery – shaved, cut into small pieces for ease of cooking
½ Teaspoon cardamom powder
1 Teaspoon poppy seeds
1-2 Tablespoons milk (optional)

Cover:
1 Cup water
¾ Cup rice flour
1 Teaspoon Ghee/clarified butter
Pinch of salt
Oil/Ghee on the side as needed
  • Combine grated coconut, jaggery, cardamom powder and poppy seeds and cook on low flame until the jaggery melts completely and the mixture comes together. If you are using frozen grated coconut as opposed to fresh, add just a tablespoon or two of milk to re-hydrate and soften the coconut. Keep aside.
  • Now the most important part - the ukad (cooked rice flour dough for the covering). You must work very quickly with the rice flour as it can overcook easily and form lumps. Keep a plate lightly greased with oil/ghee ready to knead the dough. Have some oil/ghee available on the side.
  • Sift the rice flour to remove any lumps and grit.
  • Heat water in a pot with a teaspoon of ghee and a pinch of salt. Take it off the flame just at the brink of boiling. Ghee makes the dough soft.
  • Add the rice flour right away to the water whisking vigorously so lumps do not form.
  • Transfer the dough to the greased plate and knead the dough really well until smooth and soft. You can use the back of a spoon to remove lumps and then work with your hands. Make sure you grease your palms as well so the dough doesn't stick. The dough requires kneading while it's still hot. Gloves or even zip-lock bags will work for protection. If you are like me, you'll just suck it up and dig your hands in :D. 


  • Take a golf-ball sized dough ball and start flattening it to form a cup shape, working border in. Keep dipping your fingers in oil/ghee to avoid sticking/breaking of the dough. The center should be tad bit thicker than the border so the modak doesn't break. 
  • Once you have a thin cover, fill a spoonful of the coconut-jaggery mixture and pinch the borders of the covering to make petal-like shapes. The more petals you can make, the better.
  • Start pulling the open end together carefully without flattening the petal shapes. Pinch the end on top to close it  completely. 
  • Steam these modaks in a greased pan for 5-6 minutes on high heat. I keep the modaks in idli-patra and steam them in a pressure cooker. You can also use pessure cooker flat pans. 


Enjoy the modak with a drizzle of warm ghee!!!

Tuesday, August 30, 2011

Blast From The Past

When I tell people I grew up in the southern Maharashtrian town of Kolhapur, I am sure to either hear about their love for Kolhapuri food or be questioned about my tolerance for spiciness. Kolhapur is famous for its clear-your-sinuses spicy food, especially the Tambada and Pandhara rassa (curries made with lamb meat). As for me, I must be a disgrace to the people of Kolhapur, for not only am I a vegetarian but I prefer my food on the milder side. Good thing there is more than just spice to put Kolhapur on the map. Kolhapur is a large producer-exporter of milk and milk products, including ice-cream. The most luscious, creamy, smooth and utterly delicious ice-cream!!! And as a kid, I was convinced it was the best thing my town had to offer to the world!

Kolhapur touts a few family owned ice-cream parlors run for almost 4-5 generations now. While it's hard to pick a favorite, there won't be two opinions about who serves the best sundae. Those who've tried the 'Cocktail' at Imperial Cold Drink House will swear it's undeniably the best ice-cream sundae they've ever had. Don't be dismayed as this Cocktail has nothing to do with alcohol, but a TALL glass of this layered ice-cream sundae was no less intoxicating for me as a kid. Imperial boasts a British make ice-cream machine that has been churning some of the best ice-cream since the late 40's.


The shop was very close to the famous Mahalaxmi (or Ambabai, as the locals call it) temple in the 'town' area. Every time we drove in the direction of Imperial after visiting the temple, I wholeheartedly believed the Goddess had answered my prayers :). My grandfather was friends with the shop owner Mr. Gawali. As far as I was concerned, it was comparable to knowing the president of the country! Imagine getting an extra large scoop of ice-cream every time as a 10 year old?? Many a times, grandpa would just call up Mr. Gawali and have their special Rose ice-cream delivered in. But I really looked forward to the late night post dinner drives to the shop, ordering that special glass of Cocktail and enjoying it right in the car. Now when I think of it, it probably had to do with the crammed space in the store that we ate in the car, but I used to think it was a matter of prestige at the time. Regardless, I would forget all about that nonsense the minute I held a glass of this colorful concoction and become a kid again. I savored each bite of the tropical fruits mix like banana, chikoo, mango, orange, apple and grapes, 2 big scoops of Rose ice-cream(that's what I always got), big chunks of wiggly jelly and bits of tutti-frutti (candied fruits). All this goodness was topped with my favorite wafer biscuits. It was everything a kid could ask for! Perfect with all the wonderful flavors, textures and colors. If you ask me, it was no less than a piece of art - and a darn tasty one at that!

On a sweltering hot day like the one we had on Sunday, I couldn't stop craving a yummy Cocktail. Luckily, the local Indian store carries just the perfect ice-cream flavor to make this sundae and I decided to indulge in an extra large glass to cool off. Just like the old days, I was struggling to finish the last bits of the sundae when hubby squeaky cleaned his glass and asked sheepishly, "Can I have some more?". The Cocktail surely brings out the child in you!

Look at those gorgeous colors!
Imperial Cocktail Sundae

Ingredients:
Mixed fruits - banana, apple, mango, grapes, oranges, chikoo(if you can find it)
Tutti-Frutti ice-cream - I chose it for the gorgeous color, authentic Indian taste and of course, the confections
Jelly - you can pick your favorite colors/flavors. I went for orange.
Mango puree
Wafer biscuits

To assemble:
  • Fill a glass 1/4th with chopped mixed fruits. 
  • Add two large scoops of ice-cream. You can pick any mild flavor like vanilla, rose, strawberry etc. if not tutti-frutti.
  • Top it off with some cubes of jelly. As you can tell, I was too impatient to wait till my jelly was set! If you have more patience, your jelly won't start sinking to the bottom. 
  • Add a little more ice-cream on top. And because you can never have enough mango, add some mango puree to finish it. 
  • Stick a couple of wafer biscuits on the top. 
Take a large dessert spoon and dig in!

Tuesday, August 23, 2011

Sweet Heat

It's 1:04am on a weekday and here I find myself squinting at the glaringly bright screen in a pitch dark room, writing up a quick post. Work and other social obligations (mostly self inflicted) have taken over my life recently and there's no relaxation in the foreseeable future. On days like these, it's good to have something stored in the fridge to fix up a quick meal. It's even better if it's the most important meal of the day - breakfast!

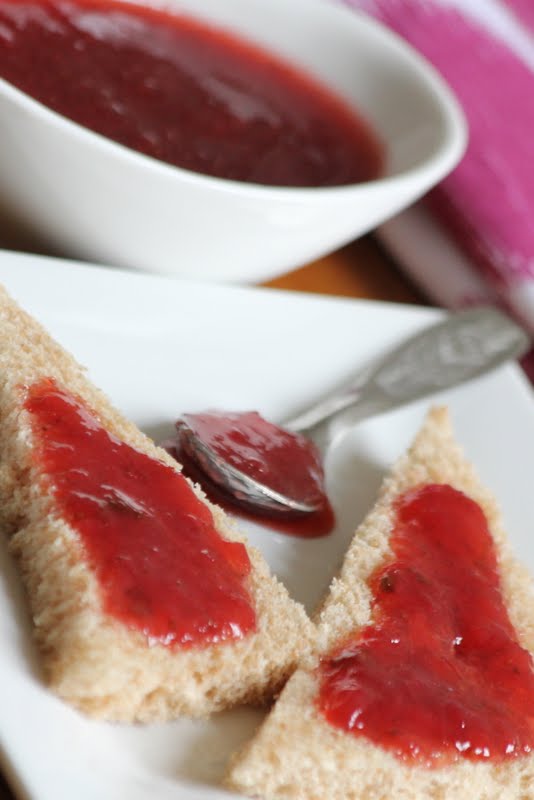
Look at that gorgeous color - isn't it pretty??
When you are lucky, you'll make yourself a hearty breakfast of eggs and toast, maybe some potatoes, fruits or cereal-milk. But when breakfast means grabbing a slice of bread and skillfully managing to eat and not drop any crumbs while driving to work, I like to have some yummy jam on hand. A delicious jam transforms a simple slice of bread to a wonderful sandwich we all wanted for breakfast as kids. My mom usually made us healthy breakfast from scratch every day, but bread and jam or a roll of jam smeared poli/roti(Indian bread) was a welcomed change. 

Remember I stocked up on a whole lot of strawberries at the Carlsbad farmer's market? Well, don't think I forgot all about them after. I did make a yummy jam out of them the way we liked it as kids, with a grown-up twist! The jam has all that goodness from sweet strawberries, but it surprises you with a hint of heat from jalapeno at the end. I love the combination of sweet & heat which makes this jam perfect for grown-ups. This was prepared upon hubby's request and he's been eating it by the spoonfuls. The jam has definitely turned 'good' mornings to 'better' :).


Sorry about the picture quality here. Just when I thought I was making some progress in taking good pictures, I have to post these less than impressive ones. I'll blame it on the recent madness!


Strawberry-Jalapeno Jam

Ingredients
1 1/2 Cups crushed strawberries
2-2 1/2 Cups white sugar
1 Jalapeno

  • Crush fresh strawberries. I just tossed them in the food processor and gave a quick pulse. Leave them slightly chunky. 
  • Combine sugar and crushed strawberries on medium heat for about 15 minutes. Strawberries give out a lot of water so the cooking time is a bit longer than other berries. 
  • Add 1 finely chopped jalapeno (without the seeds and vein) and cook on medium-high heat for another 20 minutes or until you achieve the desired consistency. Keep stirring occasionally. 


Friday, August 12, 2011

Dabeli

I've never met an Indian who doesn't like street food. There's got to be something ridiculously good about those spicy-savory-sour-sweet dishes for a country of billions to be crazy about! Street food is a different class of cuisine altogether and call me crazy, but I'll pick that over a 5-star restaurant any day! You can pretty much get anything from sandwiches to noodles on a little streetside cart in India, but what gets me really drooling is the broad category of Chaats. Yum! Bhel, shev-puri, paani-puri, ragada chaat and all those tasty concoctions of tangy tamarind and hot chili-cilantro chutneys, crunchy-thin chickpea flour noodles called Sev, finely diced onion and tomatoes over potatoes or white peas, puffed rice or crispy puris.  


I remember my mom or sister taking me a few lanes down from our house to the park, where a dozen or so vendors with their fully equipped carts used to crowd the corner. We were not allowed to eat there too often for 'questionable' cleanliness to put it in mild words. But it was one of those guilty pleasures that felt better than going to the candy store! The chaat-wallah used every inch of the space creatively. A flat pan of ragda boiling away over a kerosene stove in one corner, every shelf stacked with enough ingredients for the week, containers of chutneys and spices, plates and drinking(?) water, all in one crammed cart. All this left a small cutting-board sized space where he would dice the veggies at the speed of light.


It wasn't until I visited Mumbai, then Bombay, though that I experienced the culture of street food! Mumbai is the Mecca for street food lovers. It's a potpourri of cultures and people from all around the country have contributed to the numerous food carts that have become the lifeline of students, workers, rishkshaw or taxi drivers and every other person who stops by for a quick snack. My cousin, who I used to visit during the holidays, had her favorite designated cart for every item. She was the one who first introduced me to the awesomeness called 'Dabeli'! Ahh - how I fell in love with this delicious 'burger' that was too small for my liking. The Kacchi Gujarati community has made Dabeli a popular item on street carts in Mumbai. And like all other Gujarati dishes, they have managed to bring a sweet element into this yummy chaat item.

Spicy Roasted Peanuts
'Dabeli' literally means pressed in Gajarati. It is a delicious burger with spiced mashed potatoes, spicy roasted peanuts, pomegranate seeds, sev and tamarind-date chutney all sandwiched between a bun, graciously lathered with Amul butter! The butter is applied in such generous amounts that the bread literally melts in your mouth. Dabeli has been one of my favorite street foods all these years. I make sure to visit my cousin's favorite Dabeli-wallah at the time during my busy trips to India. 
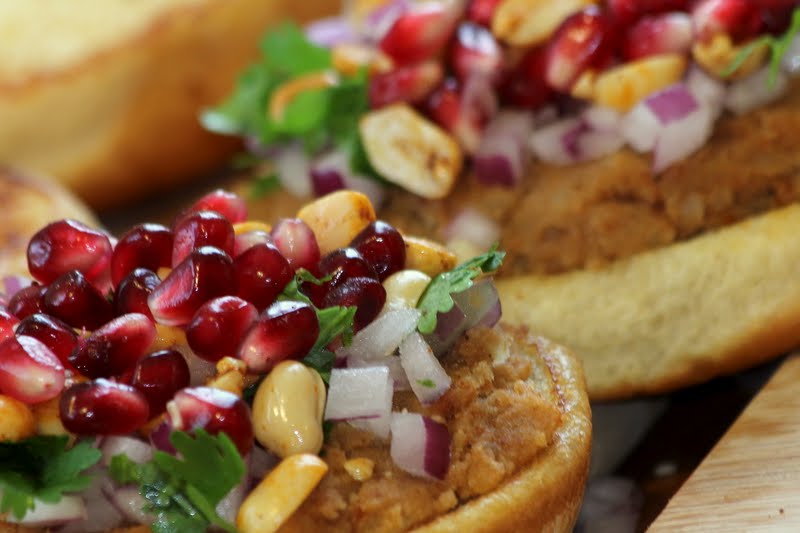
Utterly  Butterly Delicious!
I love making Dabeli for dinner once in a while for a change of taste. I have made it from scratch many times before, but this time I took advantage of having all the components available at the grocery store. It's a quick fix meal on a week night. The Dabeli Masala I brought from India was a time saver as well, although it's a simple combination of coriander seeds, cumin seeds, red chili, cloves and cinnamon roasted and ground to a fine powder

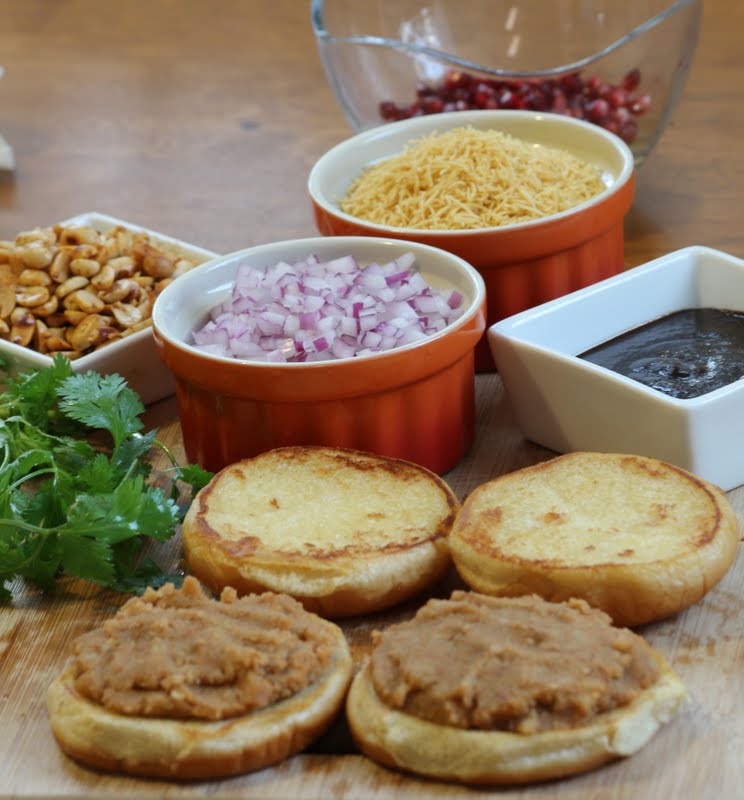
Everything you need for the best bite ever!
Ready to be 'dabeli' - pressed.
 

Kacchi Dabeli

Ingredients:
2 Potatoes
2 Teaspoons Dabeli Masala
1/4 Teaspoon cumin seeds
1/4 Cup peanuts
1/2 Teaspoon cumin-coriander powder
1/2 - 1 Teaspoon red chili powder
Salt to taste
2 Tablespoons oil
Burger buns
1 Small onion finely chopped
1 Pomegranate seeds
Bareek sev (fine sev) for garnishing
Tamarind-date chutney
Butter

Potato stuffing:
Boil potatoes, peel and mash. Add dabeli masala and salt to taste to the potatoes and mix well.
Heat 1 tbsp oil in a pan, add cumin seeds and let them splutter, add in the mashed potatoes and cook everything for a couple of minutes. You can add a little bit of water if the potatoes become too dry.

Roasted peanuts:
Heat a teaspoon of oil in a sautee pan, add peanuts, sprinkle cumin-coriander, red chili powder and salt to taste and let them roast, stirring occasionally.

To assemble:
Toast bread with a generous application of butter.
Make a small patty of the mashed potato and put it on the slice of bread. Top it with some tamarind-date chutney, then onions, peanuts, pomegrante seeds and lastly sev.
Press the other slice of bread on top. You can toast the burger on a pan again or just enjoy it!

Spicy potatoes, crunchy peanuts and sev, tangy-sour chutney and sweet pomegranate to balance it all create the most perrrfect bite ever!!!

Dabeli is a great snack for entertaining too. You can make a little assembly of all the ingredients and let your guests make their own. Or you can make a 'cake' with layers of mashed potatoes and all the other ingredients and let your guest cut a piece for their burger.
Grapes cut in half make a great substitute for pomegranates, providing the same sweetness, crunch and juicy pop in the mouth.

Tuesday, August 9, 2011

It's Raining Tomatoes

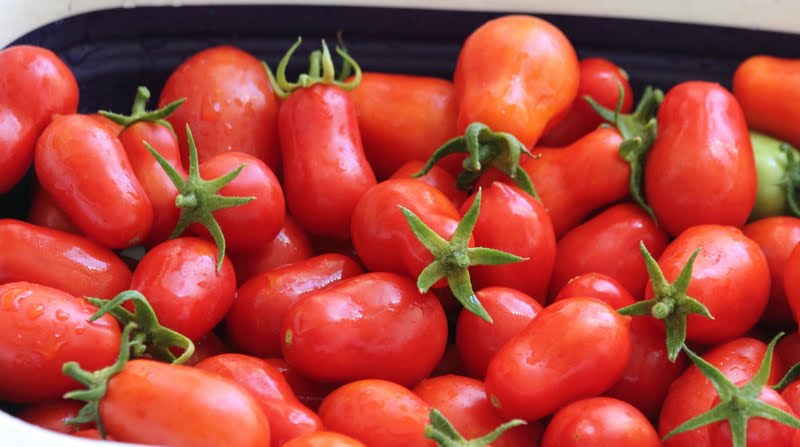
I have an incredible luck with tomato plants. Either that, or they are just not a fussy vegetable to grow. I conveniently opt to believe in the former, but it wasn't just the beginner's luck that resulted in summer-long bountiful crop when I planted tomatoes last year. You got a glimpse of my garden here and the recipe for an aromatic tomato-basil bread. I kept plucking a couple of tomatoes here and there for sandwiches or curries, but what do you do with a bucketful of tomatoes at the peak of ripeness all at once?! The tomato plants in my garden are flourishing, although the same can not be said about zucchini and jalapeno. On the bright side, I can think of a hundred different recipes to use up the tomatoes - these many jalapenos would've been another story!


After contemplating between Italian and Mexican dishes, I circled back to what I knew the best - Mom's Tomato Rice recipe! Our fridge was almost always stocked with tomatoes and this dish appeared on dinner table in between mom's grocery visits. The monsoon season especially created scarcity of fresh vegetables and a soulful rice dish out of something readily available was a great dinner option. A serving of steaming tomato rice with home-made curd and spicy-salty pickle on the side made me a happy camper. I loved the preparation of fragrant basmati rice cooked in a rich roasted coconut-onion paste with a whiff of whole spices and of course, tomatoes!  The puff of steam, as I was cooking the rice yesterday, filled my kitchen with familiar aromas my mom's saree would pick up in the kitchen and it gave me a warm-fuzzy feeling of being somewhere very comfortable :).


Tomato Rice

Ingredients:
1 Cup Basmati rice
4-5 large or 8-10 small tomatoes
1 Heaping tablespoons fresh grated coconut
1 Small onion
1-2 Green chilies
~ 1 Teaspoon Garam masala
1 Bay leaf/7-8 Curry leaves
7-8 Black pepper corns
3-4 Cloves
1 Tablespoon oil
Salt to taste

  • Cook tomatoes in boiling water until the skin peels off. Strain the tomatoes (save the broth) and puree.
  • Wash rice and keep aside. This helps cook the rice faster. 
  • In a cooking pot, roast chopped onion for 2-3 minutes on medium heat, add grated coconut and let it get toasty. Grind the roasted onion, coconut and garam masala into a paste. You can use cumin-coriander powder if you don't have garam masala. 
  • In the same pot, heat oil, add pepper corn, cloves, bay leaf or curry leaves (I enjoy flavors of both - add either based on your preference), slit green chilies and let them roast for a few seconds.
  • Add the coconut-onion paste, rice, tomato puree, 2 cups of water (I use the broth of cooked tomatoes) and cook on medium heat covered. Stir the rice occasionally so it doesn't stick to the bottom and add water little by little if needed until the rice is cooked.

This rice is very fragrant from the whole spices. Green chilies provide just enough heat to balance the sweet-citrus-y taste of tomatoes. Roasted onions and coconut are subtle and heighten the flavors of the dish. Enjoy!

LinkWithin

Related Posts Plugin for WordPress, Blogger...